Marshmallow Fluff Fudge
Sweet Nostalgia: My Marshmallow Fluff Fudge Memory
When I think about marshmallow fluff fudge, I’m instantly transported back to cozy family holidays, the kitchen glowing warm from the oven and laughter floating through the house. There was always something magical about watching my mom swirl together decadent chocolate and gooey marshmallow fluff—her secret to creating the creamiest, dreamiest fudge squares. Even now, every time I make homemade marshmallow fudge, it’s like wrapping myself up in a hug. Trust me—once you try this marshmallow fluff fudge recipe, you’ll understand why it’s a family tradition worth keeping.
Why You’ll Adore This Marshmallow Fluff Fudge
Honestly, there’s just so much to love about this recipe—and I’m not just saying that as a lifelong fudge fanatic! Here’s why this homemade marshmallow fudge will grab a spot in your dessert hall of fame:
- Creamy, melt-in-your-mouth texture: The marshmallow fluff makes every bite extra smooth and impossibly lush.
- Quick and easy: Minimal fuss, maximum flavor. You don’t need a candy thermometer or fancy equipment, just a saucepan and a little patience.
- Irresistible chocolate richness: Thanks to a generous dose of semi-sweet chocolate chips, the flavor is bold, not too sweet, and perfectly balanced.
- Nostalgic and shareable: This fudge is a guaranteed crowd-pleaser at holidays, potlucks, or anytime you want to treat your friends and family to a little homemade comfort.
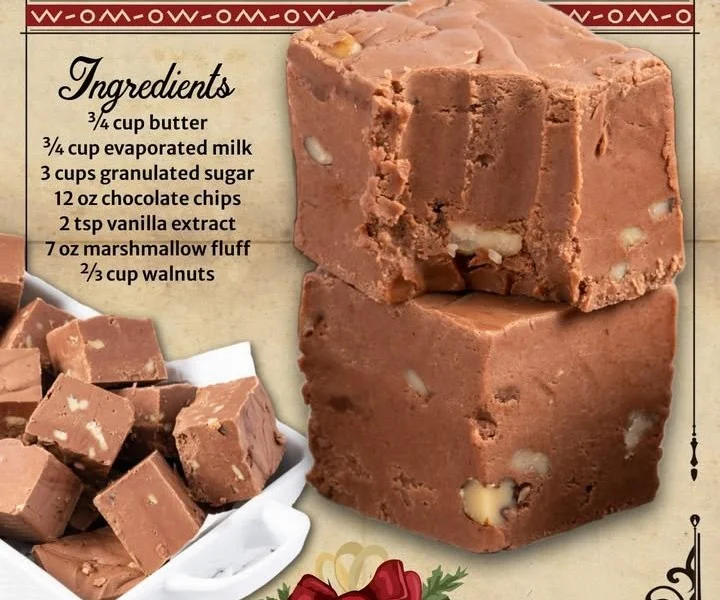
Ingredients You’ll Need for Marshmallow Fluff Fudge
Let’s break it down. Here’s everything you’ll need for this classic marshmallow fudge—and a few tips to help you choose the best ingredients (because a little kitchen wisdom goes a long way!):
- 3/4 cup salted sweet cream butter: The salt rounds out the sweetness and gives the fudge heavenly richness. I always reach for quality butter here—it really makes a difference.
- 3/4 cup evaporated milk: Don’t substitute with regular milk! Evaporated milk gives this fudge its signature velvety texture.
- 3 cups granulated sugar: Essential for that classic, sweet bite. Try to use fresh sugar to avoid any clumping.
- 12 ounces semi-sweet chocolate chips: Trust me, this is the sweet spot between too-bitter and too-sweet. Go for a good brand for smooth melting.
- 2 teaspoons pure vanilla extract: Real vanilla deepens the flavor. If you can, avoid imitation vanilla for the richest taste.
- 7 ounces marshmallow fluff: This is what makes that gorgeous creamy texture happen—don’t skimp!
- 2/3 cup chopped walnuts: Totally optional, but they add a lovely crunch and nutty flavor to your homemade fudge.
Step-by-Step Guide: Making the Perfect Marshmallow Fluff Fudge
You’re only a few simple steps away from fudge bliss! Here’s how to make marshmallow fluff fudge—totally stress-free:
- Melt the butter: Place your butter in a medium saucepan over medium heat. (The kitchen’s already starting to smell amazing at this point!)
- Add the evaporated milk and sugar: Stir them in gently, then bring the mixture to a boil. Once it’s bubbling, set your timer for 5 minutes and stir constantly to avoid burning. (This is the hardest part—just stay close and keep mixing!)
- Stir in the goodness: Remove the saucepan from the heat. Immediately add chocolate chips, marshmallow fluff, and vanilla. Stir, stir, stir until it’s completely smooth and glossy.
- Mix in walnuts: If you’re using them, fold the chopped walnuts in now for that extra crunch.
- Pour and cool: Pour the mixture into a greased 9×9 inch pan. Use a spatula to smooth it out, then leave it alone to cool completely. (Resist the urge to dig in early—waiting is always the hardest part with homemade fudge!)
My Secret Tips and Tricks for Marshmallow Fluff Fudge Success
Over the years, I’ve picked up a few fudge-making tricks to guarantee success every time:
- Stir constantly when boiling: This prevents sugar from sticking and burning at the bottom (which can give your fudge that dreaded gritty texture).
- Cut with a warm knife: For clean, pretty squares, run your knife under hot water before each cut.
- Don’t rush cooling: Letting the fudge cool at room temperature gives it the best texture—no shortcuts in the fridge!
- Line your pan with parchment: For easy lifting and perfectly cut fudge squares (marshmallow fudge can be sticky!).
Creative Variations and Ingredient Swaps
I love playing around with this classic marshmallow fudge recipe to suit whatever mood I’m in:
- Nutty alternatives: Try swapping walnuts for pecans, almonds, or leave them out entirely for a smoother fudge.
- Go nut-free: Sunflower seeds or a swirl of sunflower seed butter work well for those with allergies.
- Extra chocolatey: Use a mix of dark chocolate chips for a deeper flavor, or even white chocolate chips for a twist.
- Festive add-ins: Stir in crushed candy canes during the holidays for peppermint fudge or sprinkle the top with sea salt for a sweet and salty combo.
How to Serve and Store Your Marshmallow Fluff Fudge
Serving your marshmallow fluff fudge is simple—slice into bite-sized squares and arrange on a pretty plate (or sneak a piece straight from the pan, I won’t judge!). I love wrapping a few in wax paper for neighborly gifts or packing them in lunchboxes.
To store: Keep the fudge in an airtight container at room temperature for up to one week. For a longer shelf life, refrigerate—it’ll last up to two weeks (and taste just as delicious chilled). You can even freeze marshmallow fudge for up to three months—just thaw before serving for best texture.
FAQs: Your Top Questions About Marshmallow Fluff Fudge Answered
Can I make marshmallow fudge without nuts?
Absolutely! Just leave out the walnuts for a smooth, nut-free fudge (a great option for allergy-friendly desserts).
How do I keep my fudge from getting grainy?
The key is stirring constantly and boiling for exactly 5 minutes—this helps the sugar dissolve completely for that signature creamy texture.
What if I don’t have marshmallow fluff?
Unfortunately, there’s no perfect substitute for marshmallow fluff in this recipe—it’s essential for the unique creamy texture. If you’re adventurous, you can try making homemade marshmallow creme (but honestly, store-bought is just as tasty and much easier!).
Can I double this homemade fudge recipe?
Definitely! Just use a larger pan (like a 9×13) and make sure your saucepan is big enough to handle the doubled ingredients.
How should I cut the fudge for clean squares?
Let the fudge cool completely, then use a sharp, warm knife (dip in hot water and wipe dry between cuts) for the neatest edges.
If you give this marshmallow fluff fudge a try, I’d love to hear how it turns out for you! Whether you’re making it for a holiday, gifting friends, or just indulging a chocolate craving, I promise it’ll make your kitchen—and your heart—a little warmer. Happy fudge-making!