Lunch Lady Brownies
The Sweet Nostalgia of Lunch Lady Brownies
There’s just something magical about the scent of brownies baking in the oven, don’t you think? Whenever I whip up a batch of Lunch Lady Brownies, I’m instantly transported back to my childhood school cafeteria. Remember those cozy afternoons when the sweet ladies behind the counter—with their warm smiles and gentle chatter—would serve up fudgy, chocolatey squares that could brighten even the gloomiest Mondays? This classic lunch lady brownies recipe isn’t just an easy dessert; it’s pure comfort baked into every bite.
I still recall rushing to the cafeteria, hoping to snag a corner piece (more frosting per bite—always a win). With every taste, I get that warm, fuzzy feeling—nostalgia and chocolate combined. Trust me, these homemade brownies have the power to do the same for you!
Why You’ll Adore This Lunch Lady Brownies Recipe
- Super chocolatey, ultra-fudgy goodness: Each bite is rich, dense, and lusciously moist—just the way classic brownies should be.
- Nostalgic charm: They taste exactly like those legendary school cafeteria brownies (maybe even better now that we’re adults and get the whole pan to ourselves!).
- No fancy ingredients or skills required: Just good old-fashioned pantry staples and a whisk—this is truly an easy dessert anyone can master.
- That irresistible chocolate frosting: Seriously, the melt-in-your-mouth, thick, and sweet frosting takes these brownies totally over the top.
Ingredients You’ll Need for Lunch Lady Brownies
For that authentic, homemade brownie magic, gather these simple ingredients:
For the Brownies
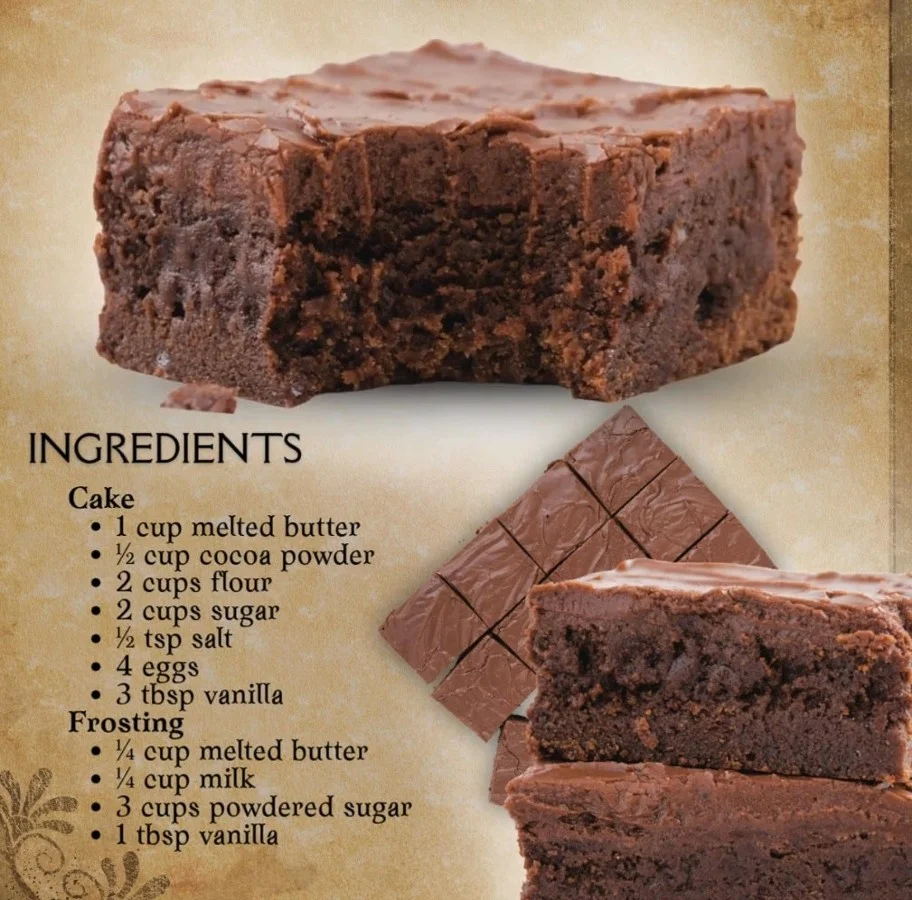
- 1 cup melted butter
(I like to use unsalted so I can control the saltiness—plus, melted butter gives that dense, fudgy texture!) - 1/2 cup unsweetened cocoa powder
(Go for a rich cocoa—it’s the star flavor here!) - 2 cups all-purpose flour
(Keeps the brownies thick and sturdy for that perfect lunchbox square.) - 2 cups sugar
(Don’t skimp—the sweetness balances the chocolate.) - 1/2 teaspoon salt
(Just a touch, to wake up all the other flavors.) - 4 eggs
(Room temperature helps them blend in nice and smooth.) - 3 tablespoons vanilla extract
(More than usual for a truly nostalgic aroma—trust me, it works!)
For the Frosting
- 1/4 cup melted butter
(More butter…because why not?!) - 1/4 cup milk
(Whole milk is best for creamy richness.) - 3 cups powdered sugar
(For that classic, sweet, spreadable icing.) - 1/4 cup unsweetened cocoa powder
(Double chocolate for the win!) - 1 tablespoon vanilla extract
(Yes, a full tablespoon! The flavor really shines.)
Quick tip: Always sift your cocoa powder and powdered sugar for lump-free, velvety-smooth frosting.
Step-by-Step Guide: Making the Perfect Lunch Lady Brownies
Let’s break it down together! Here’s exactly how I bake the best homemade lunch lady brownies every single time:
- Preheat your oven to 350°F (175°C).
Grab a 9×13-inch baking dish, grease it well, and line with parchment if you like easy cleanup. - Mix melted butter with cocoa powder.
In a large bowl, whisk until glossy and smooth—this is our flavor foundation! - Add in sugar, eggs, and vanilla.
Stir well until the mixture is thick and uniform—you want everything totally combined. - Fold in the flour and salt.
Sprinkle over the surface (no need for a mixer, just gentle folding by hand). - Scrape batter into your prepared dish.
Smooth the top with an offset spatula or the back of a spoon. - Bake for 20-25 minutes.
Check at 20—the toothpick should come out with a few moist crumbs for that perfect fudginess (overbaking = dry brownies, so keep an eye out!). - Cool completely before frosting.
(A little patience, I know. But you want the frosting to spread smoothly without melting.) - Make the frosting:
Mix melted butter, milk, cocoa, powdered sugar, and vanilla in a bowl until smooth and fluffy. - Spread generously over cooled brownies.
Swirl with a spatula for that lunch lady look! - Cut into squares and savor every bite.
Try not to eat the whole pan in one sitting—no promises, though!
My Secret Tips and Tricks for Lunch Lady Brownies Success
After plenty of brownie-baking (and, ahem, quality control taste testing), here’s what I’ve learned:
- Don’t overmix once you add the flour.
Overmixing = tough brownies. Just fold until you see the streaks disappear. - Always use real, melted butter.
Margarine just doesn’t deliver that classic, homemade flavor. - Cool completely before frosting.
Otherwise, your creamy chocolate frosting will melt into a sticky puddle (still tasty, but way messier!). - For extra thick brownies:
Try using an 8×8-inch pan and bake a little longer. Just keep an eye on them for doneness.
These little tricks make all the difference in achieving that old-fashioned, easy dessert you remember (and crave).
Creative Variations and Ingredient Swaps
Want to make these classic brownies your own? There are no rules in your kitchen—have fun with it!
- Make them gluten-free:
Sub your favorite 1:1 gluten-free flour mix for the all-purpose (no one will know the difference!). - Dairy-free swap:
Use coconut oil or vegan butter, and any dairy-free milk for the frosting—still soft and fudgy. - Nutty goodness:
Stir in 1/2 cup chopped walnuts or pecans for crunch. - Add a swirl:
Dollop peanut butter or caramel on top of the brownie batter and swirl with a knife before baking (so decadent!). - Espresso boost:
Add a teaspoon of instant espresso powder to the batter for a deeply chocolatey, mocha twist.
Feel free to get creative—a classic brownie is the perfect canvas!
How to Serve and Store Your Lunch Lady Brownies
Serving tips:
- Serve cooled and cut into generous squares (just like the sweet lunch ladies did!).
- For parties, sprinkle some extra powdered sugar over the top, or pair with a scoop of vanilla ice cream for an effortless, crowd-pleasing dessert.
- Warm a square in the microwave for 10 seconds for that “just-out-of-the-oven” gooeyness.
Storage advice:
- Cover and keep at room temperature for up to 3 days (if they last that long).
- For longer storage, refrigerate (up to a week) or freeze individually wrapped squares for up to 3 months.
- Pro tip: The frosting actually helps keep them soft and moist—so don’t skip it!
FAQs: Your Top Questions About Lunch Lady Brownies Answered
Q: Can I make lunch lady brownies ahead of time?
Absolutely! In fact, they get even fudgier on day two (just keep tightly covered so they stay soft).
Q: Are these brownies cakey or fudgy?
They’re classic lunch lady brownies—ultra-fudgy, never cakey, and with that signature chewy bite.
Q: Can I double this recipe for a crowd?
Yep! Just use a larger baking sheet and adjust the baking time as needed (add 5-10 minutes and check with a toothpick).
Q: What’s the secret to that old-school frosted brownie taste?
It’s all in the combo of real butter, extra vanilla, and that generous layer of sweet, fluffy cocoa frosting.
Q: How do I cut brownies cleanly without a mess?
Wait until fully cooled and use a plastic knife or dip your regular knife in hot water between cuts—works like a charm!
Let’s Bake Up Some Sweet Memories!
I hope this easy, nostalgic lunch lady brownies recipe brings you the same joy and cozy memories it does for me. Whether you’re baking for your family, sharing with friends, or just treating yourself to a taste of childhood, these homemade brownies are guaranteed to put a smile on your face. Got your apron ready? Let’s get baking—and make every bite a little slice of happiness!
(Don’t forget to let me know in the comments how your batch turned out, or share your own creative twists—because kitchen memories are always better when we share them together!)