Cannoli Poke Cake
The First Time I Made Cannoli Poke Cake
Some desserts just feel like a hug from the inside—cannoli poke cake is absolutely one of them. The first time I baked this easy cannoli cake, it was for a casual Sunday get-together. There’s something magical about the scent of vanilla cake filling every corner of the house, and as I layered on that luscious ricotta and mascarpone topping, I caught myself smiling. That creamy cannoli filling reminded me of visits to little Italian bakeries in my old neighborhood, picking out fresh cannoli dusted with powdered sugar. But with this poke cake twist, all those classic flavors are wrapped up in the easiest, most crowd-pleasing dessert imaginable.
If you love a simple, impressive treat that tastes like a nostalgic Italian pastry, then this cannoli poke cake is about to be your new go-to. Trust me—it’s just as good with a cup of coffee as it is for a special occasion!
Why You’ll Adore This Cannoli Poke Cake
-
It’s Ridiculously Easy
I’m all about baking shortcuts, and this poke cake starts with a classic vanilla cake mix (seriously, no one will ever guess!). Just a few simple steps, and you’re basically a dessert superstar. -
Authentic Cannoli Flavor
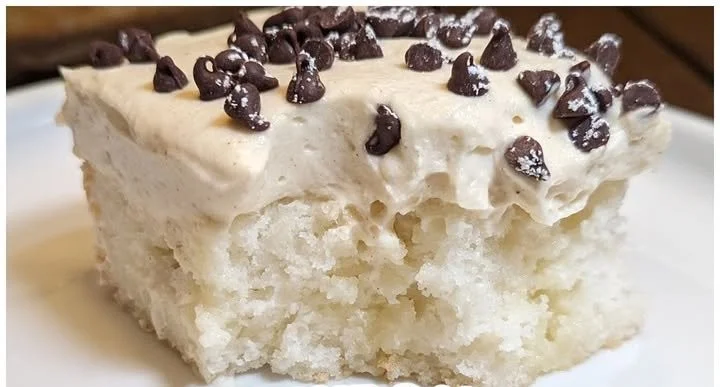
That combo of ricotta and mascarpone is basically cannoli in spoonable form. It’s rich, creamy, not-too-sweet, and full of cozy nostalgia. The mini chocolate chips and chocolate syrup on top? Pure magic. -
Perfect for Every Gathering
Whether you’re hosting dinner, attending a potluck, or just want to treat yourself after a long week, this easy cannoli poke cake wins hearts every single time. It’s no-fuss, make-ahead, and always a conversation starter. -
Chill Time = Better Flavor
Bonus: letting your poke cake rest in the fridge actually makes it taste even better. I love a dessert that’s low-stress and lets the flavors shine.
Ingredients You’ll Need for Cannoli Poke Cake
Here’s what you’ll need to make this simple and delicious homemade dessert (and a few little tips to make it even better):
- 1 box vanilla cake mix
(Go for your favorite brand—this is our shortcut to a fluffy base.) - 3 large eggs
(Room-temp eggs blend easier for a perfect batter.) - 1 cup water
(Just enough to bring it all together.) - 1 cup ricotta cheese
(Look for whole milk ricotta for dreamy, creamy texture.) - 1 cup mascarpone cheese
(This soft Italian cheese is what gives cannoli filling its signature flavor.) - 1 cup powdered sugar
(Sift it for a super smooth topping.) - 1 teaspoon vanilla extract
(Adds that warm, classic sweetness.) - 1/2 cup mini chocolate chips
(I love the mini size—they melt just a bit and create little pockets of chocolatey goodness.) - Chocolate syrup (for drizzling)
(A rich, fudgy finish.) - Whipped cream (for topping)
(For that extra little flourish—go all out!)
Step-by-Step Guide: Making the Perfect Cannoli Poke Cake
Let’s make this together! Here’s how I do it (with a few tried-and-true tips):
-
Preheat Your Oven
Get things started by following the cake mix’s instructions—usually about 350°F. Grease a 9×13-inch baking pan for easy removal. -
Mix the Cake Batter
In a large bowl, combine your vanilla cake mix, eggs, and water. Mix just until smooth—don’t overdo it, or you’ll lose that fluffy texture. -
Bake to Perfection
Pour the batter into your pan and bake according to the directions (usually 25–30 minutes). Start checking at the 25-minute mark; when a toothpick comes out clean, you’re golden. -
Cool (Just a Bit!)
Pull the cake from the oven and let it cool for about 10 minutes—just enough that it won’t crumble, but still warm for easy poking. -
Time to Poke
Here’s the fun part! Use a fork or wooden skewer to poke holes all over the cake. Don’t be shy—the more holes, the more creamy filling will seep in. -
Make That Cannoli Topping
In a medium bowl, mix the ricotta, mascarpone, powdered sugar, and vanilla. Beat until completely smooth (no lumps allowed). -
Spread the Topping
Spoon the creamy mixture over your cake, gently pressing it into the holes. This is what makes every bite full of cannoli flavor. -
Add Some Chocolate
Sprinkle mini chocolate chips evenly over the top. I scatter a few extra for good luck! -
Chill Out
Pop your cake in the fridge for at least 2 hours (overnight is perfect). This lets the flavors meld and the topping set. -
Finish and Serve
Right before serving, drizzle with chocolate syrup and add dollops of whipped cream. Major bakery vibes, minimal effort.
My Secret Tips and Tricks for Cannoli Poke Cake Success
-
Don’t skip the chill! Trust me, the longer this poke cake sits in the fridge, the better it gets. The cannoli filling seeps into all those little holes, making every bite insanely moist and flavorful.
-
Sift your powdered sugar. It sounds fussy, but it gives you the silkiest cannoli topping (and nobody wants lumps).
-
Double the chocolate chips. Feeling indulgent? Add extra mini chips or even shave some dark chocolate on top (because chocolate and cannoli are a match made in heaven).
-
Serve cold. Cannoli poke cake is best enjoyed chilled, just like the real pastry.
-
Use real mascarpone and ricotta. Authentic Italian cheeses make a delicious difference in flavor and texture (plus, it’s a great excuse for a trip to the fancy cheese section).
Creative Variations and Ingredient Swaps
- Chocolate Cannoli Poke Cake: Swap out vanilla cake mix for chocolate, and use dark chocolate chips up top for a double-chocolate twist.
- Citrus Zest: Stir in a little orange or lemon zest into the cannoli filling for a bright, authentic touch.
- Nutty Crunch: Sprinkle chopped pistachios (a classic cannoli garnish) with the chocolate chips for a fun crunch.
- Gluten-Free: Use a gluten-free vanilla cake mix to make this cannoli poke cake accessible for everyone.
- Protein Boost: Substitute part-skim ricotta for extra protein without sacrificing creaminess.
You can totally make this your own—poke cakes are made for riffing, and the flavors of classic cannoli are so versatile.
How to Serve and Store Your Cannoli Poke Cake
-
Serving: Slice the cake cold, add a swirl of whipped cream, and an extra drizzle of chocolate syrup. Serve for dessert, brunch, or anytime a sweet craving hits.
-
Storing: Leftovers (if you have them!) keep beautifully covered in the fridge for up to 4 days. The cake actually gets better as the flavors soak in. For best texture, serve cold and add whipped cream or extra syrup just before eating.
-
Freezing: You can freeze the cake (without whipped cream on top) in individual slices, wrapped well. Thaw in the fridge before serving. This makes for a quick, homemade treat whenever you need it!
FAQs: Your Top Questions About Cannoli Poke Cake Answered
Q: Can I make cannoli poke cake ahead of time?
A: Absolutely! In fact, it tastes even better after a day in the fridge. Just wait until serving to add the whipped cream and chocolate syrup.
Q: Can I use just ricotta or just mascarpone?
A: You can, but the mix really mimics authentic cannoli filling. If you have to choose, I’d go with ricotta for traditional flavor and texture.
Q: What’s the best way to poke holes in the cake?
A: A wooden skewer, chopstick, or even the handle of a thin wooden spoon works best. You want medium-sized holes—enough for the filling to soak in, but not fall apart.
Q: Can I use a homemade cake instead of boxed mix?
A: Definitely! Your favorite homemade vanilla cake recipe works perfectly here—just be sure it makes about the same amount as a standard box.
Q: Is cannoli poke cake supposed to be super sweet?
A: Not at all! The mascarpone and ricotta keep the dessert light and balanced. If you like things sweeter, add a touch more powdered sugar to the filling.
I hope you love making this cannoli poke cake as much as I do! It’s an easy, delicious way to bring classic Italian dessert flavors to any occasion, and it’s sure to win hearts (and tastebuds) every time. If you try it, let me know how it goes—bonus points if you share a photo! Happy baking, friends.