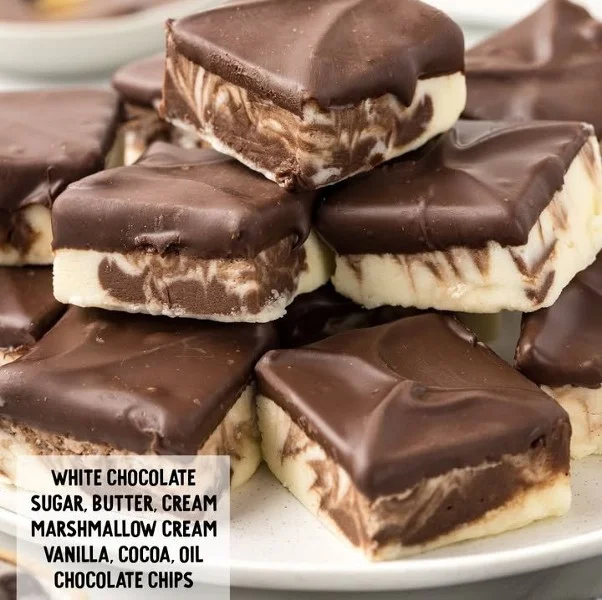
Boston Cream Fudge
The Childhood Magic of Boston Cream Fudge
Do you ever wonder why certain desserts feel like an instant hug from the past? Boston cream fudge does that for me. I vividly remember being bundled up in my grandmother’s kitchen on chilly New England afternoons, watching her swirl together layers of silky chocolate and creamy white fudge. We’d sneak bites before it was set—fingers sticky, laughter filling the air. Even now, one square of this layered fudge brings back every bit of that warmth, no matter where life has taken me.
If you’re looking for your next easy dessert, one that gives classic Boston cream pie vibes in melt-in-your-mouth fudge form, you’ve found your sweet spot. This Boston cream fudge is simple, satisfying, and utterly irresistible.
Why You’ll Adore This Boston Cream Fudge
Here’s why this easy dessert will win a permanent place in your treat rotation:
- Nostalgic flavors, simple prep: You get all the comfort of Boston cream pie, but in a simple, no-fuss fudge form—no oven required!
- Creamy meets chocolatey: The dreamy, vanilla-laced white chocolate layers pair so perfectly with rich chocolate, you’ll want to savor every bite.
- Great for sharing (or not!): This homemade fudge slices up beautifully into squares, making it perfect for sharing, gifting, or, honestly, hoarding for yourself on a tough weeknight.
- Quick & stress-free: The whole process comes together in just a few steps, and you only need to chill it for a couple hours—no fancy equipment or candy thermometers needed.
Ingredients You’ll Need for Boston Cream Fudge
For the best results, gather these classic dessert staples (plus a few personal tips!):
- 2 cups white chocolate chips: Go for a good-quality brand—these are the fudge’s mainstay, giving that creamy Boston cream flavor.
- 1 can sweetened condensed milk: The magic ingredient for rich, velvety sweetness. Scrape out every last drop!
- 1 teaspoon vanilla extract: Real vanilla adds warmth and depth; it echoes the custard notes in traditional Boston cream.
- 1 cup cocoa powder: Use unsweetened cocoa powder for the best balance—Dutch-process yields a smoother, richer chocolate layer.
- 1 cup unsalted butter: Room temperature melts more evenly; it’s worth the wait.
- 1 cup powdered sugar: For a smooth, melt-in-your-mouth finish—sift if lumpy to avoid a grainy texture.
Step-by-Step Guide: Making the Perfect Boston Cream Fudge
You’ve got your ingredients—now let’s get these sweet layers started.
- Line your pan: Take an 8×8-inch square pan and tuck in a piece of parchment paper, making sure some hangs over the edge for easy lifting (trust me, future you will thank you).
- Melt the white chocolate base: In a saucepan on low, combine the white chocolate chips, sweetened condensed milk, and vanilla. Stir gently until the mixture is glossy and completely smooth—don’t rush this step to avoid burning.
- First layer down: Pour half of your white chocolate mixture into the pan. Smooth it with an offset spatula or the back of a spoon. Pop the pan in the freezer for a bit while you prep the next layer (this helps keep the layers neat).
- Make the chocolate layer: In a bowl, stir together the cocoa powder, room-temp butter, and powdered sugar until you have a glossy, thick chocolate paste. If it’s too stiff, microwave for 10-15 seconds—just enough to loosen it up.
- Layer it on: Gently spread the chocolate layer over your chilled white chocolate. Take your time—think of it as artfully swirling classic Boston cream pie filling!
- Final layer: Pour the rest of your white chocolate over the chocolate. Smooth into the corners.
- Chill to set: Place your masterpiece in the fridge for at least 2 hours. This step requires patience (the hardest part!), but the texture really shines when fully set.
- Slice and enjoy: Use the parchment overhang to lift out the fudge. Cut into squares (or thick rectangles if you like more decadent bites) and dig in.
My Secret Tips and Tricks for Boston Cream Fudge Success
- Low and slow is key: Always melt your chocolate and butter over low heat to prevent seizing or graininess (classic fudge tip!).
- Clean slices: A hot, sharp knife does wonders for cutting perfect fudge squares. Wipe the knife between slices for those Instagram-friendly edges.
- Customize the chocolate: Want even deeper flavor? Add a pinch of flaky sea salt on top before chilling; it highlights both the chocolate and Boston cream notes.
- Let it sit before serving: If you can stand it, let your fudge sit at room temperature for 10-15 minutes after slicing. The flavors and textures are incredibly creamy and lush.
Creative Variations and Ingredient Swaps
One of the best things about homemade fudge is making it your own. Here are a few ideas:
- Dairy-free alternative: Swap the butter and sweetened condensed milk with coconut cream and a vegan butter substitute.
- Add texture: Stir in mini chocolate chips, chopped toasted nuts, or even a sprinkle of crushed graham crackers for that classic pie crunch.
- Seasonal flair: Swirl in a tablespoon of espresso powder to the chocolate layer for mocha Boston cream fudge, or top with rainbow sprinkles for a celebratory vibe.
- Flavor swaps: Almond extract instead of vanilla gives a fun twist while still keeping that iconic Boston cream dessert flavor.
How to Serve and Store Your Boston Cream Fudge
This fudge is a star at parties, bake sales, or cozy nights in. Here’s how I handle leftovers (if you have any!):
- Serving tip: For the prettiest presentation, dust lightly with extra powdered sugar before serving (such a classic fudge look).
- Storing: Place squares in an airtight container, layering parchment or wax paper between layers. Keeps in the fridge for up to a week, but honestly, it never lasts that long in my house!
- Freezing: Yes, Boston cream fudge freezes well (just wrap tightly). Thaw in the fridge overnight for best flavor and texture.
FAQs: Your Top Questions About Boston Cream Fudge Answered
Q: Can I use milk chocolate instead of white chocolate chips?
A: For that signature Boston cream flavor, white chocolate is best, but you can definitely swap in milk or dark chocolate if you prefer a more classic chocolate fudge taste.
Q: Do I need a candy thermometer for this easy dessert?
A: Nope! This Boston cream fudge recipe is perfect for beginners and doesn’t require any special equipment.
Q: Why did my chocolate layer come out too stiff or crumbly?
A: Make sure your butter is fully softened and don’t skimp on beating the cocoa mixture. Adding a touch of extra butter or a splash of milk can help loosen things up if it looks too thick.
Q: How do I keep the layers from mixing together?
A: Chill each layer for a few minutes before adding the next to get those beautiful, distinct Boston cream fudge stripes.
Q: Can I double the batch for a crowd?
A: Absolutely! Just use a 9×13-inch pan instead of an 8×8-inch, and keep the layers nice and even.
Boston cream fudge isn’t just an easy dessert—it’s a way to savor sweet moments, old and new. Whether you’re sharing it with loved ones or sneaking a late-night indulgence all to yourself, each creamy, chocolatey bite is pure comfort. I hope this recipe brings your kitchen as much joy as it does mine. If you try it, let me know—I’m always here for a fudge story or two!