Chocolate Buttermilk Cake Recipe
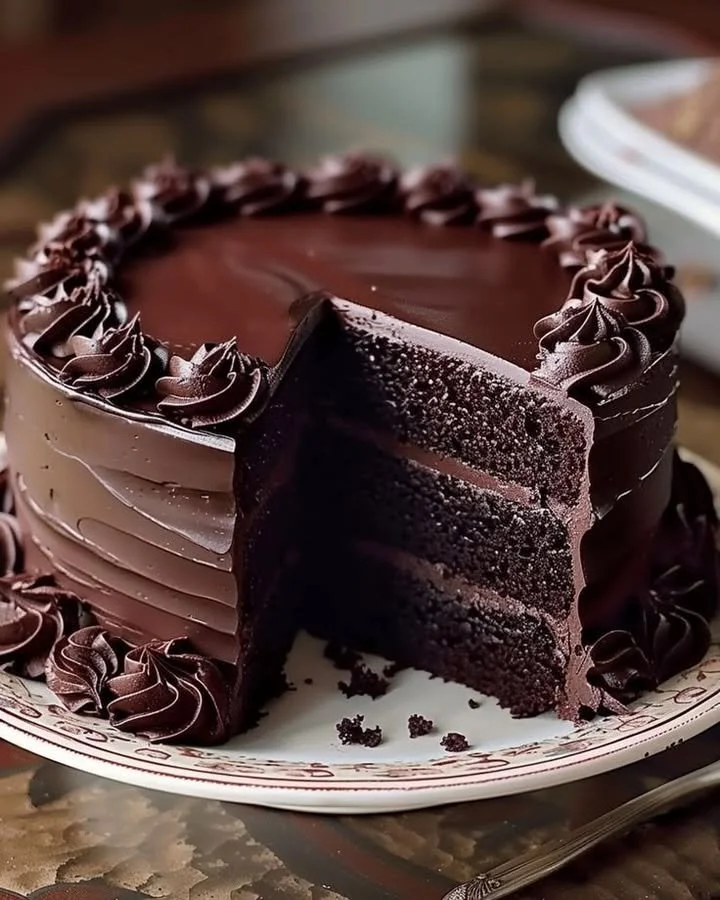
A Slice of Comfort: My Favorite Chocolate Buttermilk Cake Recipe
There are certain desserts that go beyond just satisfying a sweet tooth—they create memories, spark joy, and instantly make you feel at home. For me, this chocolate buttermilk cake recipe brings all of that and more. I think back to lazy Sunday afternoons in my grandma’s kitchen, the aroma of rich cocoa wafting from the oven, and her voice reminding me to “lick the spoon, but not the bowl!” There’s just something undeniably special about a classic, moist chocolate cake made from scratch. If you’ve been searching for an unfussy but decadent chocolate buttermilk cake, you’re in the right place—grab your apron and let’s get baking!
Why You’ll Adore This Chocolate Buttermilk Cake Recipe
Let me tell you, the love for this cake runs deep in my house. Here’s why I think you’ll fall head over heels for it, too:
- Moist and Fluffy Texture: The secret’s in the buttermilk! It gives the cake an unbelievably soft crumb, keeping each layer tender and never dry (nothing worse than dry chocolate cake, right?).
- Deep, Rich Chocolate Flavor: Between the unsweetened cocoa and a splash of hot coffee, the chocolate comes alive—bold, yet never bitter.
- Super Simple to Make: No fancy equipment—just basic pantry staples and a big mixing bowl. You don’t need to be a pastry chef to knock this one out of the park.
- Perfect for Every Occasion: Birthdays, potlucks, or those just-because cravings—this homemade chocolate cake recipe always disappears fast at gatherings.
Ingredients You’ll Need for Chocolate Buttermilk Cake Recipe
Let’s break down what you’ll need and why each ingredient earns its spot in this cake (plus a few baker-to-baker tips):
- All-purpose flour (2 1/2 cups): Provides a sturdy structure for the cake layers.
- Unsweetened cocoa powder (1 cup): Go for a good-quality, Dutch-processed cocoa if you can—it’s rich and smooth.
- Baking soda (2 1/2 tsp) & baking powder (1 tsp): Both give a lofty rise for fluffy, never-dense cake (yes, you need both!).
- Salt (1 tsp): Just enough to enhance all that chocolatey goodness.
- Unsalted butter, softened (1 cup): Room temperature is key for creamy, lump-free mixing.
- Granulated sugar (2 1/2 cups): Gives the perfect hint of sweetness (not too sweet, just right).
- Large eggs, room temp (4): These help bind everything together and add richness.
- Vanilla extract (2 tsp): Don’t skimp here—real vanilla brings all those warm, cozy undertones.
- Vegetable oil (1 cup): Combined with butter for extra moisture and softness (no dry cake here!).
- Buttermilk, room temp (1 1/2 cups): The star ingredient for tang, tenderness, and that signature cake melt-in-your-mouth moment.
- Hot coffee or boiling water (1 cup): Intensifies the chocolate—don’t worry, your cake won’t taste like coffee, I promise.
Step-by-Step Guide: Making the Perfect Chocolate Buttermilk Cake Recipe
Ready to bake? Let’s do it, step by step:
- Preheat and Prep: Start by preheating your oven to 175°C (350°F). Grease and line three 8-inch cake pans with parchment paper so your cake comes out easily (trust me, parchment is game-changing!).
- Mix the Dry Stuff: In a large bowl, whisk together the flour, cocoa powder, baking soda, baking powder, and salt. I like to sift them together to avoid cocoa clumps.
- Cream Butter & Sugar: In another bowl, beat the softened butter and sugar together until it’s extra light and fluffy. Let the mixer run for 3-4 minutes so it’s all creamy and dreamy.
- Add Eggs: Drop in the eggs, one at a time, beating well after each addition. Scrape down the sides as you go for the best texture.
- Flavor Boost: Stir in the vanilla extract and vegetable oil. The combo creates unbeatable crumb and flavor!
- Combine Wet & Dry: Add the dry ingredients to your wet mixture in three parts, alternating with buttermilk (start and end with dry!). Mix just until things come together—overmixing is the enemy of a fluffy cake.
- The Magic Touch: Slowly pour in the hot coffee or boiling water and gently stir. The batter will look thin—don’t panic, that’s what you want for ultimate moistness.
- Divide & Bake: Pour your batter evenly into the three pans and smooth the tops. Bake for 28-32 minutes, or until a toothpick inserted in the center comes out clean.
- Cool Down: Let the cakes cool in the pans for about 10 minutes, then gently turn them out onto wire racks to cool completely. (Pro tip: patience is key—you don’t want melted frosting later!)
My Secret Tips and Tricks for Chocolate Buttermilk Cake Recipe Success
After a few trial-and-error attempts (and some not-so-pretty cakes), here are my tried-and-true tips:
- Room Temperature Ingredients Are Everything: Cold dairy can mess up your batter (semantic: "room temperature eggs"), so let everything sit out for a bit before starting.
- Use Parchment Circles: They’re a lifesaver for getting clean, crumb-free layers (search "how to line cake pans").
- Don’t Skip the Coffee: Even if you’re not a coffee drinker, the hot coffee (or boiling water) brings out an even more intense cocoa flavor.
- Test for Doneness Early: Ovens can be sneaky! Check at the 28-minute mark—overbaked cake dries out fast.
- Chill Before Frosting: Want picture-perfect layers? Chill your cake before assembling and frosting for crumb-free, Instagram-worthy results.
Creative Variations and Ingredient Swaps
Want to make this chocolate buttermilk cake your own? You totally can! Here are some fun twists:
- Gluten-Free? Substitute your favorite 1:1 gluten-free baking flour (semantic: "gluten-free chocolate cake").
- Dairy-Free Swap: Use almond or oat milk mixed with a tablespoon of lemon juice in place of buttermilk (just as tender!).
- Make Cupcakes: This batter is cupcake-friendly—just bake for about 18-22 minutes.
- Fudge Factor: Stir in chocolate chips or a swirl of peanut butter before baking for an extra layer of decadence.
- Change the Frosting: Try a cream cheese frosting, a whipped ganache, or even a fluffy vanilla buttercream (semantic: "cake frosting recipes").
How to Serve and Store Your Chocolate Buttermilk Cake Recipe
Let’s be honest—this chocolate cake rarely lasts more than a day in my house. But if you do have leftovers, here’s what works best:
- Serving: Slice it up and serve slightly chilled or at room temperature with a scoop of vanilla ice cream, a drizzle of ganache, or a cloud of whipped cream.
- Storing: Wrap any leftover cake slices tightly in plastic wrap and store in an airtight container. It’ll stay moist at room temp for about 2-3 days.
- Freezing: The unfrosted cakes freeze beautifully. Just wrap each layer well, freeze, and thaw at room temp before frosting and serving (keyword: "how to freeze cake").
FAQs: Your Top Questions About Chocolate Buttermilk Cake Recipe Answered
Can I make this chocolate buttermilk cake ahead of time?
Absolutely! You can bake the cake layers up to two days in advance. Just wrap them tightly in plastic and keep them at room temperature (secondary keyword: "make ahead cake").
What’s the best substitute for buttermilk in this chocolate cake?
Mix one tablespoon of lemon juice or white vinegar with 1 1/2 cups milk, let it sit for 5 minutes, and voilà—homemade buttermilk!
How do I keep my cake moist for days?
Wrap each layer snugly in plastic wrap and avoid storing in the fridge (unless frosted with something perishable)! The buttermilk and oil already do a lot to keep this chocolate cake soft.
Can I make this cake in a 9×13 pan?
Totally! Just increase the bake time to about 35-40 minutes and check for doneness early.
What frosting goes best with a chocolate buttermilk cake recipe?
Classic chocolate buttercream is my personal favorite, but a tangy cream cheese frosting or even a light whipped cream works beautifully.
Baking a chocolate buttermilk cake at home is, for me, a little act of love—a sweet ritual that fills the kitchen with laughter, rich cocoa scents, and the promise of something deliciously comforting. Thanks for joining me and happy baking! If you try this cake, I’d love to hear how it turns out (bonus points for frosting photos!).