Marble Chocolate Loaf Cake
The Swirl of Comfort: My Marble Chocolate Loaf Cake Story
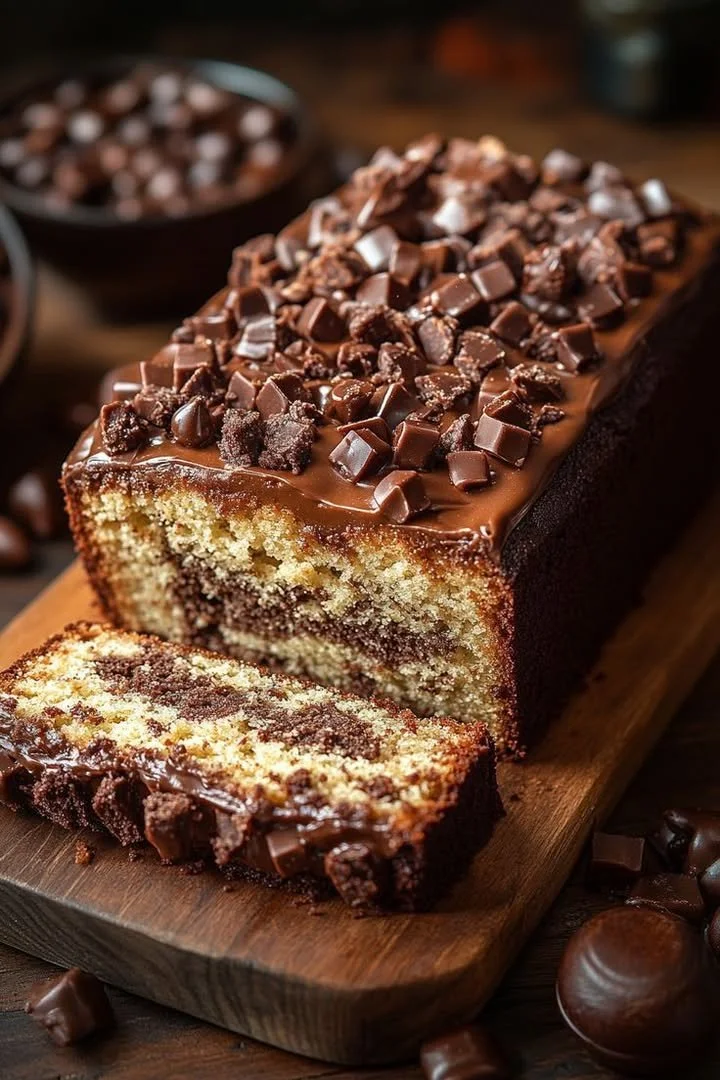
There’s just something a little magical about a marble chocolate loaf cake. I remember the first time I made one—rain softly tapping the windows, my mom humming in the kitchen as the smell of melting chocolate drifted through the air. The moment I sliced into that freshly baked loaf and saw the marbled swirls, I couldn’t help but grin. It felt like unveiling a delicious secret with every cut.
If you’ve been searching for a cozy, crowd-pleasing chocolate loaf cake recipe that feels like a warm hug, you’ve just struck gold. Let’s swirl up some joy together!
Why You’ll Adore This Marble Chocolate Loaf Cake
- Chocolate and Vanilla in Every Bite: Why settle for one when you can have both? This loaf pairs classic vanilla with rich cocoa for the perfect dessert marriage.
- Bakery-Style Looks, Home-Baked Love: That swirled effect isn’t just for show—it’s easy to pull off, yet never fails to impress (you’ll feel like a baking rock star, promise).
- Crazy Versatile: Enjoy it as a mid-afternoon pick-me-up, fancy brunch treat, or even an indulgent breakfast (I won’t tell).
- Ridiculously Moist and Tender: Thanks to a touch of milk and a decadent ganache finish, each slice is lush and satisfying—never dry or crumbly.
Ingredients You’ll Need for Marble Chocolate Loaf Cake
Here’s everything you’ll need to whip up this dreamy marble chocolate loaf cake (plus a few personal tips):
- 1 1/2 cups all-purpose flour (Sift for extra fluffiness.)
- 1 1/2 tsp baking powder (Gives that beautiful, even rise.)
- 1/4 tsp salt (Just enough to balance the sweetness.)
- 1/2 cup unsalted butter, softened (Room temp is key for creamy mixing.)
- 1 cup granulated sugar (The canvas for all that flavor.)
- 2 large eggs (Let them come to room temperature—they’ll blend in much better.)
- 1 tsp vanilla extract (Go for good vanilla; it makes a difference!)
- 1/2 cup milk (Whole milk for tenderness.)
- 3 tbsp unsweetened cocoa powder (Deep, chocolatey swirl is the goal.)
- 2 tbsp hot water (Hot water unlocks the cocoa’s richness.)
- 1/2 cup semi-sweet chocolate chips or chunks (Because extra chocolate never hurt anyone.)
- 1/2 cup chopped chocolate pieces (For garnish—think of it as the confetti of baking.)
- 2 tbsp heavy cream (optional; for a super-soft ganache finish)
Tip: Swap in dark chocolate chips if you’re craving a more intense chocolate loaf cake vibe.
Step-by-Step Guide: Making the Perfect Marble Chocolate Loaf Cake
Here’s how I like to make this loaf cake—along with a few tricks I’ve picked up along the way:
- Preheat and Prep: Set your oven to 350°F (175°C) and grease a 9×5-inch loaf pan. Lining with parchment paper means no sticking drama at the end!
- Mix Dry Ingredients: In a small bowl, whisk together the flour, baking powder, and salt. This keeps everything even and lump-free.
- Cream Butter and Sugar: In a bigger bowl, beat your softened butter with the sugar until it’s pale and fluffy—about 3 minutes. The air you whip in here helps with lift!
- Add Eggs and Vanilla: Crack in the eggs one at a time, beating well after each. Stir in the vanilla extract. (Your kitchen should be smelling amazing right now.)
- Combine Wet and Dry: Gently mix the dry ingredients into the butter mixture in two parts, alternating with the milk. Don’t overmix—just until you have a smooth batter.
- Marble Time: In a small bowl, mix cocoa powder and hot water until smooth. Fold this cocoa paste into about 1/3 of your vanilla batter.
- Layer and Swirl: Dollop alternating spoonfuls of vanilla and chocolate batter into your prepared pan. Use a butter knife to gently swirl them together for that gorgeous marble effect.
- Bake: Pop the pan in the oven and bake for 45–55 minutes. The cake is done when a toothpick comes out clean (try not to poke through a chocolate chip, though!).
- Cool and Ganache: Let the cake cool in the pan for 10 minutes, then transfer to a wire rack. For a glossy finish, melt chocolate chips with heavy cream and spread generously over the top. Garnish with chopped chocolate pieces.
There you have it—your very own marble chocolate loaf cake, fresh from the oven!
My Secret Tips and Tricks for Marble Chocolate Loaf Cake Success
- Room Temperature Ingredients Are a Must: Cold butter or eggs make for lumpy batter. I always let everything sit out for about 30 minutes before starting.
- Don’t Over-Swirl: Just a few gentle figure-eight motions with the knife—otherwise, you’ll blend the batters instead of marbling them.
- Check for Doneness Early: All ovens run a bit differently, so check with a toothpick at the 45-minute mark. (Baking loaf cakes takes practice, but you’ll nail it!)
- The Ganache Isn’t Optional (if you ask me): Melting chocolate chips with a splash of heavy cream upgrades the loaf to next-level chocolate loaf cake deliciousness.
Creative Variations and Ingredient Swaps
Marble chocolate loaf cake is all about flexibility. Try these fun twists:
- Gluten-Free: Substitute your favorite gluten-free flour blend—just be sure it has xanthan gum for structure.
- Dairy-Free: Use vegan butter and plant-based milk (oat or almond are my faves).
- Nutty Crunch: Fold in some chopped toasted walnuts or pecans for a little contrast (nutty marble loaf magic!).
- Spiced Up: Add a pinch of cinnamon or espresso powder to deepen those chocolate notes.
- Fruit-Studded: Toss in some dried cherries or raspberries for a tart pop against all that chocolate richness.
Let your cravings lead the way—this chocolate loaf cake can wear so many hats.
How to Serve and Store Your Marble Chocolate Loaf Cake
Serve this beautiful loaf:
- Warm, fresh from the oven (maybe with a scoop of vanilla ice cream—just saying).
- Sliced and topped with ganache for extra chocolatey goodness.
- Lightly toasted with a smear of butter for breakfast (it’s the best-kept secret to an indulgent morning).
Storing leftovers: Wrap the marble chocolate loaf cake tightly in plastic wrap. It’ll keep for up to 3 days at room temp or up to a week refrigerated. To freeze, cut into thick slices and wrap each in parchment paper, then slip into a freezer bag. (Perfect for chocolate emergencies!)
FAQs: Your Top Questions About Marble Chocolate Loaf Cake Answered
Q: Can I make this marble chocolate loaf cake ahead of time?
Absolutely! You can bake the loaf a day in advance—the flavor even deepens overnight. Just add the ganache the day you plan to serve.
Q: How do I prevent my chocolate loaf cake from becoming dry?
Don’t overbake! Check for doneness with a toothpick, and if you’re storing it, keep it well wrapped. Adding the ganache also keeps everything super moist.
Q: Can I skip the ganache topping?
You sure can. The loaf is delicious on its own, but the ganache gives it that extra chocolate loaf cake flair (especially if you want to impress company!).
Q: What’s the best way to get that classic marble effect?
Use a butter knife and only swirl a little—less is more! The goal is distinct, pretty swirls, not a blended batter.
Q: Can I make this as marble cupcakes instead of a loaf cake?
Yep! Just divide the batters among muffin tins and bake for about 20–25 minutes. They’re adorable and perfect for sharing.
So there you have it—a cozy, chocolate-swirled marble chocolate loaf cake that’s every bit as joyful to make as it is to eat. Whether you’re baking for friends, family, or just yourself (no judgment here!), I hope this recipe brings a little extra comfort and chocolate to your kitchen. Happy marbling!