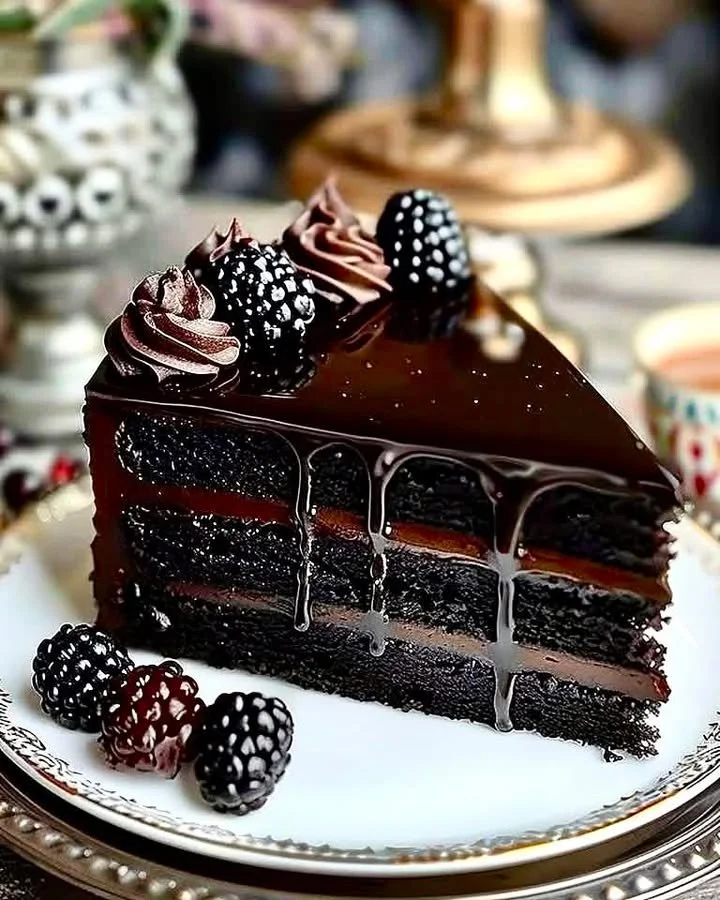
Luxurious Black Velvet Cake
A Slice of Velvet: My Journey to the Perfect Luxurious Black Velvet Cake
Every now and then, a single bite of cake brings a memory flooding back—a cozy birthday party, sweet laughter, the hush of anticipation before candles are blown out. That’s exactly how I feel about my very favorite Luxurious Black Velvet Cake. The first time I baked this classic velvet cake, it was a rainy Sunday and I wanted to treat myself and my family to something extra-decadent. I’d heard whispers of impossibly moist chocolate layers and deep, rich flavor, but nothing had prepared me for just how lush and velvety each forkful would be. The magic? It’s in the name—black velvet—a cake so tender and lavish, it feels like a celebration every time.
If you’re searching for an unforgettable homemade cake recipe that’s both impressive and surprisingly simple, you need this luxurious black velvet cake in your baking repertoire. Let’s dive in together and create a new favorite!
Why You’ll Adore This Luxurious Black Velvet Cake
There are so many reasons why this black velvet cake stands out in my kitchen, but here are a few (from one cake-lover to another!):
- Irresistibly Moist Texture: Every bite melts in your mouth thanks to the clever combo of buttermilk and hot water. You’ll actually taste the velvet.
- Intense Chocolate Flavor: With plenty of unsweetened cocoa and a touch of vanilla, the flavors are rich yet perfectly balanced—not too sweet, not too bitter.
- Gorgeous Presentation: Slice into this cake and you’ll see deep, dramatic layers that practically beg for a swoop of creamy ganache or whipped topping.
- Failsafe for Every Occasion: Whether you’re baking for a birthday, holiday, or a “just because” treat, this luxurious black velvet cake brings out oohs and aahs every single time.
Ingredients You’ll Need for Luxurious Black Velvet Cake
I always believe that what you put in is what you get out—so here’s the lineup for your best-ever black velvet cake, plus a few personal shopping tips:
- 2½ cups all-purpose flour: I like to sift mine for an ultra-light crumb.
- 2 cups granulated sugar: White sugar works best, but I’ve played with mixing in brown sugar for a hint of caramel.
- ¾ cup unsweetened cocoa powder: Go for Dutch-processed cocoa if you want the deepest color and chocolate flavor.
- 1½ teaspoons baking soda + 1½ teaspoons baking powder: Both are key for that signature rise (don’t skip either!).
- 1 teaspoon salt: Just enough to enhance those chocolatey notes.
- 2 large eggs: Room temperature helps them blend seamlessly.
- 1 cup buttermilk (or 1 cup milk + 1 teaspoon lemon juice): Buttermilk really is the secret to that tender texture, but the lemon juice hack works in a pinch.
- ½ cup vegetable oil: Makes the cake extra-moist (canola or sunflower also work).
- 2 teaspoons vanilla extract: Don’t skimp on quality—pure vanilla deepens the cake’s luxury factor.
- 1 cup boiling water: Trust me, adding hot water gives the batter a silky, pourable texture. It’s the secret weapon!
Step-by-Step Guide: Making the Perfect Luxurious Black Velvet Cake
Ready to bake an unforgettable cake? Here’s my friendly, no-stress guide:
- Preheat your oven to 175°C (350°F) and prep your cake pan with butter or a swipe of oil plus a little dusting of cocoa. (This step ensures you’ll never have those tragic cake-stick moments.)
- Mix the dry ingredients: In a big bowl, whisk together flour, sugar, cocoa, baking powder, baking soda, and salt. Sift if you can, for that pillowy softness.
- Whisk up the wets: In another bowl, lightly beat the eggs, then stir in the buttermilk, oil, and vanilla extract until smooth.
- Combine everything: Pour the wet ingredients into your dry mix and blend gently (I use a hand whisk here!) just until combined—don’t overmix, or you’ll lose that tender crumb.
- Add the magic water: Gradually stir in the boiling water. The batter will become thin and glossy—that’s exactly right.
- Pour into your prepared pan and bake for 35-40 minutes. Your kitchen will start to smell amazing! When a toothpick comes out with a few moist crumbs, you’re golden.
- Cool completely, then frost with your favorite cream, whipped ganache, or just a dusting of powdered sugar (I’m partial to a glossy chocolate ganache for full drama).
- Slice, serve, and enjoy! Let the “wow” faces around the table fill your heart.
My Secret Tips and Tricks for Luxurious Black Velvet Cake Success
Twenty tries, and I’ve picked up a few black velvet cake tips that guarantee every slice is bakery-worthy:
- Room Temp Ingredients: Remember to set those eggs and buttermilk out about 30 minutes before you bake. This helps your batter mix up smoothly (no lumpy bits!).
- Sift That Cocoa: Cocoa tends to clump, so give it a good sift with your flour for the smoothest batter.
- Don’t Fear the Thin Batter: The final batter will look runny—that’s what gives your cake its signature silky bite.
- Check Early When Baking: Ovens vary, so start checking after 30 minutes. Overbaking will steal your cake’s velvet magic!
- Cool Before Slicing: Let the cake chill fully before you frost or slice for picture-perfect pieces.
Creative Variations and Ingredient Swaps
This cake is endlessly adaptable, so let’s make it your own! Here are some of my favorite ideas:
- Gluten-Free Swap: Use a 1:1 gluten-free all-purpose flour blend.
- Vegan-friendly: Replace eggs with flax eggs and use dairy-free milk + lemon juice for buttermilk; swap in a plant-based oil.
- Spiced Black Velvet Cake: Add a pinch of cinnamon or espresso powder for warmth and depth—especially delicious for fall.
- Nutty Crunch: Toss in chopped walnuts or pecans for a little crunch in the batter.
- Frosting Fun: Try a raspberry cream, peanut butter buttercream, or classic chocolate ganache on top.
How to Serve and Store Your Luxurious Black Velvet Cake
Serving up slices of this homemade black velvet cake is a guaranteed crowd-pleaser. Here’s how to keep it fresh (if any’s left!):
- Serve: Let the cake come to room temperature for the silkiest texture and fullest flavor. Pair with fresh berries and a dollop of whipped cream—instant restaurant vibes!
- Store: Keep covered at room temp for up to two days, or refrigerate (tightly wrapped) for up to five days. This cake also freezes beautifully—just wrap individual slices in cling film and pop them in the freezer for up to a month.
FAQs: Your Top Questions About Luxurious Black Velvet Cake Answered
Q: How can I keep my black velvet cake from drying out?
A: Cover your cake well with plastic wrap or store in an airtight container. The buttermilk in this recipe also helps lock in moisture, so you shouldn’t worry!
Q: Can I make this cake ahead of time?
A: Absolutely! Bake the cake a day ahead, let it cool, and wrap tightly—then frost just before serving for the ultimate fresh flavor.
Q: I’m out of buttermilk—what’s the best substitute?
A: No worries! Add 1 teaspoon of lemon juice or white vinegar to 1 cup of milk, let sit for five minutes, and you’re good to go.
Q: Can I use this batter for cupcakes instead of a classic cake?
A: Yes! Just fill cupcake liners two-thirds full and bake for 18–22 minutes. Perfect for parties or portion-controlled treats.
Q: Why is my batter so runny? Did I do something wrong?
A: Nope, you’re doing it right! The runny batter is key to giving the black velvet cake its moist, dense-yet-tender crumb.
If you bake this Luxurious Black Velvet Cake, I hope you’ll tag me or drop a comment below. There’s nothing better than seeing your cake creations and hearing your stories (especially the ones that end with chocolate-covered smiles). Happy baking—here’s to many more velvety slices and sweet memories ahead!
Luxurious Black Velvet Cake
Ingredients
Dry Ingredients
- 2.5 cups all-purpose flour Sift for an ultra-light crumb.
- 2 cups granulated sugar White sugar works best.
- 0.75 cups unsweetened cocoa powder Use Dutch-processed for deeper color.
- 1.5 teaspoons baking soda Key for proper rise.
- 1.5 teaspoons baking powder Key for proper rise.
- 1 teaspoon salt Enhances chocolate flavor.
Wet Ingredients
- 2 large eggs Room temperature for better blending.
- 1 cup buttermilk Or use 1 cup milk plus 1 teaspoon lemon juice.
- 0.5 cups vegetable oil Can use canola or sunflower.
- 2 teaspoons vanilla extract Use pure vanilla for depth.
- 1 cup boiling water Key for silky batter.
Instructions
Preparation
- Preheat your oven to 175°C (350°F) and prep your cake pan with butter or oil and a dusting of cocoa.
- In a large bowl, whisk together the dry ingredients: flour, sugar, cocoa, baking powder, baking soda, and salt.
- In another bowl, lightly beat the eggs, then stir in the buttermilk, oil, and vanilla extract until smooth.
- Pour the wet ingredients into the dry ingredients and mix gently until combined.
- Gradually stir in the boiling water until the batter is thin and glossy.
Baking
- Pour the batter into the prepared pan and bake for 35-40 minutes or until a toothpick comes out with a few moist crumbs.
- Cool completely before frosting with your favorite topping.