Chocolate Fudge Layered Bliss
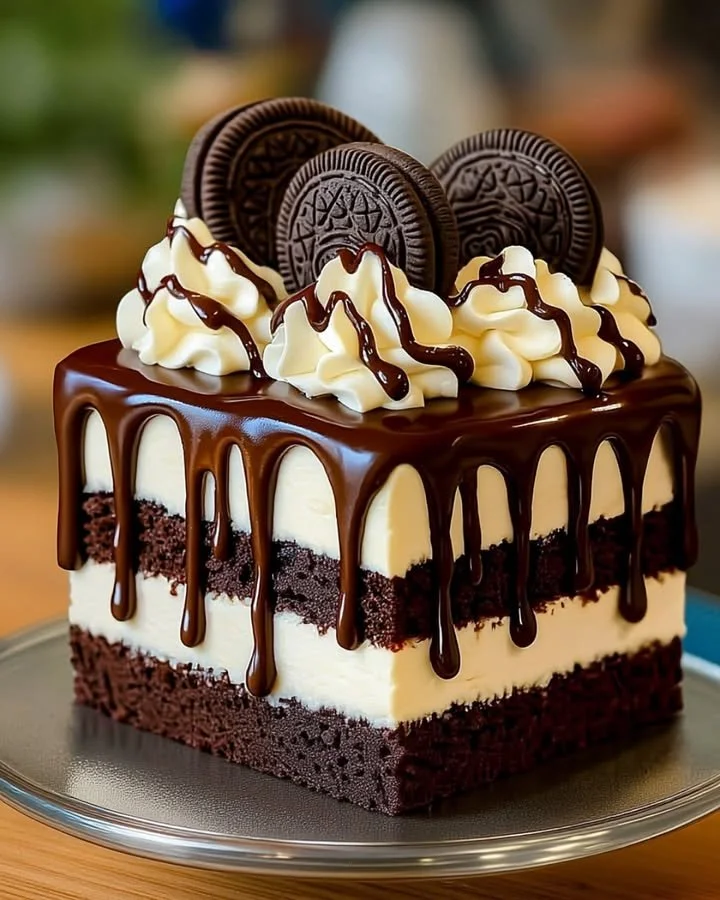
Chocolate Fudge Layered Bliss: My Ultimate Indulgence
When I think about the ultimate treat—something that makes any ordinary day feel a little more magical—my mind instantly drifts to this Chocolate Fudge Layered Bliss. The first time I made these chocolate fudge brownies, it was a chilly Saturday afternoon spent baking with my niece. The kitchen smelled like melted chocolate, laughter echoed off the cabinets, and before we could even let the ganache set, we both snuck big, gooey bites. There’s just something about a square of homemade chocolate fudge bliss that transports you—back to childhood, or maybe just to your happiest place (and let’s be honest, it always tastes even better when shared). If you’re hunting for a seriously decadent dessert recipe, Chocolate Fudge Layered Bliss is about to become your new go-to.
Why You’ll Adore This Chocolate Fudge Layered Bliss
If you’re a chocolate lover (or just a lover of all things cozy and comforting), this recipe will win your heart every time. Here’s why:
- Ultra Rich & Decadent: Every bite is layered with fudgy brownie, melty chocolate chips, and a creamy ganache that just melts in your mouth. It’s a chocolate lover’s dream come true.
- Crowd-Pleasing Magic: Whether you’re bringing dessert to a potluck, family dinner, or simply treating yourself, these chocolate fudge layered brownies always get rave reviews (“Can I have the recipe?” is guaranteed).
- Foolproof for Beginners: You don’t need to be a pastry chef to nail this. Simple ingredients, easy steps, and no weird equipment—anyone can create bakery-quality layered brownies at home.
- Perfect for Sharing (or Not!): I’ve found these brownies are the best excuse to call up a friend, pour some coffee, and savor a treat together (though, no judgment if you keep the pan to yourself).
Ingredients You’ll Need for Chocolate Fudge Layered Bliss
Let’s round up everything for this heavenly chocolate dessert! Here are my tips to ensure maximum chocolatey-ness:
- 1 cup unsalted butter – Real butter gives these brownies unbeatable richness. I recommend using unsalted so you can perfectly control the saltiness.
- 2 cups granulated sugar – For that perfect, glossy, fudge-like crumb.
- 4 large eggs – Room temperature eggs mix in smoother and create a velvety texture.
- 1 tsp vanilla extract – I love using real vanilla for a deeper flavor lift.
- 1 cup all-purpose flour – Keeps things chewy, not cakey.
- 1 cup unsweetened cocoa powder – Go for a high-quality Dutch-process or natural cocoa powder for maximum chocolate flavor.
- 1/2 tsp salt – Just enough to balance out the sweetness and bring out all the other flavors.
- 1 tsp baking powder – Helps the brownies rise just a smidge, so they’re fudgy but not dense.
- 1 cup chocolate chips (semi-sweet or dark) – I toss in a mix of both for a balanced, melt-in-your-mouth center.
- 1 cup heavy cream – Gives the ganache layer its ultimate creamy richness.
- 8 oz semi-sweet chocolate, chopped – Melts perfectly for a glossy ganache topping (use a good baking chocolate if you can).
Step-by-Step Guide: Making the Perfect Chocolate Fudge Layered Bliss
Let’s break it down, together. Here’s exactly how I make these layered chocolate fudge brownies every single time:
-
Prep Like a Pro:
Preheat your oven to 350°F (175°C). Grease a 9×13 inch pan and line it with parchment—that way, lifting out your brownies is a breeze (trust me, it saves so much stress). -
Melt the Butter:
In a large saucepan, melt your butter on medium heat. Don’t let it brown. Once melted, take if off the heat and stir in sugar, eggs, and vanilla until smooth and glossy. -
Combine Dry Ingredients:
In a separate bowl, sift together flour, cocoa powder, salt, and baking powder. This keeps your brownies ultra smooth and lump-free. -
Mix it Up:
Add the dry mix to the wet ingredients. Stir until just combined—you want to keep the batter tender and fudgy. -
Add the Chocolate Chips:
Gently fold them in (try not to overmix!). The goal is gooey pockets of chocolate with every bite. -
Bake:
Spread the batter evenly in your prepared pan. Bake for 25–30 minutes, or until a toothpick comes out with a few moist crumbs. The hardest part? Waiting for them to cool! -
Ganache Time:
For that decadent chocolate layer, heat the heavy cream in a saucepan until just simmering. Remove from heat, add the chopped chocolate, and stir until silky smooth. -
Finish in Style:
Pour the ganache over your cooled brownies, then spread evenly with a spatula. Let the whole thing set for at least 30 minutes, until the top is glossy and firm. -
Slice & Savor:
Cut into squares, serve, and soak up the praise (or enjoy quietly in your kitchen with a cold glass of milk).
My Secret Tips and Tricks for Chocolate Fudge Layered Bliss Success
Through many (delicious) rounds of recipe testing, I’ve picked up a few chocolate fudge secrets that make these brownies next-level:
- Let your brownies cool completely before pouring on the ganache. Warm brownies = melted, runny topping (not quite the aesthetic we want!).
- For an extra-rich ganache, use a higher cocoa content chocolate bar (think 60–70% cacao—so decadent).
- Parchment paper is a total game-changer for flawless removal—and easier cleanup, too.
- If you want super fudgy brownies, slightly underbake them. The toothpick should come out with just a few moist crumbs—no dry centers here!
- Sprinkle a pinch of flaky sea salt on top of the ganache before it sets for an upscale finish.
(Pro tip: these double up beautifully as a chocolate fudge cake if stacked with two layers!)
Creative Variations and Ingredient Swaps
The beauty of this chocolate fudge recipe is how easily you can tweak it to suit your tastes or dietary needs:
- Nutty Ambition: Fold in 1/2 cup walnuts, pecans, or hazelnuts to the batter for a crunchy twist (hello, chocolate walnut brownies!).
- Gluten-Free Swap: Use a 1:1 gluten-free flour blend—the results are just as delicious and fudgy.
- Dairy-Free Dream: Substitute coconut oil for butter, a plant-based milk for heavy cream, and use dairy-free chocolate chips for a rich, vegan chocolate dessert.
- Mix Up the Chips: Try white chocolate, peanut butter chips, or even toffee bits for fun flavor bursts.
- Spice it Up: Add a pinch of instant espresso or cinnamon to the batter—both bring out the chocolate flavor in amazing ways.
How to Serve and Store Your Chocolate Fudge Layered Bliss
When it comes to serving, I love these brownies either at room temperature (total fudge factor!) or slightly chilled from the fridge. Here’s what works best for keeping them fresh:
- Serving: Top with a scoop of vanilla ice cream, a dollop of whipped cream, or just enjoy straight up. These brownie bars are perfect for dessert tables, picnics, or cozy evenings in.
- Storing: Store leftovers in an airtight container at room temp for up to 3 days, or in the fridge for up to a week. (Fair warning—they rarely last that long at my house!)
- Freezing: Want to prep ahead? Freeze individually wrapped squares for up to 3 months. Just thaw at room temp and you’ve got instant homemade chocolate fudge bliss whenever the craving strikes.
FAQs: Your Top Questions About Chocolate Fudge Layered Bliss Answered
1. Can I make chocolate fudge layered brownies ahead of time?
Absolutely! In fact, I think they taste even better the next day, once the ganache has had time to settle in.
2. Can I double this recipe for a party?
Yes! Use two pans, or a large sheet pan, and just keep an eye on the baking time (it might need a few extra minutes).
3. What’s the best way to cut clean brownie squares?
Wipe your knife with a damp paper towel between each slice for perfect, bakery-style squares (trust me, it’s worth it).
4. Can I use milk chocolate instead of semi-sweet for the ganache?
You totally can! The result will be sweeter and creamier, so it’s great if you love a milk chocolate twist.
5. How do I know when my brownies are perfectly done?
Check with a toothpick—if it comes out with a few moist crumbs (not wet batter and not dry), they’re perfect. Remember, they keep cooking a bit as they cool!
There you have it, friends—a lovingly tested, indulgent, and highly shareable Chocolate Fudge Layered Bliss that’s just waiting to work its magic in your kitchen. If you try it, I’d love to hear how it turned out (bonus points if you share photos!). Until then, here’s to chocolate, togetherness, and plenty of sweet moments ahead.