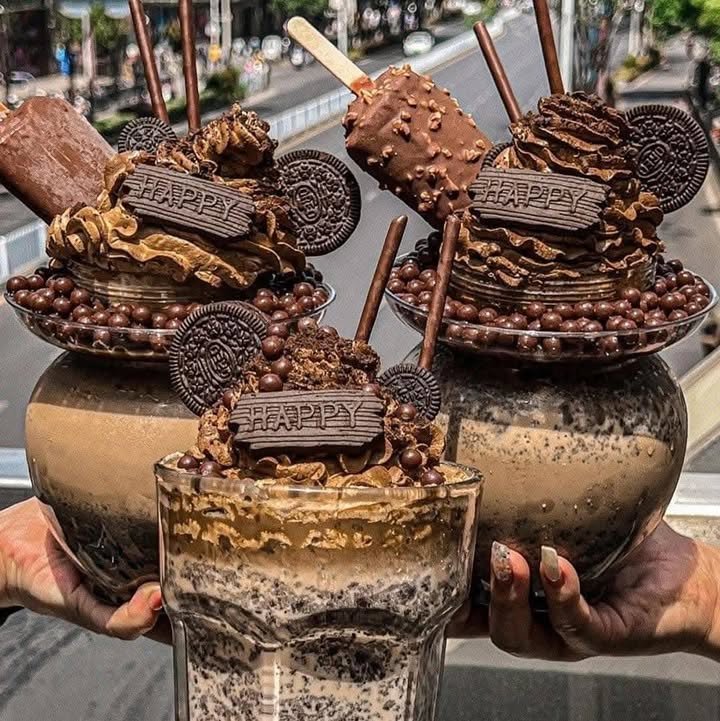
# The Best Homemade Chocolate-Covered Ice Cream Bars
One of the simple joys in life is sinking your teeth into a creamy, frozen treat, especially when that treat is a Homemade Chocolate-Covered Ice Cream Bar. There’s something magical about the soft serve of vanilla ice cream encased in a delightful, crisp layer of melted chocolate and a sprinkle of crunchy nuts. It evokes memories of summer days spent in the backyard, the warm sun kissing our skin while the laughter of family fills the air. These homemade delights aren't just for special occasions; they transform any weeknight dinner or lazy weekend afternoon into something extraordinary.
With just a few ingredients, you can whip up these luscious bars that will become a family favorite. Picture it: a warm day, the sun shining, and you take a bite into a chocolate-covered ice cream bar—pure bliss!
## Background & Origin
Ice cream has long held a special place in the hearts of Americans. From homemade churns on a hot summer day to quick store-bought cones enjoyed on the way home, the decadence of ice cream knows no bounds. Chocolate-covered ice cream bars, in particular, became popular in the mid-20th century, when ice cream companies began mass-producing these sweet treats. Each bite is a harmonious blend of flavors and textures—the creamy ice cream hugging the rich chocolate, with a satisfying crunch from nuts or sprinkles.
This Homemade Chocolate-Covered Ice Cream Bar version lets you customize it to fit your family’s taste, whether opting for rich dark chocolate or light, sweet white chocolate. How happy your kids will be grabbing their very own creations straight from the freezer!
## Ingredients
- **Vanilla ice cream (or any preferred flavor)**
*Feel free to mix it up with strawberry or coffee ice cream!*
- **Melting chocolate (milk, dark, or white)**
*Choose your favorite for the perfect coating.*
- **Crushed nuts**
*Pecans, almonds, or even crushed Oreos can add great texture.*
*(Optional: Make sure the nuts are finely chopped for an even sprinkle.)*
## Step-by-Step Instructions
1. **Cut the ice cream into bar shapes** and place them on a parchment-lined tray. Aim for about 1-inch thick bars; they should be a nice bite-size.
2. **Melt the chocolate** in a microwave or double boiler until smooth and shiny. If using a microwave, take care to stir every 30 seconds to avoid burning the chocolate.
3. **Dip each ice cream bar into the melted chocolate** ensuring it’s fully coated. A quick swirl can help you get an even layer. Let the excess chocolate drip off.
4. **Sprinkle crushed nuts** over the chocolate-coated bars before the chocolate sets. Don’t be shy; the more, the merrier!
5. **Place the bars back on the tray** and freeze until the chocolate is set. This should take about 30 minutes.
6. **Serve and enjoy your homemade chocolate-covered ice cream bars!** These bars keep well, so feel free to make a big batch and share—or not!
## Pro Tips & Common Mistakes
- **Make it extra special:** Add a hint of sea salt on top of the chocolate for a delightful twist.
- **Don't rush the melting process:** It can lead to a gritty texture if the chocolate is overheated.
- **Keep the ice cream cold:** If it softens too much while you work, you might end up with a mess.
- **Prep-ahead hacks:** Make a few batches and store them in a freezer bag for quick treats in the future!
## Variations & Substitutions
- **Vegan:** Use coconut milk ice cream and dairy-free chocolate.
- **Gluten-free:** Ensure your chocolate and toppings are gluten-free.
- **Extra creamy:** Incorporate a layer of chocolate fudge between the ice cream and dipping chocolate.
- **Kid-friendly:** Kids will love sprinkles in addition to nuts for added fun!
## Serving Suggestions
These homemade chocolate-covered ice cream bars are fantastic by themselves, but pair them with some fresh strawberries or banana slices for a refreshing touch. A scoop of sorbet on the side or charmingly presented on a colorful plate adds a delightful flair. If you’re feeling fancy, how about pairing them with a glass of dessert wine or a cold brew coffee?
## Storage, Freezing & Reheating
- **How long they last:** These bars can stay delicious in the freezer for up to 2 months—if you can resist them that long!
- **Freezer-friendly:** Wrap each bar in parchment paper and store them in labeled freezer bags to tailor your sweet treat experience.
- **Best reheating methods:** These bars are best served frozen, but if they start to melt, you can pop them back in the freezer quickly.
- **Meal-prep tips:** Spend an afternoon making several batches. It saves time on busy evenings when you need a quick dessert.
## Nutrition & Health Info
While enjoying homemade chocolate-covered ice cream bars, remember moderation is key! Depending on your ice cream and chocolate choices, each bar generally averages around 150-250 calories. Opt for lower-calorie ice cream variants if you’re watching your intake.
## FAQ Section
- **Can I prepare Homemade Chocolate-Covered Ice Cream Bars ahead of time?**
Yes, you can make these bars days in advance and store them in the freezer.
- **How do I thicken/thin the chocolate?**
To thin it, add a little bit of coconut oil. If it’s too thin, let it cool slightly before using.
- **Ingredient substitutions?**
You can swap ice cream flavors and nuts according to your dietary preferences.
- **Can I double or halve the recipe?**
Absolutely! Adjust the quantities as needed to fit your needs.
- **Best cookware to use?**
Use a microwave-safe bowl for melting chocolate, and a large tray lined with parchment paper for assembly.
- **Can I make it dairy-free or meat-free?**
Yes! Choose dairy-free ice cream and chocolate to keep everything cruelty-free.
- **What sides go well with it?**
Pair these bars with fresh fruit for a well-balanced dessert experience.
 )
## Conclusion
Homemade Chocolate-Covered Ice Cream Bars are a delightful treat that can turn any day into a sunny celebration. They're quick, customizable, and oh-so-delicious. Have fun getting creative in the kitchen with your family! I can’t wait to hear how you enjoyed them—feel free to share your creations, ask questions in the comments, or snap a picture for social media!
{image_template}
)
## Conclusion
Homemade Chocolate-Covered Ice Cream Bars are a delightful treat that can turn any day into a sunny celebration. They're quick, customizable, and oh-so-delicious. Have fun getting creative in the kitchen with your family! I can’t wait to hear how you enjoyed them—feel free to share your creations, ask questions in the comments, or snap a picture for social media!
{image_template}