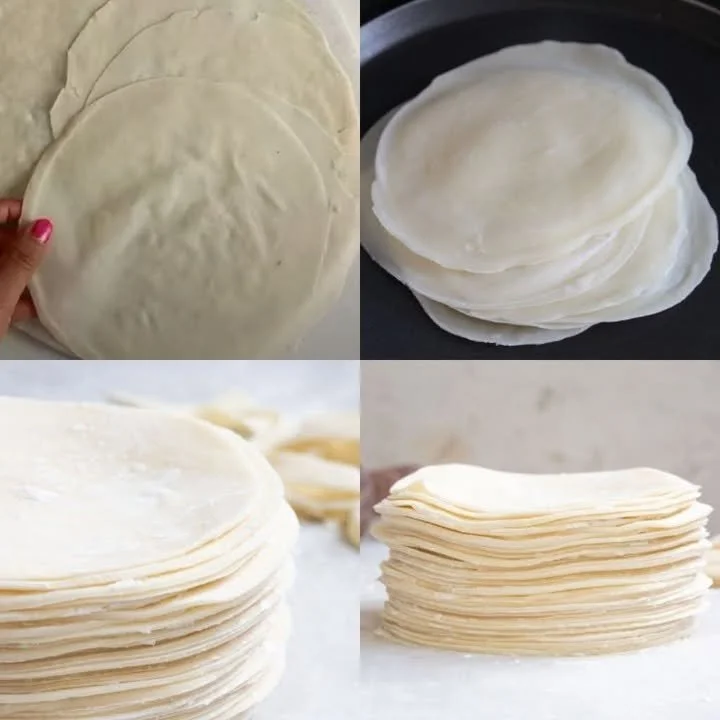
Samosa and Spring Rolls Wraps

The First Bite: My Love Affair with Samosa and Spring Rolls Wraps
You know how some recipes just stick with you, those simple ones that become a family staple because they always deliver? That’s exactly what happened with these samosa and spring rolls wraps in our house. I remember the first time I tried making homemade samosa wraps—it was a cozy Saturday, music playing, flour dust floating in a sunbeam, and all the anticipation of wrapping up spicy fillings in whisper-thin blankets. The smell of the wraps cooking—warm, a little nutty—brought back memories of street markets and grandma’s kitchen, where patience paid off in every perfect, golden bite. There’s something so grounding and joyful about starting from scratch, making these classic samosa and spring roll wrappers with your own two hands. If you’ve ever wished for foolproof, flexible homemade wraps, stick with me—because this simple, fail-safe recipe is for you.
Why You’ll Adore These Samosa and Spring Rolls Wraps
I’m so excited to share why these homemade wraps have become a go-to favorite for me (and why they might become one for you, too):
- Super Simple Ingredients: Just a handful of pantry staples means you probably have everything you need right now!
- No More Store-Bought Hassle: Never again will you race to the store only to find the spring roll wraps sold out—homemade wraps are fresh, soft, and customizable.
- Deliciously Versatile: Samosa wraps and spring roll wrappers can be filled with anything—spiced potatoes, veggies, or even a sweet surprise.
- Family-Friendly Fun: It’s a little project everyone can join in on, perfect for slow weekends or when you want an easy, hands-on kitchen adventure.
Ingredients You’ll Need for Samosa and Spring Rolls Wraps
We’re keeping things classic and unfussy for these wraps. You’ll need:
- 2 cups all-purpose flour: I love using regular flour for that perfect stretchy, tender bite. You could experiment with whole wheat for a nuttier flavor if you’d like!
- 1 ½ cups water: Use cool, filtered water if possible. Add gradually to control the batter thickness (think crepe batter here).
- ¼ teaspoon salt: Just the right amount to enhance flavor—don’t skip it!
- ¼ teaspoon sugar (optional): Adds the slightest touch of sweetness, which I enjoy for spring roll wrappers but can totally skip if you’re a savory purist.
That’s it—no eggs, no fuss, just real, straightforward ingredients.
Step-by-Step Guide: Making the Perfect Samosa and Spring Rolls Wraps
It took me a couple tries to get these just right, so don’t stress—truly, it’s all about the feel of the batter!
- Mix up the batter: In a medium bowl, combine flour, salt, and sugar (if using). Slowly whisk in water. You want a lump-free, smooth batter that’s a little thinner than pancake batter.
- Prep the pan: Heat a non-stick skillet over medium. Lightly brush or wipe the surface with just a kiss of oil—too much, and the edges won’t lift cleanly.
- Spread the batter: Pour a small ladleful onto the pan and quickly swirl (or gently use a silicone spatula) to spread it into a thin, even circle. Don’t panic if it’s not perfect—uneven edges add homemade charm!
- Cook—but don’t flip: Let the wrap cook 30 seconds to 1 minute until it looks dry on top and the edges begin to lift. Trust me, flipping isn’t needed—these are delicate and shouldn’t brown much.
- Lift and stack: Gently peel off using a thin spatula and stack on a plate, covering with a damp cloth to keep them soft.
- Repeat and rest: Stir the batter occasionally to keep it smooth, then repeat until you’re done.
Want a little pro tip from all my wrap-making mishaps? If the wrap sticks, your pan probably needs a bit more preheating or a touch more oil. If it tears, make the batter a tiny bit thicker next time. This is the kind of recipe where practice makes perfect, and the first few always get eaten as “chef snacks.” 😉
My Secret Tips and Tricks for Samosa and Spring Rolls Wraps Success
Here’s what I’ve learned (sometimes the hard way!):
- Consistency is key: Really take your time with the batter—smooth and just pourable, but not watery. Don’t rush the whisking!
- Keep ’em soft: Cover the finished wraps right away with a damp towel so they don’t dry out—this makes them super flexible for rolling classic samosas or stuffing with veggies.
- Batch ahead: These samosa and spring roll wraps freeze beautifully! Stack them between parchment, pop them in an airtight container, and those sudden samosa cravings are officially solved.
- Pan temperature: Too hot and the wraps get crispy, too cool and they’ll stick. Medium heat is the sweet spot (I always do a “tester” wrap first).
Creative Variations and Ingredient Swaps
The beauty of homemade samosa wraps and spring roll wrappers is how tweakable they are:
- Gluten-Free: Swap in a gluten-free flour blend (with a binder like xanthan gum) for delicate, celiac-friendly wraps.
- Whole Wheat: Sub 1 cup whole wheat for 1 cup all-purpose for earthy flavor and extra fiber.
- Flavor Boost: Add a pinch of turmeric or a dash of black pepper for color and warmth.
- Vegan or Dairy-Free: You’re all set—the basic wrap recipe is already naturally vegan!
Got extra wraps? Slice into strips and fry for crunchy papdi toppings on chaat, or use them as quick crepes with a swipe of jam. The possibilities are endless!
How to Serve and Store Your Samosa and Spring Rolls Wraps
When you’ve made a fresh batch of samosa and spring rolls wraps, the fun’s just beginning:
- Serve: Fill wraps with classic potato-pea samosa filling, spicy minced meat, or vibrant stir-fried veggies. Roll, seal with a dab of flour paste, and fry or bake to golden perfection.
- Dipping time: These homemade wraps shine with chutney, tangy tamarind sauce, or a creamy yogurt dip.
- Leftover storage: Stack cooled wraps between sheets of parchment paper. Store in an airtight container in the fridge (up to 3 days) or freeze for 2 months.
- Quick reheat: To soften wraps, steam gently or zap in the microwave (just 10-15 seconds) before filling.
So whether you’re meal prepping dinner, prepping for a party, or just indulging a snack attack, these wraps have your back!
FAQs: Your Top Questions About Samosa and Spring Rolls Wraps Answered
1. My wraps keep tearing—what am I doing wrong?
Usually, tears mean the batter is too thin or the wrap’s being handled too soon. Try making the batter a touch thicker and always let the wrap cool a bit before peeling it up.
2. Can I freeze homemade samosa wraps?
Absolutely! Stack with parchment between each wrap and freeze. They thaw quickly, and you’ll never be without fresh spring roll wrappers.
3. What’s the best way to make sure my wraps stay soft?
Cover them straight off the pan with a damp cloth, and keep stacked to retain moisture. This makes rolling samosas or spring rolls easy and frustration-free.
4. Do I have to use all-purpose flour, or can I substitute?
All-purpose flour works best for pliable wraps, but feel free to experiment. A whole wheat/all-purpose blend or even gluten-free flours work—just adjust water as needed.
5. Do samosa and spring rolls wraps taste different homemade?
Hands down, yes. They’re fresher, more tender, and you can control the seasoning! After making your own once, you’ll see what I mean.
Homemade samosa and spring rolls wraps have become one of my favorite kitchen rituals—a chance to slow down, connect with delicious comfort food, and celebrate the magic of making something from scratch. I hope you feel inspired to roll up your sleeves and give it a try. And if you do, I’d love to hear how the wraps turned out for you or what fillings you use! Let’s keep the joy of homemade cooking going, one samosa at a time.


