Martha Washington Candy
Homemade Sweet Nostalgia: Martha Washington Candy
If there’s a single dessert that transports me straight back to my grandma’s cheery kitchen, it’s Martha Washington Candy. The name alone floods my mind with memories of sticky fingers, bowls brimming with coconut and cherries, and that unmistakable chocolate aroma wafting through the house. Every holiday season, my family would gather around the table, rolling these little sweet gems while giggling and chatting about everything under the sun. There’s just something magical about handmade candies—every batch reminds me to slow down, savor the moment, and taste the love in every bite. If you’re searching for a melt-in-your-mouth homemade candy recipe that screams classic comfort, Martha Washington Candy is pure nostalgia wrapped in chocolate (and it’s a southern candy icon for a reason).
Why You’ll Adore This Martha Washington Candy Recipe
Let’s be real: homemade candy sometimes sounds intimidating. But this is the kind of feel-good, shareable treat you’ll want to make every year—or honestly, every chance you get. Here’s why:
- It’s delightfully easy: No candy thermometer, fancy molds, or advanced skills needed here. If you can stir and dip, you’re good to go.
- The flavor combo is out of this world: We’re talking tender coconut, sticky-sweet maraschino cherries, crunchy chopped pecans, and creamy chocolate all in one magical bite.
- Everyone loves them: Seriously, these Martha Washington candies disappear at bake sales, potlucks, and holiday gatherings faster than any other treat I bring.
- They’re a make-ahead dream: You can stash them in the fridge (or even freeze them!) for when your sweet tooth strikes—or when you need a little homemade gift.
Ingredients You’ll Need for Martha Washington Candy
Here’s what you’ll need to bring this classic candy recipe to life (with my little notes, as always):
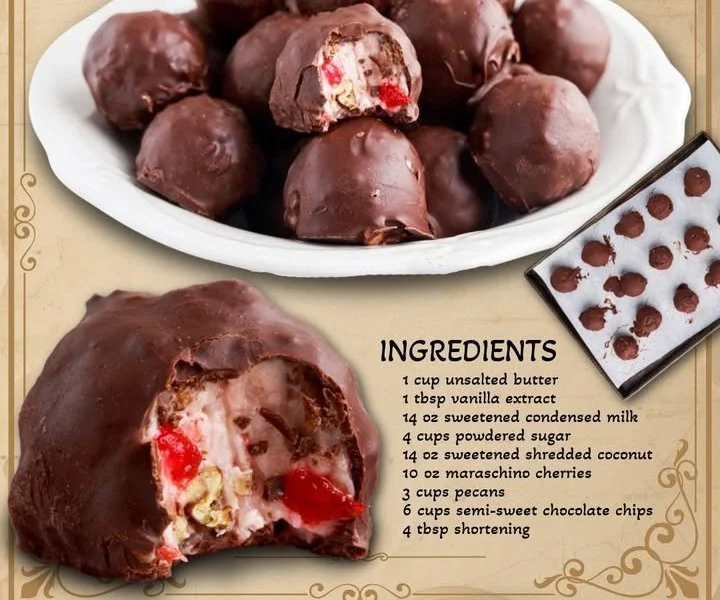
- 1 cup unsalted butter, softened
(Go for real butter—it makes the filling extra rich and creamy.) - 1 tablespoon vanilla extract
(Good vanilla = better flavor! I love using Madagascar vanilla for that deep, warm note.) - 14 ounces sweetened condensed milk
(The essential ingredient that brings everything together and adds all the creamy sweetness.) - 4 cups powdered sugar
(Sift it to keep the filling perfectly smooth—no lumps here!) - 14 ounces sweetened shredded coconut
(This gives our candy that classic chewy texture. If you’re a coconut skeptic, trust me—this is the stuff that converts people!) - 10 ounces maraschino cherries, drained and chopped
(Pat them super dry with paper towels before chopping, so your filling isn’t watery.) - 3 cups pecans, chopped
(Toasted pecans take things up a notch—so worth the extra 5 minutes!) - 6 cups semi-sweet chocolate chips
(Melts beautifully for dipping. You can mix in some dark chocolate if you want a richer shell.) - 4 tablespoons shortening
(Makes your chocolate coat look shiny and snap perfectly when you bite in. Vegetable shortening works great.)
Step-by-Step Guide: Making the Perfect Martha Washington Candy
Okay, aprons on—let’s make some sweet memories!
-
Cream butter and vanilla:
In a big bowl, beat your softened butter with the vanilla extract. (Your kitchen will already start to smell amazing!) -
Add sweetened condensed milk:
Pour in the condensed milk and mix until smooth. (Try not to lick the spoon—yet.) -
Mix in powdered sugar:
Gradually add the powdered sugar, stirring as you go. The mixture should get thick and smooth—almost like frosting. -
Fold in coconut, cherries, and pecans:
Gently stir in your coconut, chopped maraschino cherries, and pecans. It’ll look lumpy, but that’s perfect! (This is where all the texture magic happens.) -
Form into balls:
Scoop small portions (about a heaping tablespoon each) and roll them into balls. Set them on a baking sheet lined with parchment paper. -
Chill:
Pop the tray in the fridge for at least an hour, or until the candy is nice and firm. (If you’re impatient, the freezer speeds things up.) -
Melt the chocolate and shortening:
In a double boiler over low heat, melt the chocolate chips with the shortening, stirring constantly until silky and smooth. -
Dip the candy balls:
Using a fork or toothpick, dip each chilled ball into the chocolate, letting the excess drip off. Place them back on the baking sheet. -
Chill again:
Once they’re all dipped, put the tray back in the fridge until the chocolate sets.
Pour yourself a cup of coffee—it’s time to celebrate your candy-making skills!
My Secret Tips and Tricks for Martha Washington Candy Success
Over the years, I’ve made my fair share of these festive chocolates. (Maybe too many? Nah!) Here’s what I’ve learned about Martha Washington Candy and old-fashioned chocolate candy recipes in general:
- Be patient with chilling: The firmer your centers are before dipping, the easier your candies will be to handle (and the prettier your chocolate shell).
- Dry your cherries well: Excess moisture from cherries can make your candies fall apart—so blot, blot, blot!
- Don’t skip the shortening: It’s the secret to getting chocolate that’s glossy and easy to bite through—just like a box of store-bought chocolates.
- Go nuts (or don’t): If you’re not a pecan fan, substitute with walnuts, almonds, or skip the nuts entirely for an allergy-friendly candy.
- Adapt the chocolate: Play with dark chocolate, milk chocolate, or even swirl a little white chocolate for fun!
Creative Variations and Ingredient Swaps
Here’s where you can really make this dessert your own (and accommodate just about anyone):
- Nut-free: Swap pecans for sunflower seeds, pumpkin seeds, or a little extra coconut for a nut-free treat.
- Cherry alternatives: Try dried cranberries or dried apricots if maraschino cherries aren’t your thing.
- Chocolate coating: Mix in a little espresso powder for a mocha twist, or try milk chocolate chips for a softer, sweeter taste.
- Add-ins: Toss in a handful of mini chocolate chips or a pinch of sea salt on top before the chocolate sets for a gourmet touch.
It’s still homemade candy—just with an extra little personality!
How to Serve and Store Your Martha Washington Candy
When it comes to serving Martha Washington Candy, presentation goes a long way:
- Arrange on a pretty tray: Line up your candies on a festive platter, or set each one in a mini cupcake liner for a professional touch.
- Pack for gifting: Layer them in decorative tins between sheets of wax paper for a perfect homemade holiday gift.
- Store: Keep your chocolate candies in an airtight container in the fridge for up to 2 weeks. They freeze beautifully, too—just defrost in the fridge overnight. (Trust me, out-of-the-freezer candies hit that ice-cold sweet spot.)
FAQs: Your Top Questions About Martha Washington Candy Answered
1. Can I make Martha Washington Candy ahead of time?
Absolutely! This is the perfect make-ahead chocolate candy. In fact, I think they taste even better after sitting in the fridge overnight.
2. Do I have to use sweetened condensed milk?
Yes—this is the magical ingredient that holds the whole mixture together and gives the filling its creamy, old-fashioned taste.
3. Can I freeze Martha Washington Candy?
You bet! Just layer them with wax paper in a covered container, and freeze for up to 2 months. Thaw in the fridge before serving for the best texture.
4. What if I don’t have shortening?
You can use coconut oil (refined, for no flavor) in the chocolate coating. Butter technically works too, but the finish won’t be as shiny.
5. How do I keep the chocolate coating smooth and glossy?
Don’t overheat the chocolate—low and slow in the double boiler does the trick for that perfect, glossy shell (so classic homemade candy!).
If you end up with chocolatey hands and a few extra smiles, you’re doing it right. I hope this Martha Washington Candy recipe brings as much joy (and sweet nostalgia) to your kitchen as it’s brought to mine. Happy candy making—don’t forget to treat yourself to the first bite!