So Yummy Birthday Party Treats
So Yummy Birthday Party Treats: Easy and Irresistible Dessert Squares
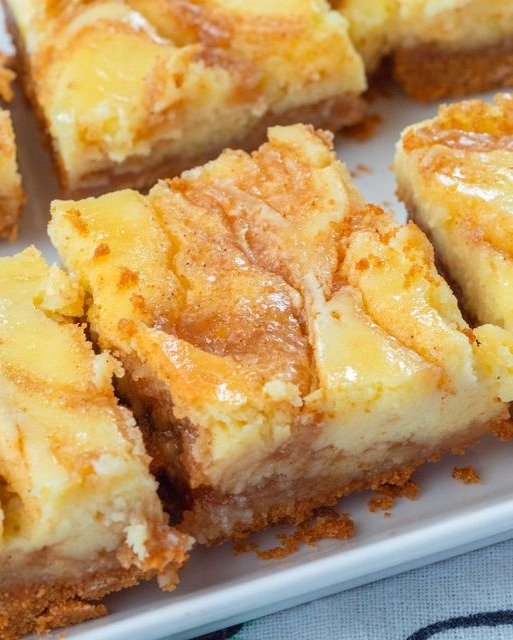
Whipping up So Yummy Birthday Party Treats is like wrapping yourself in a warm, fuzzy blanket after a long day. There’s something magical about that rich, buttery aroma wafting through the kitchen when these delightful squares are baking away. The soft, chewy texture combined with just the right amount of sweetness feels like a hug on a plate.
Perfect for busy weeknights, cozy family dinners, or weekends full of joy and laughter, this recipe has a charming simplicity that’s hard to resist. Honestly, there might have been a tiny mishap with flour flying everywhere when I got a little too excited mixing things together. But hey, a little mess is just part of the fun, right?
Background & Origin
Simple baked treats have been a staple in many homes for generations, creating sweet memories for families. This recipe finds its roots in classic butter square desserts that became popular for their ease and deliciousness. The science behind it? Creaming butter and sugar creates air pockets that help the squares rise and become delightfully fluffy, while the eggs bind everything together for that perfect soft texture.
What makes this version stand out is its straightforward method, making it easy for even the most novice of bakers to create a homemade treat. No fuss, no fancy techniques—just mix, bake, and indulge!
{image_template}
Ingredients
To make your So Yummy Birthday Party Treats, you’ll need:
- 1 cup of all-purpose flour
- 1/2 cup of sugar
- 1/2 cup of butter, softened
- 2 large eggs
- 1 teaspoon of vanilla extract
- 1/2 teaspoon of baking powder
- 1/4 teaspoon of salt
- 1 cup of chocolate chips or sprinkles (optional)
Helpful Notes
- Use room temperature ingredients for best results.
- If desired, chop the chocolate chips finely or let your kids help with the sprinkles!
- Don’t have chocolate chips? Feel free to experiment with nuts or dried fruits.
- For a slightly different flavor, consider adding a teaspoon of almond extract.

Step-by-Step Instructions
- Preheat your oven to 350°F (175°C) and line a baking pan with parchment paper.
- In a bowl, cream together the softened butter and sugar until light and fluffy—this takes about 2-3 minutes.
- Beat in the eggs one at a time until fully incorporated, then stir in the vanilla.
- In another bowl, whisk together the flour, baking powder, and salt. Gradually mix these dry ingredients into the wet ingredients until just combined. You want to see a few flour streaks—no need to overmix!
- Fold in chocolate chips or sprinkles if you’re feeling festive.
- Pour the batter into the prepared pan and spread it out evenly.
- Bake for 20-25 minutes, or until a toothpick inserted in the center comes out clean. Your house will smell like a bakery by now!
- Allow to cool before cutting into squares and serving. Patience can be hard, but letting it cool ensures they set beautifully!
Pro Tips & Common Mistakes
- Flavor Boosters: A pinch of cinnamon or a dash of espresso powder can elevate the taste.
- Texture Tricks: For extra chewy squares, don’t overbake them! Aim for a slight golden edge.
- What NOT to Do: Avoid using cold butter; it won’t mix well and can create lumps.
- Prep-Ahead Tips: You can mix the batter the night before and store it in the fridge until you’re ready to bake.
- Smart Shortcuts: Use store-bought frosting to top your squares if you want something extra special without the hassle.
Variations & Substitutions
- Want it vegan? Substitute the eggs with flax eggs and use non-dairy butter.
- For a gluten-free version, swap with a 1:1 gluten-free flour blend.
- Looking for a lighter option? You can try reducing the sugar by 1/4 cup.
- Make it kid-friendly by adding colorful sprinkles instead of chocolate chips.
- Feeling adventurous? Toss in some shredded coconut or peanut butter for a unique twist!
Serving Suggestions
These delightful squares pair wonderfully with a scoop of vanilla ice cream or a dollop of whipped cream. A refreshing glass of milk or a rich cup of coffee can bring out all the goodness too. For a cozy homemade touch, arrange them on a rustic platter with fresh berries or mint leaves, just to impress!
Storage, Freezing & Reheating
Your beautifully baked squares will keep in the fridge for about a week. If you want to freeze them, wrap the squares tightly in plastic wrap and then foil to avoid freezer burn. They’ll last for about 2-3 months. When you’re ready to enjoy again, simply thaw at room temperature or pop them in the microwave for a few seconds!
Nutrition & Health Notes
Each square roughly contains around 150-200 calories, depending on the add-ins. If you’re looking to lighten it up, substituting a portion of the butter with unsweetened applesauce can cut fat while adding moisture.
FAQ – Frequently Asked Questions
- Can I make So Yummy Birthday Party Treats ahead of time?
- How do I thicken or thin it?
- What substitutions work best?
- Can I double or halve the recipe?
- What cookware should I use?
- Can I make it dairy-free or meat-free?
- What sides go well with it?
Conclusion
I hope you feel inspired to bake these comforting So Yummy Birthday Party Treats in your own kitchen! They’re not just a dessert; they’re a little piece of joy that you can share with family and friends. I’d love to hear how yours turn out—did you add any fun twists of your own? Comment below, rate the recipe, and share your thoughts! Happy baking!