Homemade Chocolate-Covered Ice Cream Bars
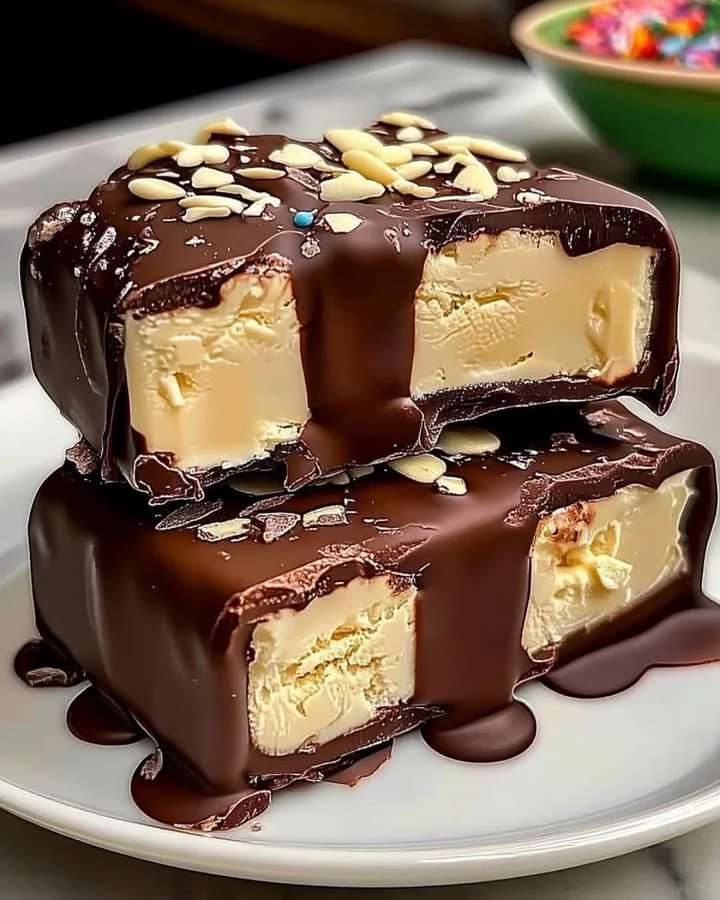
Homemade Chocolate-Covered Ice Cream Bars: Summer Nostalgia on a Stick
There’s something downright magical about biting into a homemade chocolate-covered ice cream bar on a hot afternoon. I remember those long, sun-soaked summers as a kid—bare feet, sticky fingers, and that unmistakable thrill of chasing down the ice cream truck. But you know what’s even better than nostalgia? Making your own homemade chocolate-covered ice cream bars, right in your kitchen, with all your favorite toppings (and no need to outrun the neighborhood kids). It’s a simple dessert, but it brings with it a huge dose of happiness—trust me, one bite and you’ll be hooked.
Why You’ll Adore These Homemade Chocolate-Covered Ice Cream Bars
I’m so excited to share this recipe with you because it’s:
- Ridiculously customizable. Whether you’re craving vanilla, chocolate, or something wild like pistachio, these ice cream bars have you covered. Plus, the toppings—nuts, cookies, sprinkles—are all fair game!
- Kid-friendly and fun for everyone. Seriously, making these homemade treats is just as much fun as eating them (and yes, adults have full permission to decorate wildly).
- Perfect for beating the heat. There’s nothing like a cold, creamy chocolate-covered ice cream bar on a blazing day.
- Absolutely nostalgic. There’s a special kind of joy that comes from making a treat that feels straight out of childhood—minus the artificial stuff and with all your favorite flavors mixed in.
Ingredients You’ll Need for Chocolate-Covered Ice Cream Bars
Let’s dive into what you’ll need for these homemade ice cream bars:
- Vanilla ice cream (or any flavor you love): Creamy classics like vanilla work beautifully, but if you’re feeling adventurous, try chocolate, strawberry, or even something dairy-free for a vegan twist.
- Melting chocolate (milk, dark, or white): I like using a good-quality baking chocolate or chocolate chips; they melt smoothly and taste amazing. Choose dark chocolate for a richer bite, or white for a sweeter treat.
- Crushed nuts (almonds, peanuts, or pistachios): For that extra crunch! Toasting the nuts first makes them even more flavorful.
- Crushed cookies (Oreos, graham crackers, digestive biscuits): This adds fun texture and a cookie-dough-like vibe to every bite.
- Sprinkles: Let’s be honest—everything’s better with sprinkles. Go wild with rainbow, chocolate, or themed varieties.
- Popsicle sticks: You’ll want sturdy sticks that can handle some big-time dipping action.
Step-by-Step Guide: Making the Perfect Chocolate-Covered Ice Cream Bars
Ready? Let’s make those chocolate-covered ice cream bars (and I promise, it’s easier than you think):
-
Prepare the Ice Cream:
Scoop your chosen ice cream into a rectangular dish or silicone mold. Press it down firmly to create an even 1–2-inch layer. Gently insert popsicle sticks into the ice cream—about halfway in so they’re sturdy. Pop the whole thing into the freezer for a solid 4 hours (overnight is totally fine!). -
Melt the Chocolate:
Place your chocolate (chopped or in chips) in a microwave-safe bowl. Heat in 30-second bursts, stirring well each time, until smooth and glossy. Set the bowl aside to cool slightly—hot chocolate can melt your ice cream too quickly. -
Coat the Ice Cream Bars:
Once the ice cream is rock-solid, remove the block and cut into bars (if not using molds). Working quickly, dip each bar into the melted chocolate, letting any excess drip back into the bowl. Pro tip: Use a spoon to help cover the whole bar in chocolate. -
Add Toppings:
While the chocolate is still glossy, sprinkle or press on your toppings. Crushed nuts, cookie crumbs, sprinkles, or, honestly, whatever you’re craving. -
Freeze Again:
Place your finished bars on a parchment-lined baking sheet and return to the freezer for at least 30 minutes—this helps the chocolate fully set and keeps everything nice and crisp. -
Serve and Enjoy:
Unleash your inner child! Grab a bar, take a big bite, and enjoy that perfect blend of creamy, crunchy, chocolatey goodness.
My Secret Tips and Tricks for Chocolate-Covered Ice Cream Bar Success
- Work quickly! Once the ice cream hits warm chocolate, it can melt fast. Arrange your toppings so you can move from dipping to decorating in seconds.
- Chill your dipping chocolate. If the chocolate’s too hot, your ice cream will melt into a puddle. Let it cool for a few minutes, stirring occasionally, before dipping.
- Freeze your bars hard. Don’t skimp on the freezing time before and after dipping. Super-firm bars mean cleaner coatings and less mess.
- Try layered ice creams. Scoop two (or more!) flavors in your mold for a swirled or layered bar—think cookies-and-cream meets coffee, or strawberry with chocolate fudge.
- Don’t stress about perfection. Honestly, part of the homemade charm is those little imperfections. Drips, smears, and uneven toppings? Totally delicious.
Creative Variations and Ingredient Swaps
One of my favorite parts about these homemade chocolate-covered ice cream bars is how easy it is to switch things up:
- Dairy-Free Bars: Swap in your favorite non-dairy ice cream and choose vegan-friendly chocolate for a plant-based treat.
- Nut-Free Option: Skip the crushed nuts in favor of just cookies or sprinkles, or try shredded coconut for a fun twist.
- Fruity Swaps: Dip cherry, berry, or mango ice cream and roll them in freeze-dried fruit powders.
- Flavor Bombs: Add a dash of vanilla extract, espresso powder, or a sprinkle of sea salt to your melted chocolate for a grown-up upgrade.
- Holiday Makeover: Color-code your sprinkles or toppings to match the season—think red, white, and blue for summer, or orange and black for Halloween.
How to Serve and Store Your Chocolate-Covered Ice Cream Bars
Homemade chocolate-covered ice cream bars are best served straight from the freezer (they melt fast on a hot day!). For parties, I like to pile them up on a chilled platter with lots of napkins nearby.
- Storing leftovers: Place the finished bars between sheets of parchment paper in an airtight container. They’ll stay fresh in your freezer for up to 2 weeks (if they even last that long!).
- Taking them on-the-go: Wrap each bar in wax paper and freeze in advance. Perfect for summer picnics or backyard get-togethers.
FAQs: Your Top Questions About Homemade Chocolate-Covered Ice Cream Bars Answered
Can I make these chocolate-covered ice cream bars in advance?
Absolutely! Prep them up to a week ahead. Just keep them sealed in the freezer until you’re ready to serve.
What’s the best chocolate for dipping ice cream bars?
Go with a good-quality melting chocolate or chocolate chips. If you want a firm, snappy shell, you can add a teaspoon of coconut oil to the melted chocolate for better hardening.
My chocolate coating keeps sliding off—help!
Make sure your bars are super frozen and your chocolate is just warm (not hot). Working quickly is key. Also, dry off any ice crystals on the surface before dipping.
Can kids help make these homemade treats?
Definitely! Kids love decorating with sprinkles and toppings. Just watch the chocolate melting step (it can get hot).
Can I use homemade ice cream?
Of course! If you’re up for it, churn your favorite homemade ice cream for an extra-special touch—it makes these bars even dreamier.
If you give these homemade chocolate-covered ice cream bars a try, let me know how it goes! Share your wildest topping combos, your silliest chocolate drips, and, most importantly, your biggest summer smiles. There’s nothing quite like a little homemade magic to turn any day into a celebration—so go ahead, grab a stick, and dig in.