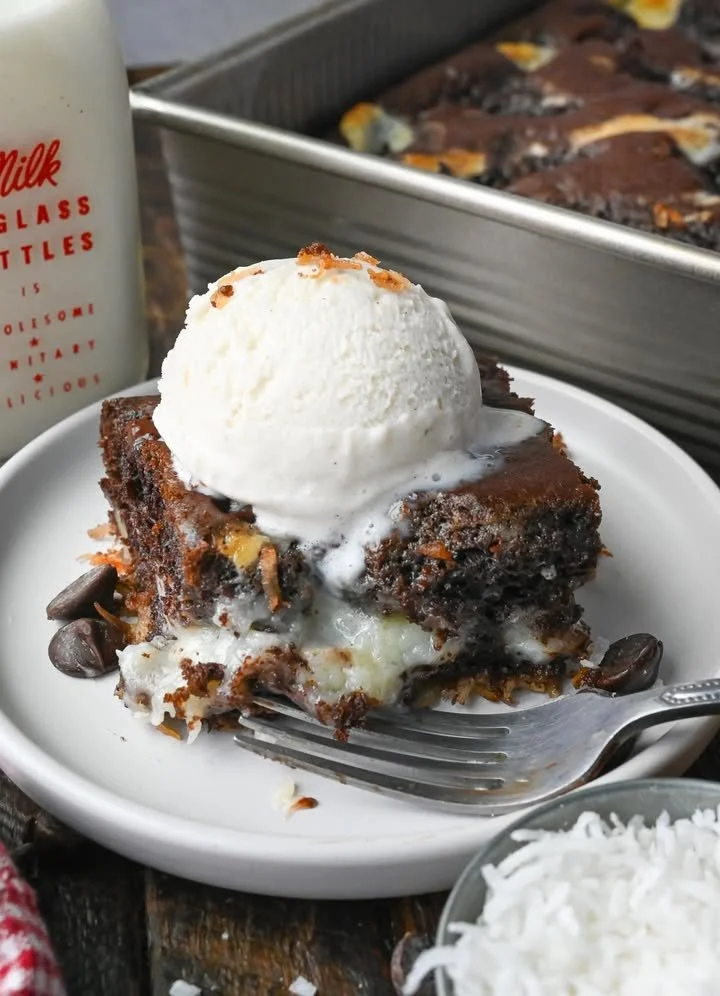
Chocolate Earthquake Cake
That One Time I Fell in Love With Chocolate Earthquake Cake
I still remember the first slice like it was yesterday: school was out for the summer, and my neighbor, Mrs. Benny, would invite us kids over for snacks. On her kitchen counter, cooling in a battered old 9×13 pan, was her legendary chocolate earthquake cake. Gooey swirls of melted chocolate, a lush layer of tangy cream cheese, and crunchy bites of pecan…it was love at first messy bite! Every forkful was a happy, chaotic combination—just like childhood itself (and yes, I begged for seconds).
So today, I’m sharing my very favorite version of this easy, decadent chocolate dessert. If you’re searching for an easy earthquake cake that feels both nostalgic and drool-worthy, this is the one you’ll want to bake, share, and savor (and probably not share, honestly—no judgment!).
Why You’ll Adore This Chocolate Earthquake Cake
Let’s be real: there are a million reasons to fall for chocolate earthquake cake, but here are my top picks:
- It’s Foolproof: Whether you’re a seasoned baker or, like me, tackling this with two kids glued to your hip, this easy dessert is practically impossible to mess up.
- Layers of Texture & Flavor: Imagine biting through rich chocolate cake, creamy cheesecake, gooey chocolate chips, toasty coconut, and crunchy pecans—all in one.
- Perfect for Chocolate Lovers: Got a chocolate craving that won’t quit? This cake delivers on deep chocolate flavor, especially with chocolate chips sprinkled everywhere.
- Crowd-Pleaser: Bring this homemade cake to potlucks, holidays, or random Tuesdays. It vanishes faster than you can say “just one more bite.”
- Comfort in a Pan: There’s something about the messy, swirled layers that’s pure comfort food—especially fresh from the oven.
Ingredients You’ll Need for Chocolate Earthquake Cake
Here’s what you’ll want to have ready before you start baking your chocolate earthquake cake (plus a few personal pointers!):
- 1 package chocolate cake mix: Use your favorite brand (devil’s food or dark chocolate works great for that rich cocoa kick).
- 1 cup water: Room temp helps everything combine smoothly.
- 1/2 cup vegetable oil: Keeps the cake layer ultra-moist (can swap for melted butter if you’re feeling decadent).
- 3 large eggs: Let them come to room temperature for an extra fluffy texture.
- 1 cup powdered sugar: Adds sweetness and structure to the cream cheese layer.
- 1 package cream cheese (8 oz): Softened—leave it out while you preheat the oven for easy mixing.
- 1 cup shredded coconut: Adds a chewy, tropical layer (toast it beforehand for even more flavor—chef’s kiss!).
- 1 cup chopped pecans: Gives that irresistible crunch and a little nutty warmth. Walnuts work too!
- 1 cup chocolate chips: Semi-sweet is my go-to, but milk or dark chocolate chips are equally dreamy.
Step-by-Step Guide: Making the Perfect Chocolate Earthquake Cake
Here’s how I whip up this easy chocolate dessert—trust me, every step is doable (even if the kids are “helping”):
- Preheat & Prep: Fire up your oven to 350°F (175°C). Grease and flour a 9×13-inch baking pan. (Pro tip: a little parchment on the bottom saves on scrubbing later.)
- Cake Batter: In a big bowl, stir together the chocolate cake mix, water, oil, and eggs until well combined. Don’t over-mix—just until it’s smooth. Pour half the batter into your prepared pan.
- Cream Cheese Layer: In a medium bowl, beat the softened cream cheese until creamy. Add the powdered sugar and mix until silky.
- Layer It Up: Gently spread the cream cheese mixture over the cake batter (it’s okay if you don’t get every corner—it’ll swirl a bit in the oven).
- Top with Goodies: Sprinkle on shredded coconut, chopped pecans, and chocolate chips. Seriously, don’t skimp here—this is the best part!
- Finish Batter: Pour the remaining cake batter evenly over all the delicious toppings.
- Bake: Bake for 40-45 minutes, or until a toothpick inserted into the center comes out almost clean. (If you hit a chip, try a different spot.)
- Cool & Serve: Let it cool so the layers can set (patience is a virtue, trust me), then slice and enjoy, preferably with a glass of cold milk!
My Secret Tips and Tricks for Earthquake Cake Success
Through lots of trial, error, and kitchen messes, I’ve got a few secrets:
- Room Temperature is Key: Take your eggs and cream cheese out ahead of time for a smoother batter and fluffier cake layer.
- Let It Cool Before Cutting: I know, the smell is outrageous, but cooling helps those gooey chocolate and cream cheese swirls set up perfectly.
- Don’t Overmix: Stir just until the cake batter comes together—you want a tender crumb, not a tough cake.
- Check Early: All ovens run a little differently. Test with a toothpick around the 38-minute mark (there might be melted chocolate, so look for just a few moist crumbs).
- Storage: Earthquake cake keeps well, covered, at room temp for up to 3 days—or in the fridge if your house is warm. The flavors get even richer the next day!
Creative Variations and Ingredient Swaps
Making chocolate earthquake cake your own is half the fun! Try these tweaks:
- Nut-Free: Skip the pecans for allergies—sunflower seeds or extra coconut make a great substitute.
- Flavor Twists: Add a teaspoon of espresso powder or instant coffee to the batter for mocha magic.
- White Chocolate Earthquake Cake: Use a white cake mix and swap chocolate chips for white or peanut butter chips.
- Swirl in Jam: Dollop in a little raspberry or cherry jam with the cream cheese for a fruity surprise.
- Seasonal Add-ins: Toss in crushed peppermint candies at Christmas or mini marshmallows for extra gooeyness.
How to Serve and Store Your Chocolate Earthquake Cake
Serving up slices of earthquake cake isn’t just dessert—it’s an event. Here’s how I do it:
- Warm or Room Temp: Heat a slice in the microwave for 10 seconds for max gooey-ness. (Pair with vanilla ice cream or coffee for a real treat!)
- Storing Leftovers: Cover tightly with foil or plastic wrap. It’ll stay fresh at room temp for 2-3 days, or pop it in the fridge for up to a week.
- Freezing: Cut cooled cake into squares, wrap in plastic, and freeze for up to 2 months. Thaw on the counter for the quickest dessert fix ever.
FAQs: Your Top Questions About Chocolate Earthquake Cake Answered
Q: Can I use homemade chocolate cake instead of a box mix?
A: Absolutely! A homemade chocolate cake recipe works beautifully and lets you control the level of cocoa (just use about 4 cups of batter).
Q: Do I have to use pecans?
A: Nope! Swap in your favorite nuts (or leave them out if you prefer a nut-free chocolate dessert).
Q: Why is it called “earthquake cake”?
A: Because the crunchy, creamy, and gooey layers end up all swirled and cracked, just like a tasty kitchen “earthquake” happened!
Q: Can I double this recipe for a bigger crowd?
A: For sure—just use two pans or a larger one (and add a few minutes to the bake time).
Q: Can earthquake cake be made ahead?
A: Yes! In fact, it tastes even better the next day as those flavors melt together. Just store covered at room temp or chill in the fridge.
Nothing says “home” quite like a generous square of chocolate earthquake cake—all swirls, cracks, and rich, comforting goodness. Whether you bake it to chase away the gloom or to sweeten a celebration, I hope you love it as much as I do. If you try this recipe, let me know how your own “earthquake” turned out in the comments below!