Red Velvet Marble Cupcakes
Red Velvet Marble Cupcakes: A Swirl of Sweet Memories
I can still remember the first time I bit into a red velvet marble cupcake—it wasn’t just a treat, it was an experience. The day was chilly, I’d just come in from a walk, and the whole kitchen was scented with butter, cocoa, and that hint of tangy cream cheese frosting that always feels like a warm hug. What makes these red velvet marble cupcakes so unforgettable for me isn’t just their gorgeous swirls or the pop of color in the frosting, but how baking them always brings everyone together—kids swirling batters, friends “taste-testing” the icing, and that sweet moment when you bite in and find the raspberry ripple surprise. If you’re searching for a decadent, crowd-pleasing dessert, these red velvet marble cupcakes are about to become your new favorite bake.
Why You’ll Adore This Red Velvet Marble Cupcake Recipe
Let me tell you why this is more than just another cupcake recipe:
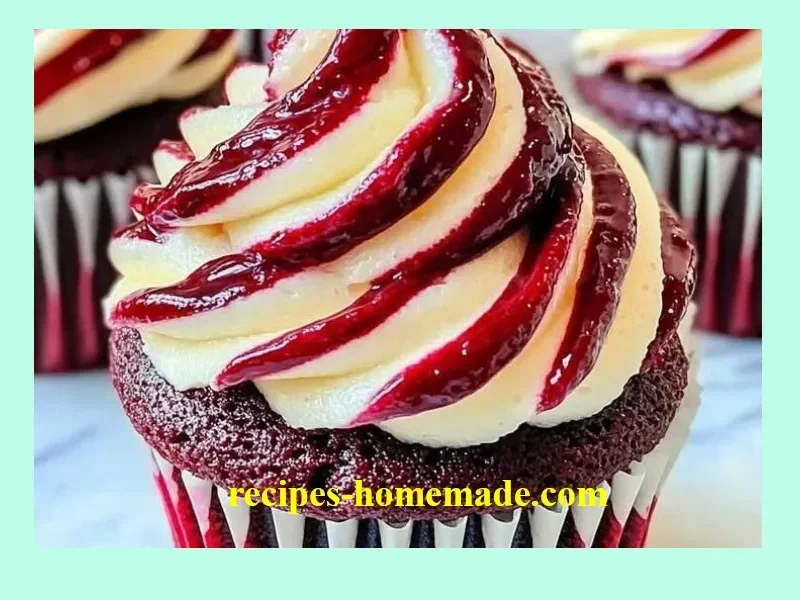
- Eye-Catching & Elegant: That beautiful red and white marble swirl isn’t just pretty to look at—it feels like you’ve made bakery-level treats at home (hello, Instagram-ready!).
- Unbelievable Flavor Depth: The classic red velvet cocoa note meets tangy buttermilk and rich cream cheese frosting, plus a pop of raspberry in every bite. It’s a party for your taste buds.
- Perfect for Every Occasion: Whether you’re baking for Valentine’s Day, birthdays, or just because, these make every table feel special.
- Seriously Fun to Make: Swirling the batters and frosting is like edible art. Kids and friends love to join in (and sneak a fingerful of icing, too).
Ingredients You’ll Need for Red Velvet Marble Cupcakes
Here’s everything you’ll want to have on hand, with some of my favorite shopping and prep tips:
- For the cupcakes:
- 1 1/4 cups all-purpose flour (I like King Arthur for a soft crumb)
- 1 tbsp cocoa powder (unsweetened natural—don’t skip! It brings the velvet)
- 1/2 tsp baking soda (for gentle lift)
- 1/4 tsp salt (balances the sweet)
- 1/2 cup buttermilk (brings that classic tang; whole milk + lemon juice works in a pinch)
- 1 tsp white vinegar (helps the batter react & lifts the texture)
- 1 tsp vanilla extract (real vanilla—makes a difference)
- 1/2 cup unsalted butter, softened (room temp means no lumps)
- 3/4 cup granulated sugar (classic for red velvet)
- 2 large eggs (room temp eggs blend in smoothly)
- Red gel food coloring (start small, add more as you blend)
- For the frosting:
- 8 oz cream cheese, softened (let it sit out for 30 minutes—trust me)
- 1/2 cup unsalted butter, softened (creamy frosting needs soft butter!)
- 2 1/2 cups powdered sugar (sifted for ultra-smooth icing)
- 1 tsp vanilla extract (for a cozy, familiar flavor)
- 1/2 cup seedless raspberry preserves or raspberry puree (look for thick, quality jam—St. Dalfour is a fave)
- Red gel food coloring (optional, for a bolder pink swirl in the frosting)
Step-by-Step Guide: Making the Perfect Red Velvet Marble Cupcakes
Let’s bake these beauties together! Here’s how I do it (with a few personal tidbits along the way):
- Preheat & Prep: Set your oven to 350°F (175°C). Line your cupcake tin with 12 paper liners—pick your prettiest ones!
- Sift Dry Ingredients: In a medium bowl, whisk together flour, cocoa, baking soda, and salt. Mixing well here stops any lumps later.
- Mix Buttermilk Blend: In a measuring cup, whisk buttermilk, vinegar, and vanilla. This combo makes your cupcakes tender and tangy.
- Cream Butter & Sugar: In your largest mixing bowl, beat butter and sugar until it’s really light and fluffy—if you think you’ve whipped enough, give it another 30 seconds.
- Add Eggs: Beat in eggs one at a time, scraping the bowl. This keeps your batter silky.
- Red Food Coloring: Add the gel food coloring now. Go for a deep red—remember, it fades a bit as it bakes.
- Combine Wet & Dry: Alternate adding the dry mix and buttermilk blend, beginning and ending with flour. Mix just until smooth—don’t overdo it!
- Fill Liners: Spoon batter evenly into the liners (an ice cream scoop makes this easy).
- Bake: Bake for 18–20 minutes, or until a toothpick comes out clean. Don’t overbake—moist crumb is key!
- Cool Completely: Let cool in the pan for 5 minutes, then transfer to a rack. Trust me, frosting melts on warm cupcakes (patience pays off).
- Swirled Frosting: Beat cream cheese & butter until fluffy. Add vanilla and powdered sugar—beat again. Meanwhile, stir a drop of red coloring into the raspberry preserves for a vibrant swirl.
- Piping Bag Magic: Spoon frosting into one side of a piping bag, raspberry mixture into the other. Gently swirl, then pipe on a generous flourish to each cupcake. It’s messy-fun but worth it!
- Serve With Love: Invite someone to watch the inside marble pattern with you—every cupcake is a unique masterpiece.
My Secret Tips and Tricks for Red Velvet Marble Cupcake Success
Want bakery-worthy red velvet cupcakes every time? Here’s what I’ve learned:
- Room Temp Everything: Cold ingredients don’t blend well; leave out butter, eggs, and cream cheese for at least 30 minutes.
- Gel Food Coloring over Liquid: Gel gives intense, even color (and doesn’t water down your batter like liquid dyes).
- Don’t Skip the Vinegar: It reacts with the baking soda for that signature pillowy crumb.
- Chill the Frosting: If your kitchen’s warm and the cream cheese frosting gets soft, pop it in the fridge for 10 minutes before piping.
- For Swirl Perfection: When swirling the raspberry, use a gentle hand; too much mixing muddies the effect—think marbled, not blended.
- Test Bake: Since everyone’s oven is a little different, check at 18 minutes. Overbaking dries out red velvet cupcakes fast!
Creative Variations and Ingredient Swaps
Let’s make these red velvet marble cupcakes your own (and fit every craving!):
- Chocolate Lover’s Marble: Add a tablespoon of mini chocolate chips to the batter, or swirl in a bit of melted dark chocolate instead of preserves.
- Berry Swirl: Use blueberry or blackberry jam if you’re out of raspberry—any thick, seedless preserve works.
- Gluten Free: Sub in your favorite all-purpose GF flour blend (I’ve had success with Cup4Cup).
- Dairy Free: Use vegan butter, plant-based buttermilk (like almond milk with vinegar), and dairy-free cream cheese for the frosting.
- Lemon Berry: For a fresh twist, add lemon zest to the frosting and swap raspberry preserves for a homemade lemon curd swirl.
How to Serve and Store Your Red Velvet Marble Cupcakes
Serving:
- These red velvet marble cupcakes look (and taste) best when freshly frosted—set them out on a pretty platter and watch them disappear!
- Sprinkle with crushed freeze-dried raspberries or white chocolate curls for extra flair.
Storing:
- Store leftovers in an airtight container in the fridge for up to 3 days (the frosting keeps everything soft).
- For extra freshness, bring to room temp before serving—cold cupcakes = dense crumb!
- Unfrosted cupcakes freeze well. Wrap tightly and freeze for up to 2 months; thaw, then frost as desired.
FAQs: Your Top Questions About Red Velvet Marble Cupcakes Answered
Can I make the red velvet cupcakes ahead of time?
Absolutely! Bake the cupcakes a day in advance, store in an airtight container (no need to refrigerate if plain), and frost the day you’re serving.
Why is buttermilk important in red velvet cupcakes?
Buttermilk’s tangy flavor and acidity help create that classic red velvet texture and taste. If you don’t have buttermilk, mix 1/2 cup whole milk with 1 teaspoon lemon juice or vinegar and let it sit for 5 minutes.
How do I get the perfect marble effect in my cupcakes and frosting?
Be gentle and don’t over-mix—swirl just enough to see distinct streaks for that classic red velvet marble cupcake appearance.
How do I prevent the frosting from being too runny?
Start with very soft—but not melted—butter and cream cheese. If it feels loose, chill it for 10–15 minutes, then continue to beat until fluffy.
Can I make mini red velvet marble cupcakes?
You sure can! Just reduce the bake time to 10–12 minutes; they’re adorable for parties or lunchbox treats.
I truly hope these red velvet marble cupcakes bring a little extra joy to your kitchen—as they have to mine. If you bake them, I’d love to hear how you made them your own! Leave a comment, share a photo, or just let me know how many swirls ended up on your apron (zero judgment, promise). Happy baking!