Chocolate Pudding Recipe

A Cup of Cozy: My Go-To Chocolate Pudding Recipe
There’s something about whipping up a homemade chocolate pudding recipe that transports me right back to my childhood kitchen. I can almost hear my mom’s laughter and smell the comforting aroma of warm cocoa drifting through the house. Chocolate pudding isn’t just an easy dessert—it’s a hug in a bowl, the kind that soothes the roughest days and makes everyday moments feel special. Whether you’re craving a nostalgic treat or looking to impress your family with a silky-smooth chocolate dessert, this simple recipe is always a winner. Let’s dive in together and create a chocolate pudding that feels just like home!
Why You’ll Adore This Chocolate Pudding Recipe
I’ll be honest—this chocolate pudding recipe is pure joy in every spoonful. Here’s why it’s always in my dessert rotation:
- Ridiculously Easy: Seriously, you don’t need to be a pastry chef. If you can stir and pour, you’re halfway there!
- Lusciously Creamy: Thanks to the cornstarch (the secret thickener!), you get a dessert with that irresistible, melt-on-your-tongue texture.
- Deep Chocolate Flavor: Using unsweetened cocoa powder and a dash of vanilla extract, the flavor is rich but never overwhelming.
- Perfectly Sweet: Just sweet enough to satisfy a craving—without sending you into a sugar coma!
- Loved by All Ages: My picky nephew and my chocoholic friends both agree—it’s a pudding everyone falls for.
Ingredients You’ll Need for Chocolate Pudding
Before you get started, let’s round up what you’ll need. (Don’t worry—all easy-to-find, pantry staples!)
- Milk (2 cups / 500 ml): I usually use whole milk for that ultra-creamy texture, but nut milks work for dairy-free friends.
- Granulated Sugar (1/2 cup / 100 g): Keeps things perfectly sweet—feel free to scale back a bit if you prefer darker chocolate.
- Unsweetened Cocoa Powder (1/4 cup / 30 g): Go for good-quality cocoa—it makes all the difference in deep, chocolatey flavor.
- Cornstarch (1/4 cup / 30 g): This magic ingredient transforms runny chocolate milk into a thick, velvety pudding.
- Salt (1/4 tsp): Just a pinch—that tiny hit balances the sweetness and elevates the chocolate.
- Vanilla Extract (1 tsp): Adds an aromatic, warm note that rounds out the flavors.
- Butter (2 tbsp / 30 g): Stirred in at the end for richness and gloss (skip if making it vegan!).
- Optional: Chopped Chocolate or Chocolate Chips: Stir in a handful during the final step if you want extra decadence!
Step-by-Step Guide: Making the Perfect Chocolate Pudding
Ready? Let’s make some magic:
- Mix Dry Ingredients: In your favorite medium saucepan, whisk together sugar, cocoa powder, cornstarch, and salt (no fancy tools—just a good whisk!).
- Add Milk Slowly: Gradually whisk in the milk, a little at a time. This helps avoid lumps—no one wants clumpy pudding.
- Heat and Stir: Set your saucepan over medium heat. Keep stirring gently but constantly to prevent sticking. In about 5–8 minutes, your mixture will thicken and start to bubble.
- Boil Briefly: Once it’s bubbling, let it boil (still stirring!) for about 1–2 minutes. This helps the cornstarch fully activate—no runny pudding here.
- Finish With Butter & Vanilla: Pull the saucepan off the heat. Add butter and vanilla extract, stirring until silky and fully melted. If you’re feeling extra, stir in some chopped chocolate or chocolate chips now.
- Dish It Up: Pour the pudding into individual bowls or a big family-style dish.
- Cool Off: Let it cool just a bit. Press plastic wrap directly onto the surface—this prevents a “pudding skin” (unless you secretly love that, like my dad does!).
- Chill & Serve: Pop in the fridge for at least 2 hours. Good things come to those who wait!
Bonus tip: Taste before you chill. If you want it more chocolatey, whisk in a bit of melted chocolate right away (no one’s judging).
My Secret Tips and Tricks for Chocolate Pudding Recipe Success
Okay, here’s the scoop—these little moves make all the difference:
- Sift the cocoa powder and cornstarch together first. I’ve skipped this before, but it really does prevent lumps (smooth chocolate pudding is the goal).
- Keep an eye on the heat. Medium heat is key. Too hot, and you’ll scorch the bottom. Too low, and it’ll take forever.
- Taste as you go. Want it a touch less sweet? Hold back a tablespoon of sugar and give it a taste test mid-cook.
- Plastic wrap trick. Press it directly onto the surface. No pudding skin unless you’re into it!
- Use real vanilla extract. I once used imitation vanilla and trust me—it’s not the same. The real deal just sings in this recipe.
If you ever wondered how to make the creamiest homemade pudding, these chocolate dessert tips are truly lifesavers!
Creative Variations and Ingredient Swaps
Want to put your own spin on this easy chocolate pudding? Here’s how I sometimes change things up (especially for guests or dietary swaps):
- Dairy-Free/Vegan: Use full-fat canned coconut milk or almond milk. Skip the butter or use vegan margarine. The result? Still super creamy!
- Extra Chocolatey: Stir in 1/2 cup mini chocolate chips or 2 oz chopped dark chocolate right at the end for a double chocolate pudding.
- Mocha Twist: Swap 1/4 cup of the milk with strong brewed coffee (trust me—it’s divine for coffee lovers).
- Spiced Chocolate: Add a tiny pinch of cinnamon, or even a dash of cayenne for Mexican-inspired chocolate pudding.
- Lighter Option: Use reduced-fat milk, though the result will be slightly less rich.
Don’t be afraid to play! Homemade chocolate pudding is wonderfully forgiving, and the flavor combos are endless.
How to Serve and Store Your Chocolate Pudding
Here’s how we enjoy and keep our pudding fresh:
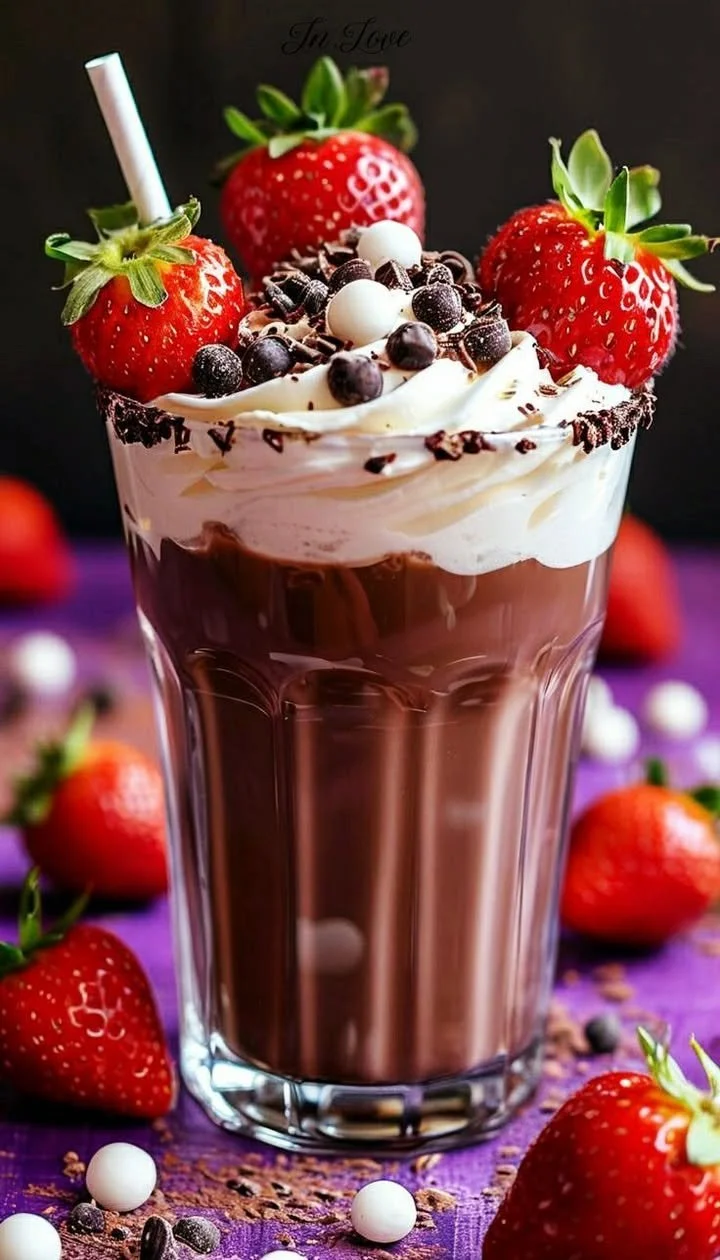
- Serving Suggestions: Top with whipped cream, fresh berries, a dusting of cocoa powder, or even a sprinkle of sea salt for a modern touch (kids love rainbow sprinkles too!).
- Make-Ahead: This easy dessert is better when chilled for a few hours—flavors deepen!
- Storage: Cover tightly with plastic wrap (touching the pudding surface) and refrigerate. Keeps for up to 4 days—if it lasts that long!
- Pack for Lunch: Pour into little jars for grab-and-go snacks or school treats (homemade pudding always gets rave reviews from my family).
FAQs: Your Top Questions About Chocolate Pudding Recipe Answered
1. Can I freeze chocolate pudding?
Technically, yes, but I don’t recommend it—freezing changes the smooth texture, so it may get watery when thawed.
2. How do I avoid lumpy pudding?
Whisk, whisk, whisk! Add the milk slowly, and keep stirring over medium heat. Sifting your dry ingredients first also helps (see my tips above).
3. Can I make this chocolate pudding gluten-free?
Absolutely! Cornstarch is naturally gluten-free, making this an easy gluten-free dessert as written.
4. What’s the best cocoa powder to use?
Any good, unsweetened cocoa works great—but I love Dutch-process for extra smoothness and dark color.
5. Can I double this recipe?
For sure! Just use a bigger saucepan and stir a little longer so it cooks evenly.
I hope this homemade chocolate pudding recipe brings a little sweetness and comfort to your kitchen—just like it does in mine. If you give it a try, let me know how it goes or tag me in your photos. Here’s to happy, chocolatey moments shared (even if it’s just you, a spoon, and the end of a long day)!
Happy cooking,
[Your Name]