Bumpy Cake
Bumpy Cake
If you’re craving something goofy, nostalgic, and totally delicious, this bumpy cake is your new go-to. It’s that sort of dessert that looks fancy but is actually just a clever trick with a boxed cake mix, marshmallow fluff, and a whipped chocolate topping. Trust me — it’s easier than it looks.
I made something like this on a rainy afternoon once and ended up with frosting on my sleeve and a kitchen that smelled like chocolate heaven. If you like fuss-free boxed-mix desserts, you might also enjoy my take on a 5-ingredient cake.
This recipe is perfect for when you want a showstopper without a lot of drama. Also: I totally once cut the bumps too deep and the cake tore a bit — no one cared, it just tasted better.
Why This Bumpy Cake Works
- Quick and forgiving — uses a box chocolate cake mix so you can have dessert fast.
- Built-in texture contrast — the soft marshmallow fluff meets light, whipped chocolate for a fun bite.
- Crowd-pleaser look — those little waves (the bumps) make it feel homemade and special.
- Beginner-friendly — no fancy piping or layers, just simple spreading and a serrated knife.
Quick cooking insight: whipping a little heavy cream into the frosting lightens it and stops the topping from feeling too dense. It’s a small step that makes a big difference.
Also, if you love nostalgic layer cakes, check out this cozy write-up of Amalia’s cake for more inspiration.
Ingredients You’ll Need
- 1 box chocolate cake mix — any brand will do.
- 3 eggs — room temperature is best.
- 1 cup water — use the amount called for on your box if it differs.
- 1/2 cup vegetable oil — neutral flavor keeps the cake moist.
- 1 jar marshmallow fluff — this becomes the fluffy “bumps.”
- 1 cup chocolate frosting — store-bought or homemade.
- 1/2 cup heavy cream — whipped and folded into the frosting.
Notes:
- Marshmallow fluff is the key to the bumpy look — it spreads thick and holds shape.
- If you want a slightly sweeter or denser marshmallow layer, try switching to a thicker white frosting from recipes like Amalia’s sugar cake for ideas on textures.
Kitchen Tools
- Rectangular (9×13-inch) baking pan
- Mixing bowl and whisk (or electric mixer)
- Serrated knife
- Rubber spatula or offset spatula
- Measuring cups
- Electric mixer or whisk for whipping cream
These are all basic items — nothing fancy. If you’ve got a serrated knife and an offset spatula, you’re set.
Step-by-Step Instructions
- Preheat the oven and prepare the cake mix according to the package directions (typically eggs, water, and oil).
- Bake the cake in a rectangular pan as directed on the box. It should be set in the center and slightly springy.
- Let the cake cool completely in the pan. This matters — if it’s warm the fluff will melt and you’ll lose the bumps.
- Once cooled, use a serrated knife to create bumps by cutting shallow, wavy slices across the top. Think gentle waves, not tunnels. You want ridges that hold a dollop of fluff.
- Spread the marshmallow fluff over the bumps. Use a spoon or spatula to dollop and then lightly drag it so the bumps stay defined.
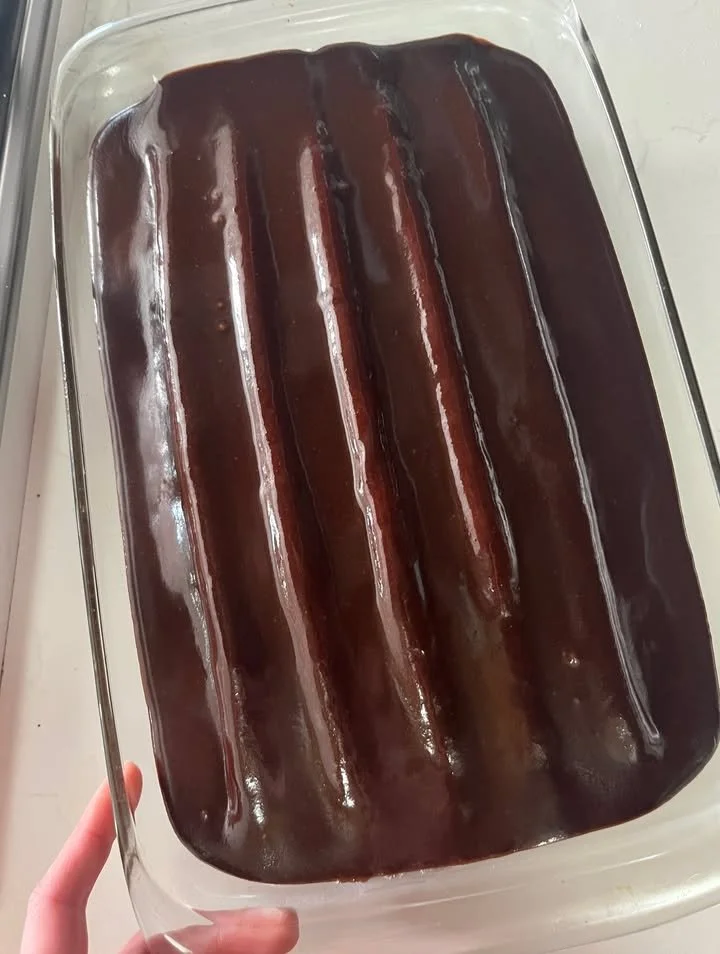
- In a separate bowl, whip the heavy cream until it holds soft peaks, then fold it into the chocolate frosting until smooth and airy.
- Spread the frosting mixture over the marshmallow layer, sealing the sides if you like a neater look.
- Chill in the refrigerator for a few hours (2–4) before serving — this helps everything set and makes cutting cleaner.
Visual cues: when the cake is done, it should pull slightly from the pan edges and a toothpick comes out with a few moist crumbs. The whipped cream should look light and pillowy before you fold it into the frosting.
Pro Tips for Success
- Use a serrated knife and a light hand when making bumps; shallow wavy cuts give the best look without breaking the cake.
- Cool completely — I can’t stress this enough. Warm cake + marshmallow = meltdown.
- If your marshmallow fluff is stubborn, warm the jar slightly (10–15 seconds in the microwave) and stir for a smoother spread.
- Chill the assembled cake at least a couple hours so slices come out neat. Patience pays off here.
Real kitchen confession: I once forgot to let the cake cool and my first attempt looked like a marshmallow lava flow. It still tasted fine, but you do want it tidy.
Common Mistakes to Avoid
- Cutting too deep — makes the cake fall apart. Keep cuts shallow.
- Spreading fluff on warm cake — it melts and you lose the bump shape.
- Overwhipping the cream — stops being silky and becomes grainy. Aim for soft peaks.
- Rushing the chill time — slices will smear if the cake isn’t set.
If something goes wrong, don’t stress — it’ll still taste fantastic. Presentation is just the icing (well, and fluff).
Variations and Substitutions
- Chocolate-lover’s version: use a fudgy boxed mix and add a few tablespoons of cocoa to the frosting.
- Fruity twist: spread a thin layer of raspberry jam under the marshmallow for a tart contrast.
- Dairy-free option: swap heavy cream for full-fat coconut cream and use dairy-free frosting.
- For a more decadent showstopper, try the technique in this amazing cake post for layering tips.
These swaps are simple and keep the recipe approachable.
What to Serve With This Recipe
This cake stands well on its own, but here are a few good pairings:
- A scoop of vanilla ice cream for warm-cold contrast.
- Fresh berries to cut the sweetness.
- Coffee or a milk-based drink for dunking.
If you’re into boozy chocolate desserts, this other recipe — Baileys chocolate cake with buttercream frosting — is a great companion for special occasions.
Storage and Leftovers
- Refrigerator: Store slices in an airtight container for 3–4 days. The marshmallow will soften a bit but still be delicious.
- Freezer: You can freeze baked, unfrosted cake layers for up to 2 months. Thaw in the fridge before assembling.
- To serve from chilled: let slices sit at room temp for 10–15 minutes for softer texture.
Slices keep best when chilled and cut with a sharp knife wiped between cuts.
FAQ (People Also Ask Style)
Q: Can I make this ahead of time?
A: Yes — assemble and chill up to 24 hours ahead. Longer than that and the marshmallow may soften more.
Q: Can I use homemade frosting instead of a jar?
A: Absolutely. Any chocolate frosting works; folding in whipped cream lightens store-bought frosting nicely.
Q: Can I freeze the whole assembled cake?
A: I don’t recommend freezing the fully assembled cake — the marshmallow texture changes badly. Freeze layers instead.
Q: What pan is best for the bumps?
A: A 9×13-inch rectangular pan gives the most surface area for waves, but a slightly smaller or larger pan is fine; adjust baking time.
Q: Can I make this gluten-free?
A: Yes — use a gluten-free chocolate cake mix and confirm your marshmallow fluff and frosting are GF.
Quick Recipe Summary
Prep time: 20 minutes (plus chilling)
Cook time: according to cake mix (usually 25–35 minutes)
Servings: about 12
Ingredients
- 1 box chocolate cake mix
- 3 eggs
- 1 cup water
- 1/2 cup vegetable oil
- 1 jar marshmallow fluff
- 1 cup chocolate frosting
- 1/2 cup heavy cream
Short steps
- Prepare and bake cake per package directions; cool completely.
- Cut shallow wavy bumps with serrated knife.
- Spread marshmallow fluff over bumps.
- Whip cream and fold into frosting, then spread over fluff.
- Chill 2–4 hours, slice, and serve.
Final Thoughts
Give this bumpy cake a try next time you want an easy-but-impressive dessert. Don’t worry about perfection — some of my best desserts started as mishaps. If you make it, tell me how it turned out and whether your bumps were artful or totally accidental. Either way, there will be chocolate, and that’s what matters.