DIY Aroma Stones
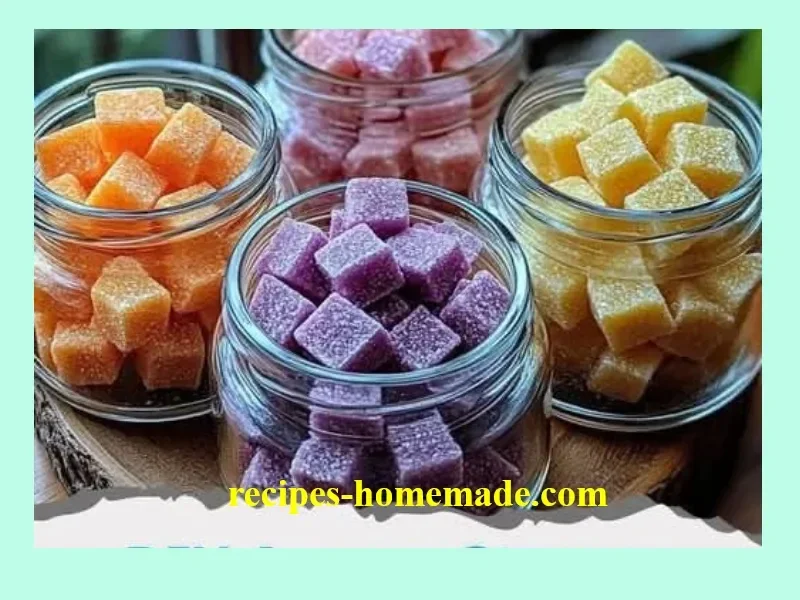
Easy Homemade DIY Aroma Stones — A Traditional, Healthy, & Natural Air Freshener
1️⃣ Title:
Easy Homemade DIY Aroma Stones — Traditional, Healthy, & Homemade Natural Air Freshener
2️⃣ Introduction (Storytelling + Emotion)
I still remember the soft, lemony scent that drifted from my grandmother’s linen closet on Sunday mornings — simple, comforting, and somehow like home. That memory is why I love making DIY Aroma Stones: they’re an easy, homemade way to bottle a small moment of calm and sprinkle it through your day.
DIY Aroma Stones are perfect for freshening a bedroom, brightening a weeknight reset, gifting at holidays or housewarmings, and adding a natural scent to cars, closets, or bathrooms. They’re gentle, long-lasting, and feel like a tiny act of self-care you can make with your hands.
3️⃣ 🧂 Ingredients:
- 2 cups baking soda (odor-absorbing base)
- 1 cup cornstarch (binds and smooths)
- 1 1/4 cups water (adjust as needed for consistency)
- Food coloring or natural pigments (optional — a few drops)
- 10–20 drops essential oils of your choice (lavender, lemon, eucalyptus, rosemary, peppermint)
- Silicone molds or small cookie cutters (stone shapes, hearts, stars)
- Mixing bowl, whisk, spoon, and a small funnel or dropper for oils
- Wax paper or cooling rack for drying
- Optional: dried flowers, activated charcoal powder, or glitter (eco-friendly) for decoration
Notes: This recipe is naturally vegan and gluten-free (cornstarch is typically gluten-free; check packaging if you have celiac concerns). For pet-friendly homes, choose pet-safe essential oils — more on that in Tips & Variations.
4️⃣ 👩🍳 Directions:
- In a large mixing bowl, whisk together 2 cups baking soda and 1 cup cornstarch until evenly combined.
- Slowly add 1 1/4 cups water, stirring continuously until you reach a thick paste — like damp sand. Add a little more water if it seems too dry.
- If using color, divide the mixture into portions and add a drop or two of food coloring or natural pigment to each. Mix until color is uniform. (Tip: use gloves to avoid staining hands.)
- Decide when to add essential oils:
- Method A (strong scent now): Add 10–15 drops essential oil per batch and stir thoroughly.
- Method B (best scent retention): Form and dry the stones first, then add oil drops after drying (recommended for baking/oven drying).
- Press the mixture firmly into silicone molds or shape stones by hand. Tap the mold gently to remove air bubbles and smooth the tops. Add dried flowers or a sprinkle of activated charcoal for contrast while mixture is wet.
- Drying options:
- Air-dry: Place stones on wax paper or a rack and let them dry 24–48 hours, flipping once so both sides cure evenly.
- Oven method (faster): Preheat oven to 200°F (90–95°C). Place stones on a baking sheet lined with parchment and bake 60–120 minutes, flipping halfway. Keep an eye on them — they should harden but not brown.
- Once completely dry and hard, remove gently from molds. If you didn’t add oils before drying, use a dropper to add 2–4 drops of essential oil to each stone now. Allow oils to absorb 1–2 hours before placing them around the house.
- Enjoy! Place stones in small bowls, sachets, drawers, cars, or gift boxes. Refresh scent with a few drops of oil every 2–6 weeks.
Total hands-on time: ~15–30 minutes. Drying time: 24–48 hours (air) or 1–2 hours (oven).
5️⃣ 💡 Tips & Variations:
- Pet & Kid Safety: Avoid tea tree, eucalyptus, citrus oils around birds and some cats. Lavender and chamomile are generally safer for humans and many pets, but always research each oil for your household.
- Natural color: Use beet powder for pink, spirulina for green, or turmeric for golden hues instead of artificial dyes.
- Longer-lasting scent: Seal stones with a light brush of Mod Podge or diluted white glue after drying for slower oil release. Test on one stone first.
- Activated charcoal variation: Add 1–2 tsp activated charcoal to the batter for odor-neutralizing “black stone” air purifiers ideal for bathrooms.
- Herbal add-ins: Mix in dried lavender, rosemary, or citrus zest for visual interest and layered fragrance.
- Gift-ready: Package in small muslin bags with a ribbon and a care note (“Refresh with 1–2 drops of oil every few weeks”).
- Refreshing idea: For a burst of scent, warm a stone gently (place on a warm radiator or in a low oven for a few minutes) — never heat stones with essential oils in an open flame.
- Storage: Keep extra stones in an airtight container to preserve scent for up to 6 months.
Healthy-swap notes (because the recipe guidance asked!): this DIY is already naturally vegan, gluten-free, and "low-carb" (it’s not food), but if you’re avoiding certain ingredients, substitute cornstarch with arrowroot powder for a different texture.
7️⃣ 🩺 Health & Lifestyle Tie-in (Optional)
Aromatherapy can help reduce stress, boost focus, and improve sleep — lavender for relaxation, peppermint for alertness, citrus for mood. Choosing non-toxic, high-quality essential oils can support a healthier home environment and reduce exposure to synthetic fragrances linked to sensitivity. Plus, making your own DIY Aroma Stones is budget-friendly: a small investment in bulk baking soda, cornstarch, and oils goes a lot further than costly single-use air fresheners or plastic diffuser refills. In the long run, small healthy choices at home can contribute to personal well-being — and potentially save on health-related expenses down the line.
Safety note: If you have respiratory issues, young children, or pets, consult guidance about which oils are safe to use at home.
8️⃣ Conclusion
Simple, little, and soul-soothing — these DIY Aroma Stones are an easy homemade project that brings a traditional, healthy scent into your everyday life. They make sweet gifts, low-waste decor, and a calming companion on rainy afternoons.
If you try this recipe, let me know in the comments or tag me — I’d love to see your versions and favorite scent blends! If you want my go-to silicone molds or essential oil brands (affiliate picks), check the links in my sidebar for my favorites. Happy crafting!
DIY Aroma Stones
Ingredients
Method
- In a large mixing bowl, whisk together 2 cups baking soda and 1 cup cornstarch until evenly combined.
- Slowly add 1 1/4 cups water, stirring continuously until you reach a thick paste — like damp sand. Add a little more water if it seems too dry.
- If using color, divide the mixture into portions and add a drop or two of food coloring or natural pigment to each. Mix until color is uniform. (Tip: use gloves to avoid staining hands.)
- Decide when to add essential oils: Method A (strong scent now): Add 10–15 drops essential oil per batch and stir thoroughly. Method B (best scent retention): Form and dry the stones first, then add oil drops after drying (recommended for baking/oven drying).
- Press the mixture firmly into silicone molds or shape stones by hand. Tap the mold gently to remove air bubbles and smooth the tops. Add dried flowers or a sprinkle of activated charcoal for contrast while mixture is wet.
- Drying options: Air-dry: Place stones on wax paper or a rack and let them dry 24–48 hours, flipping once so both sides cure evenly. Oven method (faster): Preheat oven to 200°F (90–95°C). Place stones on a baking sheet lined with parchment and bake 60–120 minutes, flipping halfway.
- Once completely dry and hard, remove gently from molds. If you didn’t add oils before drying, use a dropper to add 2–4 drops of essential oil to each stone now. Allow oils to absorb 1–2 hours before placing them around the house.
- Enjoy! Place stones in small bowls, sachets, drawers, cars, or gift boxes. Refresh scent with a few drops of oil every 2–6 weeks.