Black Forest Brownie Sundae Stack
The Black Forest Brownie Sundae Stack: My Favorite Indulgent Dessert
There’s something magical about those moments when chocolate, cherries, and celebration come together in one truly decadent bite. My first memory of enjoying a Black Forest Brownie Sundae Stack goes back to a rainy Saturday, sitting at my grandmother’s kitchen table while she whipped cream and melted chocolate with a patience only grandmas have. Even now, just thinking about that warm, fudgy chocolate brownie, sweet-tart cherries, and mountains of fluffy whipped cream makes me feel like a little kid again.
If you’re craving a special treat, this Black Forest Brownie Sundae Stack really is next-level—a love letter to the classic Black Forest cake, but with a gooey, brownie twist. Trust me, if you adore chocolate desserts, want an easy yet show-stopping treat, or simply love combining cherry and chocolate flavors, you’re in for a sweet adventure.
Why You’ll Adore This Black Forest Brownie Sundae Stack
- Chocolate Lovers’ Paradise: The brownies are rich, deeply chocolatey, and wonderfully fudgy—perfect for anyone who dreams in cocoa and craves an easy dessert that feels luxurious.
- Sweet Nostalgia: The mix of whipped cream, fresh cherries, and chocolate drizzle is basically Black Forest cake, but way less fussy and much more fun to make (and eat!) with family or friends.
- Impress Without Stress: This homemade brownie sundae stack looks incredible and always gets “oohs” and “aahs,” but the steps are simple. (A win for beginner bakers or last-minute planners!)
- Customizable Joy: Whether you go classic or get creative with toppings and swaps, this base Black Forest dessert is a blank canvas for your sundae dreams.
Ingredients You’ll Need for Black Forest Brownie Sundae Stack
Here’s what you’ll want on hand for brownie sundae bliss. A few quick tips and notes from my kitchen:
- Unsalted Butter (1 cup / 225g): Always use unsalted so you control the flavor—bring it to room temp for easy melting.
- Dark Chocolate (8 oz / 225g), chopped: Go for a bar with 60–70% cocoa for rich flavor. Chocolate chips work, but a good-quality bar melts smoother.
- Sugar (1 1⁄2 cups / 300g): Regular granulated is perfect—no fancy sugars needed.
- Large Eggs (4): Room temperature eggs blend better and help the brownies stay fudgy.
- Vanilla Extract (1 tsp): Real vanilla boosts everything; don’t skip it!
- All-Purpose Flour (1 cup / 125g): Just enough for structure; keep those brownies dense and chewy.
- Cocoa Powder (1⁄4 cup / 30g): Opt for Dutch-process if you love deep flavor, but natural works too.
- Pinch of Salt: Don’t be shy—salt makes all the chocolate flavors sing.
- Fresh or Jarred Cherries (1 cup, pitted & halved): Fresh in summer, jarred or even frozen in winter. Pat jarred cherries dry to avoid excess moisture.
- Whipped Cream & Fresh Cherries (for topping): Homemade whipped cream is best, but I won’t judge if you go the spray can route.
- Chocolate Syrup or Ganache: Drizzle away! Homemade ganache takes 2 minutes if you’re feeling fancy.
- Optional: Shaved Chocolate for extra wow.
Step-by-Step Guide: Making the Perfect Black Forest Brownie Sundae Stack
Let’s build this cherry-chocolate masterpiece together. You’ve got this!
- Preheat & Prep: Set your oven to 350°F (175°C). Grease and line an 8×8-inch baking pan—parchment paper is your best friend for easy removal.
- Melt Chocolate & Butter: In a heatproof bowl, melt the butter and chopped chocolate together. (I use short bursts in the microwave, stirring frequently—but stovetop over a double boiler works too.) Cool for 5 minutes.
- Whisk in Sugar: Add sugar to the melted chocolate and mix well. This bit is always my favorite—the glossy texture is SO satisfying!
- Add Eggs & Vanilla: Whisk in eggs one at a time, mixing well after each, followed by the vanilla extract.
- Sift Dry Ingredients: To guarantee no lumps, sift in flour, cocoa powder, and salt directly over the bowl. Gently fold everything together—no overmixing, just until you see no streaks.
- Add Cherries: Fold in your cherries. Don’t be alarmed if the batter is thick—this makes those brownies ultra-fudgy.
- Bake: Pour into prepared pan and spread evenly. Bake 30-35 minutes, until the edges are set but the middle is still a bit soft (a toothpick should have fudgy crumbs).
- Cool & Slice: Cool completely—torture, I know!—before cutting into squares.
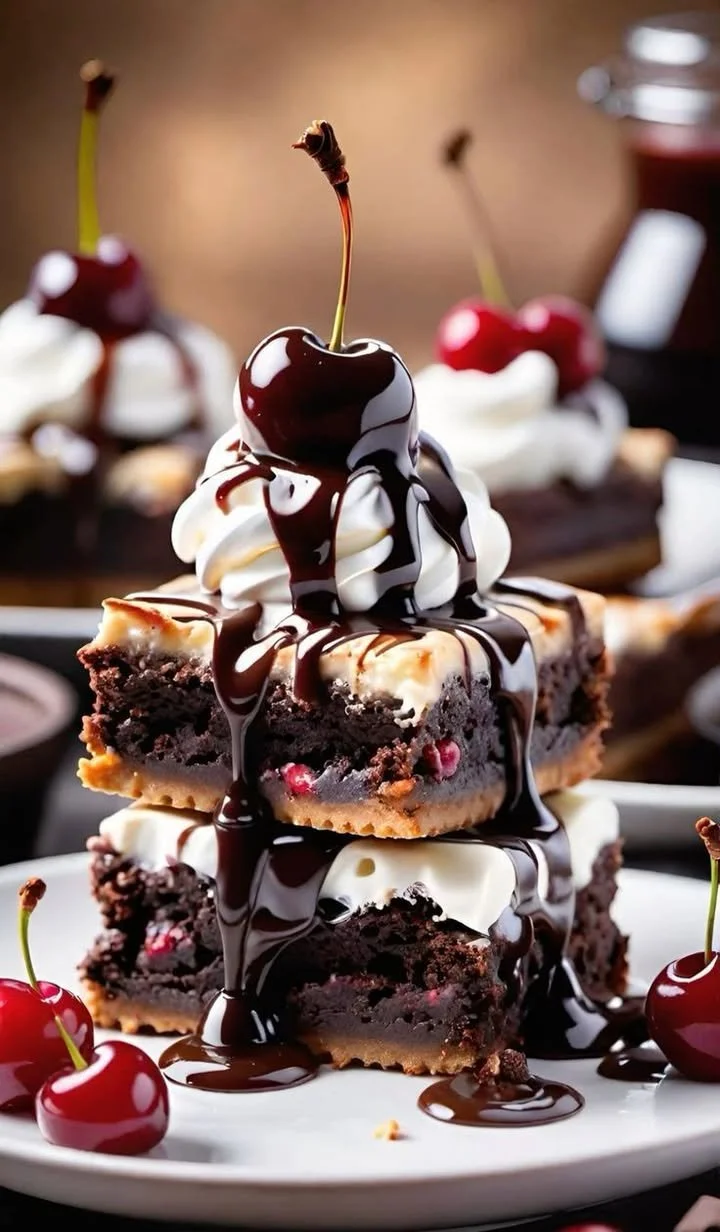
- Stack & Serve: Place a brownie square down, dollop or pipe on whipped cream, top with another brownie, more whipped cream, and a glossy cherry. Drizzle with chocolate syrup. You can add more shaved chocolate…and you should.
My Secret Tips and Tricks for Black Forest Brownie Sundae Stack Success
- Don’t Overbake: The magic word is fudgy. Pull your brownies when the edges are set but the center still looks just a tad underdone.
- Chill for Clean Cuts: Want those perfect, bakery-style brownie squares? Chill before slicing (a sharp, hot knife helps too!).
- Make Ahead for Parties: Brownies can be baked a day ahead and stored (airtight) at room temp. Build sundaes just before serving for the freshest taste.
- Use Seasonal Fruit: If fresh cherries aren’t in season, use jarred Morello cherries or even thawed frozen cherries—both bring out the classic Black Forest vibes.
Creative Variations and Ingredient Swaps
Mix it up to suit your cravings or what’s in your pantry:
- Swap the Cherries: Try raspberries or strawberries for a different berry twist, or even diced pears for winter warmth.
- Gluten-Free Black Forest Dessert: Substitute a good 1:1 gluten-free all-purpose flour blend for classic brownies.
- Make it Boozy: Brush brownie squares lightly with cherry liqueur—or mix a splash into the whipped cream for adults-only decadence.
- Vegan-Friendly: Use a plant-based butter and flax eggs, and swap in coconut cream for non-dairy whipped topping.
- Nutty Crunch: Add a handful of chopped walnuts or pecans to the batter for texture—delicious with chocolate and cherries!
How to Serve and Store Your Black Forest Brownie Sundae Stack
- Serving: I love piling these sundaes high on a small plate or shallow bowl. Top with an extra cherry (with the stem on for that perfect look!) and a heavy drizzle of chocolate syrup. Wonderful as a birthday cake alternative or for a “just because” dessert night.
- Storing: Unassembled brownies keep well in an airtight container for 3-4 days at room temperature (or freeze for up to a month—thaw before building sundaes). Only add whipped cream and fresh cherries when you’re ready to eat, or the cream can make them soggy.
- Leftovers: If you’ve got extra stacked sundaes (lucky you), store covered in the fridge and enjoy within a day—they’re still delicious, just a bit softer.
FAQs: Your Top Questions About Black Forest Brownie Sundae Stack Answered
Can I use boxed brownie mix instead of homemade?
Absolutely! If you’re pressed for time, your favorite fudge brownie mix works great—just stir in the cherries before baking and follow the stacking instructions.
Do I need to pit fresh cherries?
Yes—unless you love living dangerously! (Trust me, nobody likes biting into a pit.)
What’s the best way to melt my chocolate and butter?
You can microwave in 30-second bursts (stir after each) or melt gently over a double boiler for that classic kitchen experience.
Are these brownies cakey or fudgy?
Super fudgy—almost truffle-like in texture. For cakier brownies, use a little more flour.
Can I make these Black Forest sundaes ahead?
Bake the brownies and prep the toppings in advance, but assemble just before serving for the ultimate texture and wow factor.
Thanks so much for hanging out with me in the kitchen today. Whether you’re making this Black Forest Brownie Sundae Stack for a birthday, a cozy movie night, or just because you need a chocolate fix, I hope it brings as much joy to your table as it does to mine. If you try it, let me know in the comments—nothing makes me happier than hearing about your sweet successes!
Happy baking (and stacking)! 🍒🍫

Black Forest Brownie Sundae Stack
Ingredients
Brownie Ingredients
- 1 cup Unsalted Butter Bring to room temperature for easy melting.
- 8 oz Dark Chocolate, chopped Use chocolate with 60-70% cocoa for rich flavor.
- 1.5 cups Sugar Regular granulated sugar is perfect.
- 4 Large Eggs Should be at room temperature.
- 1 tsp Vanilla Extract Real vanilla boosts flavor.
- 1 cup All-Purpose Flour Provides structure for the brownies.
- 0.25 cup Cocoa Powder Dutch-process recommended for deeper flavor.
- 1 pinch Salt Enhances chocolate flavors.
- 1 cup Fresh or Jarred Cherries, pitted & halved Use fresh in summer or jarred/frozen in winter.
Toppings
- to taste Whipped Cream Homemade is preferred.
- to taste Chocolate Syrup or Ganache Drizzle as desired.
- to taste Shaved Chocolate Optional for decoration.
Instructions
Preparation
- Preheat your oven to 350°F (175°C). Grease and line an 8x8-inch baking pan with parchment paper.
- In a heatproof bowl, melt the butter and chopped chocolate together, stirring frequently. Allow to cool for about 5 minutes.
- Add sugar to the melted chocolate and mix well.
- Whisk in the eggs one at a time, followed by the vanilla extract.
- Sift flour, cocoa powder, and salt over the bowl and gently fold everything together until just combined.
- Fold in the pitted cherries into the brownie batter.
Baking
- Pour the batter into the prepared pan and spread evenly. Bake for 30-35 minutes, until the edges are set and the center is slightly soft.
- Let cool completely before cutting into squares.
Assembly
- Place a brownie square on a plate, dollop or pipe on whipped cream, top with another brownie, more whipped cream, and a cherry.
- Drizzle with chocolate syrup and add shaved chocolate if desired.