Butterscotch Layer Cake

Memories Drizzled in Butterscotch: My Butterscotch Layer Cake Story
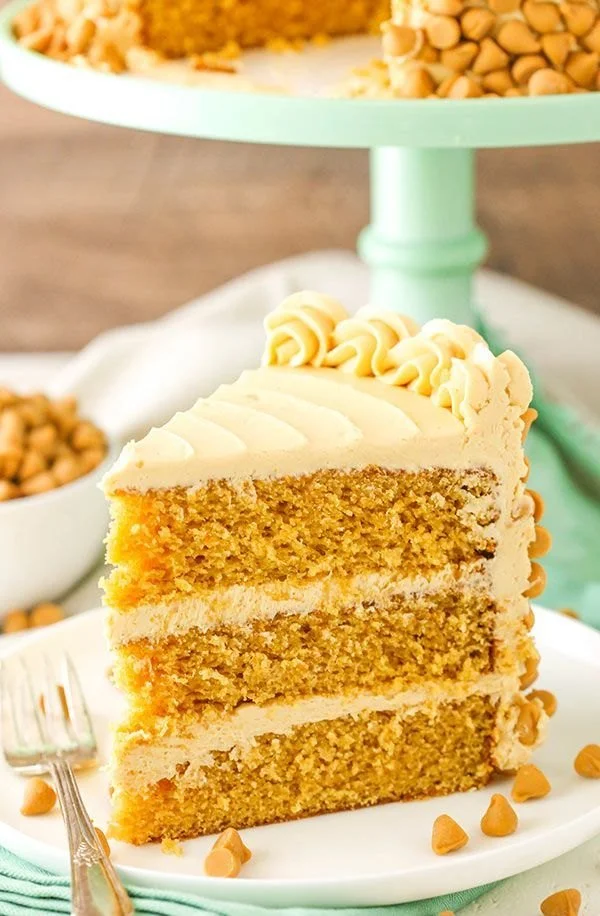
There are some recipes that instantly evoke a feeling of warmth—and for me, this homemade butterscotch layer cake is one of them. I still remember the first time my grandma let me help stir her famous butterscotch sauce, standing on a stool so I could just reach the stovetop (cheeks dusted with flour, waiting for that first golden drizzle I would always sneak a taste of). If you’re a lover of caramel-like, old-fashioned desserts, you’re in for a treat. This butterscotch layer cake wraps up all those cozy, nostalgic flavors in a slice of pure comfort—sweet memories included! Whether you’re celebrating something special or just craving a decadent, easy dessert, I promise this is the cake that’ll leave everyone swooning at your table.
Why You’ll Adore This Butterscotch Layer Cake
Let me gush for a second because, truly, this butterscotch cake is one of my proudest baking moments. Here’s why you need it in your life:
Incredibly Moist Texture: Thanks to rich brown sugar and a splash of milk, every bite is melt-in-your-mouth tender.
Homemade Butterscotch Magic: The star is obviously the silky butterscotch sauce (trust me, you’ll want to eat it with a spoon). It’s swirled into both the cake and frosting!
Crowd-Pleasing Flavors: That sweet, buttery, and slightly salty butterscotch flavor is equal parts comforting and sophisticated. It’s perfect for birthdays, holidays, or a cozy afternoon treat.
Impressive but Accessible: Even though it looks bakery-worthy, this homemade butterscotch cake is totally doable for bakers of all levels (promise!).
Ingredients You’ll Need for Butterscotch Layer Cake
Let’s break down what you’ll need for this show-stopper cake—and a few tips I’ve picked up along the way!
For The Cake:
- All-purpose flour (2 ½ cups): Classic, reliable, and creates a sturdy crumb.
- Brown sugar (2 cups): Light or dark both work—go dark for a deep, caramel-like flavor.
- Unsalted butter (1 cup, softened): Don’t skimp on quality. Softened butter helps the cake stay fluffy.
- Large eggs (4): Room temperature eggs mix best.
- Milk (1 cup): Whole milk makes it ultra-moist, but 2% works in a pinch.
- Vanilla extract (2 tsp): Real vanilla = big flavor.
- Baking powder (2 tsp) and Baking soda (½ tsp): Trusty leaveners for a perfect rise.
- Salt (½ tsp): Just enough to balance all that sweetness.
For the Butterscotch Sauce:
- Unsalted butter (½ cup): Melts into rich, gooey sauce.
- Brown sugar (1 cup): Yes, more! (You can’t overdo the brown sugar when it comes to real butterscotch.)
- Heavy cream (½ cup): For dreamy creaminess.
- Vanilla extract (1 tsp): Don’t skip!
- Pinch of salt: To round out the sweetness.
For the Butterscotch Frosting:
- Unsalted butter (1 cup, softened)
- Powdered sugar (4 cups): Sift if lumpy.
- Prepared butterscotch sauce (½ cup): The more, the merrier.
- Heavy cream (2–3 tbsp): For the silkiest spread.
- Pinch of salt
Tip: If you’re missing something, check out my swaps below!
Step-by-Step Guide: Making the Perfect Butterscotch Layer Cake
Take a deep breath, preheat your oven, and let’s do this together!
Whip Up the Butterscotch Sauce:
Melt ½ cup butter in a saucepan over medium heat. Stir in the brown sugar until it’s fully dissolved and thick, with that irresistible nutty aroma filling your kitchen. Slowly whisk in the cream—don’t rush here—then simmer for 3–4 minutes (it should look glossy and dreamy). Stir in vanilla and that pinch of salt. Let it cool completely. (Be warned: stray spoons will want to “test” it.)Bake the Cake Layers:
Cream your softened butter and brown sugar together until pale and fluffy. Add eggs, one at a time, beating between each so your batter stays beautifully smooth. Mix in the vanilla.- In a separate bowl, combine flour, baking powder, baking soda, and salt.
- Add the dry ingredients to your wet mixture, alternating with milk—start and end with the flour. This keeps your cake texture light!
- Stir in ½ cup cooled butterscotch sauce (the secret elixir!).
- Divide the batter evenly among three greased and floured 8-inch cake pans.
Bake at 350°F for 25–30 minutes (your kitchen will smell amazing). Check with a toothpick for doneness. Let cool completely on wire racks.
Make the Butterscotch Frosting:
Beat the butter until creamy; gradually add the powdered sugar, then the cooled butterscotch sauce. If the frosting looks too thick, splash in a bit of heavy cream. Beat until it’s dreamy and spreadable.Assemble the Beauty:
Spread frosting over each layer, stack ‘em high, and generously frost the sides and top. Don’t forget to drizzle extra butterscotch sauce over the top—so gooey, so gorgeous.
If you have little helpers (like my daughter!), let them go wild with drizzling or a handful of chopped pecans.
My Secret Tips and Tricks for Butterscotch Layer Cake Success
- Chill Out: If your butterscotch sauce is too warm, it’ll melt the frosting! Let it cool to room temp.
- Don’t Rush the Creaming: The lighter and fluffier your butter/sugar, the airier your homemade cake.
- Level Up: Use a serrated knife to trim domed cake tops. Your butterscotch cake layers will stack better.
- Love the Mess: This is a gooey cake—and that’s what makes it irresistible! Place some parchment under your cake stand for easy cleanup.
Whether you’re a layer cake beginner or a seasoned baker, these tips will guarantee a heavenly butterscotch layer cake every time.
Creative Variations and Ingredient Swaps
- Gluten-Free: Replace the all-purpose flour with a 1:1 gluten-free blend.
- Nutty Twist: Scatter toasted pecans or walnuts between layers for crunch.
- Salted Caramel Vibes: Sprinkle flaky sea salt over the finished cake for a sweet-salty treat (think butterscotch-meets-salted-caramel).
- Dairy-Free: Sub in plant-based butters and coconut cream for an allergy-friendly, still-yummy cake.
- Cupcakes: Pour batter into cupcake tins and reduce bake time to 16–20 minutes for adorable, grab-and-go treats.
Feel free to experiment! This butterscotch dessert is super forgiving, so don’t be afraid to get creative.
How to Serve and Store Your Butterscotch Layer Cake
Serving:
I love slicing this butterscotch cake with a big mug of coffee, or dressing it up with a scoop of vanilla ice cream (seriously—it’s next-level).Leftovers:
Store leftover butterscotch layer cake in an airtight container in the fridge for up to 5 days. Let slices come to room temp for the richest flavor. This homemade dessert is also freezer-friendly—just wrap slices tightly and thaw before serving.
Tip: If you don’t polish it off in the first day, it only gets more delicious as the flavors meld!
FAQs: Your Top Questions About Butterscotch Layer Cake Answered
1. Can I make butterscotch layer cake ahead?
Absolutely! Bake the cake layers a day in advance, wrap tightly, and assemble with fresh frosting before serving.
2. Can I use store-bought butterscotch sauce?
Honestly, I recommend homemade for the best flavor! But if you’re in a pinch, store-bought works—just look for one with real butter.
3. My cake turned out dense. What happened?
Make sure your butter is properly softened, and don’t overmix the batter once the flour is in. That keeps your butterscotch cake light and moist.
4. How do I keep my frosting from being too runny or stiff?
Start with room temp butter, and add cream slowly until you hit the perfect spreadable texture. If it’s too runny, add more powdered sugar; too stiff, add a splash more cream.
5. Can I make this as a sheet cake?
For sure! Bake in a 9×13-inch pan, but add a few extra minutes to the bake time and check with a toothpick.
Whether you’re hunting for your next birthday cake, a showy but easy dessert, or just want to relive the golden-brown flavors of old-fashioned butterscotch, this butterscotch layer cake is a must-bake. If you give it a try, let me know in the comments—there’s nothing I love more than sharing a slice of kitchen joy with fellow bakers! 🍰


