Candy Christmas Trees
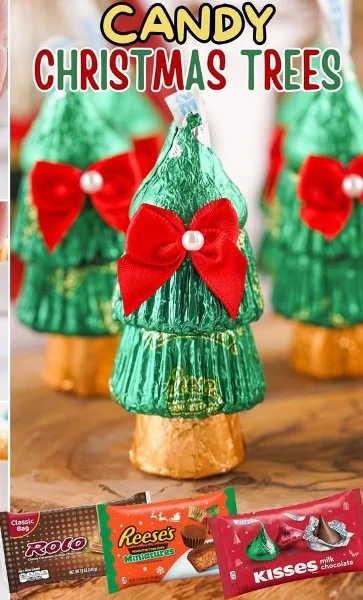
Creating Magic: Candy Christmas Trees for a Sweet Holiday
There’s just something about the holidays that brings out my inner kid—and nothing captures that nostalgic wonder quite like making Candy Christmas Trees in the kitchen. I still remember the first time I made these whimsical treats with my nieces. The entire counter was dusted with edible glitter, and we all wore more icing than the chocolate cones did! Every year since, making these festive candy trees has become a much-loved holiday tradition in our house. Not only are they adorable Christmas desserts, but they’re also ridiculously fun to make, decorate, and—most importantly—eat.
Why You’ll Adore These Candy Christmas Trees
If you need a festive pick-me-up during December, these Candy Christmas Trees are your answer. Here’s why you’ll want to add them to your holiday lineup:
- Effortlessly Joyful: You don’t need to be a pastry chef! This no-bake Christmas treat is simple enough for kids (and the kid-at-heart).
- Creative Expression: Decorating these little edible trees with candy decorations and glitter lets you flex your creative muscles—perfect for a cozy afternoon indoors.
- Memorable Moments: Making candy trees together has sparked some of our best family laughs (and friendly decorating competitions).
- A Show-Stopping Display: Whether you’re hosting a holiday party or filling treat boxes for gifts, a plateful of these sparkling Christmas desserts is truly a showstopper.
Ingredients You’ll Need for Candy Christmas Trees
Let’s break down what you need—and I’ll toss in some tips I’ve picked up along the way!
- Chocolate Cones: The base of your tree! I like using chocolate-coated ice cream cones (the “bugle” shaped ones) for a rich, crunchy surprise.
- Green Icing: Either homemade or store-bought works. I go for a thick buttercream or pre-made decorating icing for easy spreading.
- Marshmallows: Mini marshmallows make layering a breeze, but you can slice jumbo ones if needed.
- Candy Decorations: Sprinkles, mini chocolate candies, or holiday-shaped sugar toppers are all welcome.
- Edible Glitter: This is optional—but if you love a bit of shimmer, edible glitter turns these treats into a twinkling winter wonderland.
(Pro tip: Have extra marshmallows handy—some will invariably vanish during decorating!)
Step-by-Step Guide: Making the Perfect Candy Christmas Trees
Ready? Here’s my foolproof, stress-free way to make these delightful Candy Christmas Trees:
- Build Your Base: Place a chocolate cone upside down on a tray or plate. This becomes your Christmas tree trunk.
- Spread the “Pine”: Using a small offset spatula (or the back of a spoon), coat the entire cone in green icing. Don’t worry about perfect coverage—the marshmallows will hide any gaps!
- Layer with Marshmallows: Starting at the base, gently press mini marshmallows into the icing, overlapping slightly to create a lush, tree-like effect. Work your way up until you reach the tip.
- Deck the Halls: Scatter candy decorations all over—think garlands, ornaments, or stars. Kids love this part!
- Add a Little Magic: If using, sprinkle with edible glitter for that snowy sparkle. (Be generous! It’s Christmas after all.)
- Let Them Set: Give your Candy Christmas Trees a little time to set in a cool spot. Then, pile them onto a festive platter or nestle them into Christmas treat boxes to share.
I love putting on some holiday music and making a whole “forest” at once—assembly-line style!
My Secret Tips and Tricks for Candy Christmas Tree Success
Over the years (after many sticky fingers and toppled cones), I’ve gathered a few tricks for picture-perfect holiday candy trees:
- Chill Your Cones: If your kitchen is warm, pop chocolate cones in the fridge before icing them. Cold cones help icing grip better, which prevents sliding marshmallows.
- Tame the Icing: If pre-made icing feels too stiff or too runny, mix in a little powdered sugar to thicken or a drop of milk to loosen.
- Get Hands-On: Kids love this hands-on treat, but marshmallowy fingers can get messy. Keep a damp cloth nearby for easy clean-up!
- Mix Textures: Combine classic sprinkles, mini chocolate chips, and fun edible stars for maximum “wow factor” on your Christmas dessert table.
Creative Variations and Ingredient Swaps
Craving a twist on the traditional Candy Christmas Tree? Here are some variations I’ve tried (and loved):
- Chocolate Trees: Swap the green icing for melted white chocolate dyed with green food coloring for extra decadent candy trees.
- Gluten-Free: Choose gluten-free cones and marshmallows to make this a safe sweet treat for everyone.
- Vegan-Friendly: Use plant-based marshmallows (and vegan icing) to fit your dietary needs—there are so many great alternatives these days.
- Candy Canes: Stick a mini candy cane trunk at the base for a pepperminty surprise!
That’s the beauty of these edible Christmas crafts—there’s no wrong way to make them.
How to Serve and Store Your Candy Christmas Trees
These Candy Christmas Trees are a total crowd-pleaser, whether you’re setting them out for dessert or packing them in Christmas treat boxes for gifts. Here’s how to keep yours fresh and festive:
- Serving: Arrange trees on a pretty holiday platter as an edible centerpiece, or tuck individual ones into cellophane bags for adorable party favors.
- Storing: Store your decorated trees in an airtight container at room temperature. They’ll stay fresh for up to 3 days (assuming they last that long!).
- Avoid the Fridge: Too much cold can make the marshmallows hard and the icing sticky—keep them at room temp for best texture.
FAQs: Your Top Questions About Candy Christmas Trees Answered
Can I make Candy Christmas Trees ahead of time?
Yes, you can! Prepare them up to two days in advance and store in a cool, dry place. Just wait until close to serving to sprinkle edible glitter, so their sparkle really shines.
What kind of icing is best for Candy Christmas Trees?
A thick, stable buttercream or ready-to-use decorating icing works great for adhering marshmallows and decorations. Avoid whipped cream—it gets too soft.
Are there nut-free options for decorations?
Absolutely—stick to nut-free candies and sprinkles (there are so many fun allergy-friendly options at most grocery stores).
Can I use giant marshmallows?
You can, but I’d suggest slicing them in half or thirds to help them stick and resemble classic tree “branches.”
Do these Candy Christmas Trees travel well?
Yes! Just be sure to let the icing set fully, pack each tree upright in a cupcake liner, and nestle together in a box for safe transport.
I hope these Candy Christmas Trees bring a little extra magic—and a few giggles—into your holiday kitchen. If you try them, I’d love to hear how you decorated yours (and who won the family decorating contest)! Wishing you the sweetest, sparkliest holiday season.