Indulgent Sandwiches
Indulgent Sandwiches
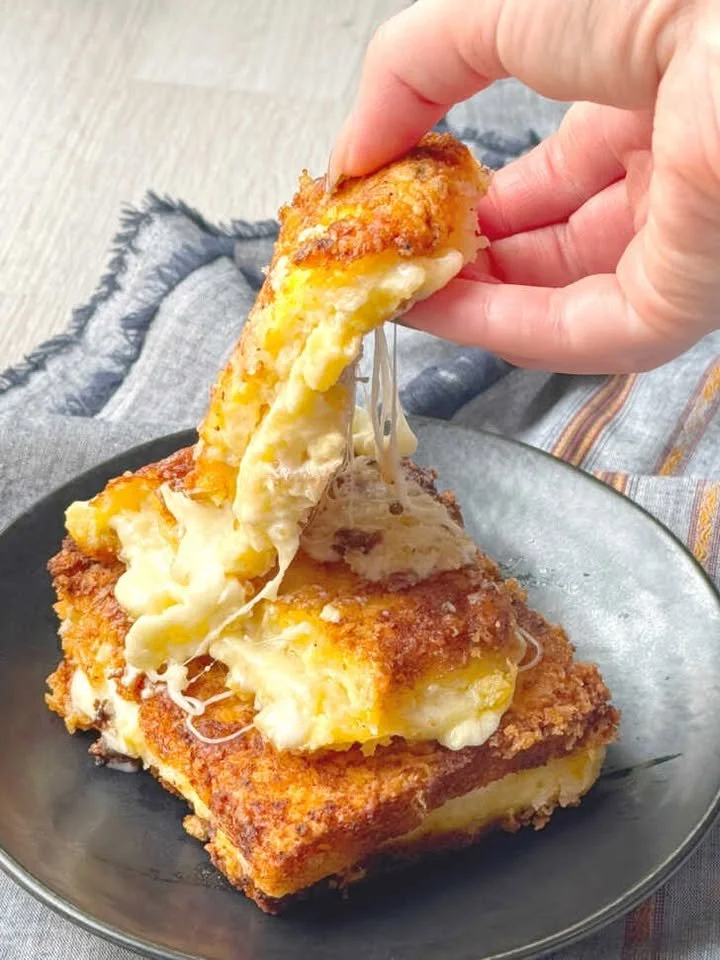
There’s something wonderfully cozy about a hot, melty sandwich at the end of a long day. I make these indulgent sandwiches when I want something quick, satisfying, and impossibly comforting — you know, the kind of snack that instantly feels like a hug.
The first time I tried this, I forgot to butter one slice of bread and ended up with one side a little too crisp. Nobody complained, of course. That’s the thing about simple recipes: they forgive small mistakes, and they still taste amazing.
If you’re craving a warm, cheesy bite with minimal fuss, this is your new go-to. And if you like exploring other hearty sandwiches, I often peek at recipes like Italian beef sandwiches for inspiration when I want something extra saucy.
Why indulgent sandwiches work
- Quick to make — from pan to plate in under 10 minutes.
- Uses pantry staples — bread, cheese, deli meat, and butter.
- Great texture contrast — crisp, buttery exterior and gooey, melty interior.
- Super flexible — swap cheeses, breads, or add extras if you’re feeling fancy.
Quick cooking insight: cooking on medium heat gives you a golden crust without burning, while letting the cheese melt slowly inside. If you rush the heat, the bread browns before the cheese has a chance to melt.
I love this kind of comfort food for weeknights, especially when I’m tempted to order takeout. For a heartier sandwich night, I sometimes pair this with pulled options like pulled pork sandwiches — they’re great for feeding a crowd.
Ingredients You’ll Need
- 2 slices of bread — any kind you love; thicker bread gives a more substantial bite.
- 2 slices of cheese (cheddar or American work great) — melty cheese is the star.
- 2 slices of deli meat (ham or turkey) — or swap for leftover roast.
- Butter (for grilling) — room temperature spreads easier.
- Salt and pepper to taste
Notes:
- If you like a richer sandwich, use salted butter; otherwise, unsalted and a pinch of salt does the trick.
- Feel free to add a slice of tomato or a smear of mustard for brightness.
I sometimes try richer versions inspired by recipes like smoked pulled beef sandwiches with au jus when I want more oomph — but for tonight, keep it simple.
Kitchen Tools
- Non-stick or cast-iron skillet
- Butter knife
- Spatula
- Plate and a sharp knife for slicing
A heavy pan helps press the sandwich slightly for better contact with the heat — that’s how you get those nice golden lines.
Step-by-Step Instructions
- Heat a frying pan over medium heat. Give it a minute so it’s evenly warm.
- Butter one side of each slice of bread. Spread to the edges for an even crust.
- Place one slice of bread, buttered side down, in the pan. You should hear a gentle sizzle.
- Layer with cheese and deli meat, then top with the second slice of bread, buttered side up. Press lightly with your spatula.
- Cook until golden brown, about 3–4 minutes. Watch the edges — when they’re nicely toasted, flip and cook the other side until the cheese melts (another 2–3 minutes).
- Remove from pan, let it sit 30 seconds, then slice in half and serve hot.
Visual cues: look for a deep golden color (not too dark) and a soft give under the spatula. You’ll smell buttery, toasty goodness when it’s close.
If you’d like a little variation mid-recipe, try adding a thin spread of mustard or a slice of pickle before the second flip — trust me, the tang balances the richness.
Pro Tips for Success
- Use room-temperature butter so it spreads easily and covers the bread evenly.
- Keep the heat at medium — high heat browns too fast and leaves the cheese unmelted.
- Let the sandwich rest 30 seconds after cooking to let the cheese set slightly; it makes slicing neater.
- For extra crispness, press down gently with a spatula as it cooks.
I once cooked one too long and the edges got dark — lesson learned: better to be patient and go lower-and-slower than hot-and-fast.
Common Mistakes to Avoid
- Cooking on too high heat — the bread burns before the cheese melts. Lower the heat and wait.
- Not buttering to the edges — dry patches can dry out and burn. Cover the whole surface.
- Overfilling — piling in too much meat or cheese prevents even melting. Keep it balanced.
- Flipping too soon — give it a minute or two for a golden crust to form before turning.
Variations and Substitutions
- Spicy version: swap deli meat for peppered salami and add a thin spread of Sriracha mayo.
- Dairy-free: use vegan butter and a plant-based cheese slice.
- Low-carb: make it an open-faced melt on a large lettuce leaf or use low-carb bread.
- Vegetarian: replace deli meat with grilled mushrooms or roasted veggies for earthy flavor.
For inspiration on turning sandwiches into a show-stopping meal, I sometimes combine simple melts like this with robust recipes such as pulled pork sandwiches at weekend gatherings.
What to Serve With This Recipe
- Classic: crispy potato chips or French fries
- Lighter: a crisp green salad with lemon vinaigrette
- Cozy combo: tomato soup for dunking — old-school and perfect
- Pickles or quick slaw for bright contrast
A bowl of soup plus a melty sandwich = instant comfort.
Storage and Leftovers
- Refrigerator: store cooled sandwiches in an airtight container for up to 3 days.
- Freezer: you can freeze unbuttered sandwiches wrapped tightly in foil for up to 1 month (re-butter before reheating).
- Reheating tip: rewarm in a skillet over low-medium heat, covered with a lid for a couple minutes so the cheese melts without burning the bread.
I don’t usually freeze these — they’re best fresh — but reheating in a pan keeps that toasty crust alive.
FAQ (People Also Ask)
Q: Can I make this ahead of time?
A: You can assemble and keep them wrapped in the fridge for a few hours, but they’re best cooked right before eating so the bread stays crisp.
Q: Can I freeze cooked sandwiches?
A: Yes — wrap tightly in foil and freeze up to a month. Reheat in a low oven or skillet to avoid sogginess.
Q: What’s the best cheese to use?
A: Cheddar and American melt beautifully. Swiss or provolone work, too. Go for cheeses labeled "melting" when possible.
Q: Can I add vegetables?
A: Absolutely. Thin tomato or roasted peppers are great. Keep slices thin so the sandwich heats through evenly.
Q: Best pan to use?
A: A cast-iron or heavy skillet gives the most even browning, but non-stick works fine for easy cleanup.
Q: Can I double or triple the recipe?
A: Yes — cook sandwiches in batches and keep finished ones warm in a low oven (200°F / 95°C) on a tray.
Quick Recipe Summary
Prep time: 5 minutes
Cook time: 6–8 minutes
Servings: 1 sandwich
Ingredients:
- 2 slices of bread
- 2 slices of cheese
- 2 slices of deli meat
- Butter
- Salt and pepper
Short steps:
- Heat pan over medium.
- Butter bread; place one slice buttered-side-down.
- Add cheese and meat; top with second slice buttered-side-up.
- Cook 3–4 minutes per side until golden and cheese melts.
- Slice and serve hot.
If you’re looking to riff a little, try stacking different cheeses or switching the meat — it’s forgiving and fun.
Final Thoughts
Give these indulgent sandwiches a try the next time you want something fast and comforting. Don’t worry if your first one is a little too toasty — I’ve burned a few in my time and still kept eating them. If you make them, tell me how you dressed them up — I love hearing new twists!