Italian Chicken Cutlets
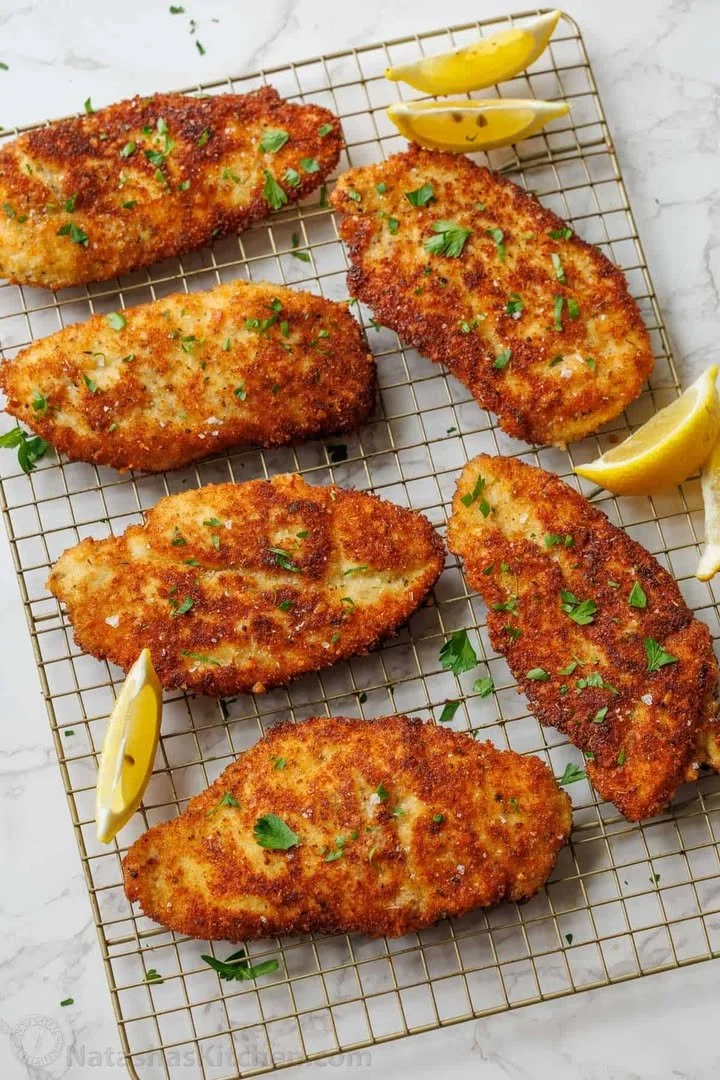
Memories on a Plate: My Family’s Italian Chicken Cutlets
Isn’t it funny how some dishes just stick to our hearts forever? For me, Italian chicken cutlets instantly bring back the bustling sounds and irresistible aromas of my childhood kitchen. I can still picture my mom—flour dusting her hands, humming Italian classics, expertly pan-frying each piece until perfectly golden brown. To this day, the sizzle of chicken cutlets in hot olive oil feels like a warm hug, promising something delicious and comforting. If you’re searching for a recipe that tastes like nostalgia (and happens to be the best Italian chicken cutlets you’ll ever try), you’ve landed in the right place.
Why You’ll Adore These Italian Chicken Cutlets
Let me gush for a second—these classic Italian chicken cutlets aren’t just mouthwateringly good; they’re the kind of meal everyone begs for. Here are just a few reasons you’ll fall head over heels:
- Crispy and Tender: The secret breadcrumb-Parmesan coating creates that crave-worthy golden crunch, while the inside stays juicy (seriously, every bite is perfection).
- Super Quick and Easy: Dinner on the table in under 30 minutes? Yes, please. Minimal fuss, maximum flavor—truly an easy chicken recipe for busy weeknights.
- Versatile as Anything: Serve these cutlets on their own, pile them high on a sandwich, or top them with marinara and mozzarella for a chicken parm moment.
- Crowd Pleaser: Whether it’s a Sunday family dinner, potluck, or cozy solo night, homemade chicken cutlets have universal “yum” appeal.
Ingredients You’ll Need for Italian Chicken Cutlets
Gather these simple, classic ingredients, and you’re halfway to greatness:
- 4 chicken breasts – I like to use boneless, skinless pieces and slice them in half horizontally for extra tenderness and even cooking.
- 1 cup all-purpose flour – Helps the coating stick (I’ve swapped for gluten-free flour in a pinch—works like a charm!).
- 2 large eggs – For that gorgeous, golden “glue” layer.
- 1 cup breadcrumbs – Regular or Italian-style, depending on what’s in my pantry. Panko gives extra crunch!
- 1/2 cup grated Parmesan cheese – Adds a nutty, savory kick to the crust (don’t skip this!).
- 1 teaspoon garlic powder – For that subtle garlicky warmth.
- 1 teaspoon Italian seasoning – Brings those herby, Mediterranean flavors.
- Salt and black pepper, to taste – Essential for balancing all the flavors.
- Olive oil, for frying – Extra-virgin gives the best flavor (plus, it smells amazing).
Step-by-Step Guide: Making the Perfect Italian Chicken Cutlets
Ready to conquer this foolproof Italian chicken cutlet recipe? Here’s my easy, friendly game plan:
Prep the Chicken: Start by slicing each breast horizontally (so you get 8 thinner cutlets total), then place between parchment and pound gently until ½-inch thick. This helps them cook evenly and stay juicy.
Set Up the Bread-Crumb Station: Grab three shallow bowls or plates. In the first: flour. In the second: beat the eggs with a pinch of salt. In the third: breadcrumbs, Parmesan, garlic powder, Italian seasoning, and another touch of salt and pepper. Give that a good mix!
Dredge Time: Dip each piece of chicken—first in flour, then egg, then press into the breadcrumb-Parmesan mixture until it’s totally coated. Get every nook and cranny!
Fry to Crispy Goodness: Heat olive oil in a big skillet over medium (don’t be shy—generous oil means crispier cutlets). Fry each cutlet for about 4-5 minutes per side. They’ll be golden, bubbling, and impossible to resist.
Drain & Serve: Set the finished cutlets on a paper towel–lined plate to soak up extra oil. Serve immediately with lemon wedges, marinara, or just as is.
I absolutely love munching that first cutlet standing at the stove—chef’s treat, right?
My Secret Tips and Tricks for Italian Chicken Cutlet Success
- Breadcrumb Tip: For ultra-crispy, restaurant-style “Italian breaded chicken cutlets,” use a mix of panko and regular breadcrumbs. The combo = wow.
- Pound Gently: Don’t skip the pounding step—thin, even cutlets cook up juicier (and faster).
- Test the Oil: Drop a bit of breadcrumb into the oil; if it sizzles, you’re ready!
- Batch It Out: Don’t crowd the pan—fry in batches for the crispiest crust.
If you’re after easy, authentic “homemade chicken cutlets,” these tricks have saved me every time.
Creative Variations and Ingredient Swaps
Want to switch things up? Here are a few tried-and-true twists:
- Gluten-Free: Sub gluten-free breadcrumbs and flour—no one will know the difference.
- Herb Swap: Add fresh chopped parsley or basil to the breadcrumbs for garden-fresh flavor.
- Cheese Boost: Try shredded Asiago or Romano cheese in the coating for a little extra zing.
- Baked Option: Skip the frying—place cutlets on a greased baking sheet, drizzle with a bit of olive oil, and bake at 425°F for 18-20 minutes, flipping halfway.
- Spicy Kick: Sprinkle some red pepper flakes in the breading for spicy Italian chicken cutlets—so good!
How to Serve and Store Your Italian Chicken Cutlets
Serving suggestions:
- Pile your cutlets on a platter with fresh lemon slices (classic and bright!)
- Serve over spaghetti with lots of marinara (like a “homemade chicken parmesan”)
- Tuck inside a crusty roll with provolone and arugula for the best chicken sandwich ever
Storing leftovers:
Keep cooled cutlets in a sealed container in the fridge for up to 3 days. To reheat, bake in a 350°F oven for 10-12 minutes (they’ll stay crispy!). These Italian chicken cutlets also freeze like a dream—just wrap individually and thaw before reheating.
FAQs: Your Top Questions About Italian Chicken Cutlets, Answered
1. Can I make Italian chicken cutlets ahead of time?
Absolutely! Prep the breaded chicken up to a day ahead and refrigerate (covered). Fry just before serving for the best texture. (Perfect for easy meal prep!)
2. What’s the difference between chicken cutlets and chicken parmesan?
Great question! Italian chicken cutlets are just the breaded, pan-fried chicken—chicken parmesan tops them with marinara sauce and cheese before baking. Both are delish!
3. How do I keep cutlets crispy after frying?
Drain on paper towels, then lay them on a wire rack in a low oven (200°F) if you’re not serving immediately. This keeps them super crunchy.
4. Can I use thigh meat instead of breasts?
Definitely—boneless, skinless thighs are juicy and flavorful! Just pound them to a similar thickness for even cooking.
5. Are these Italian chicken cutlets freezer-friendly?
You bet. Freeze cooked cutlets between layers of parchment in an airtight container for up to 2 months. Just reheat in the oven straight from frozen (so easy!).
Whether you’re making dinner for your family or treating yourself to a taste of Italy, these crispy Italian chicken cutlets always deliver. I can’t wait for you to make them—and maybe, just maybe, start a tradition (and a few delicious memories) of your own. 💛
Happy cooking, amici! If you try this recipe, let me know in the comments or tag me so I can see your gorgeous chicken cutlets! Mangia!
