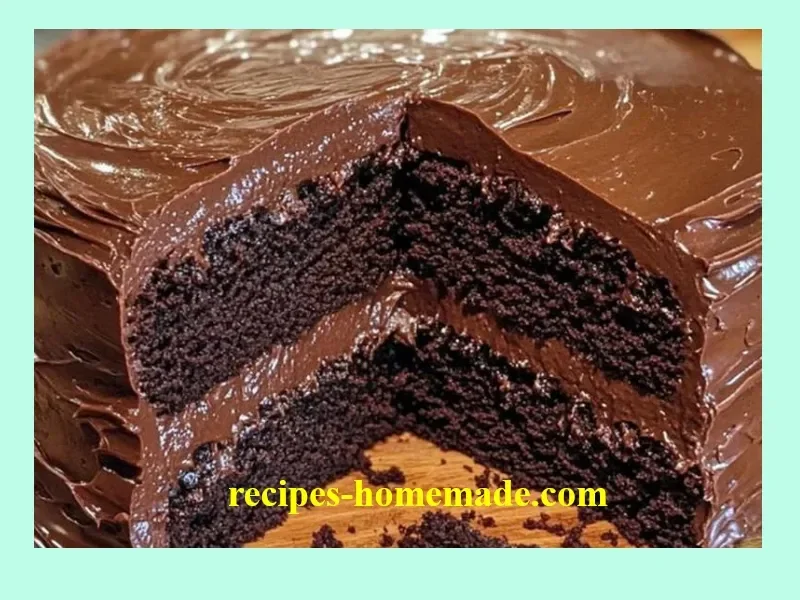
Old-Fashioned Chocolate Cake
A Slice of Nostalgia: My Old-Fashioned Chocolate Cake Story
There’s nothing quite like the smell of an old-fashioned chocolate cake drifting through your kitchen. For me, it brings back memories of Sunday afternoons at my grandmother’s house—her apron dusted in flour, her laugh carrying above the whir of the mixer. Whenever I need a taste of comfort (or a guaranteed crowd-pleaser), I turn to this classic chocolate cake recipe. It’s simple, chocolaty, and hits that sweet, nostalgic spot every single time.
Whether you grew up baking alongside family or are just looking for a seriously delicious homemade chocolate cake, this classic recipe is one that you’ll want to keep in your back pocket—and possibly pass down to the next generation, too.
Why You’ll Adore This Old-Fashioned Chocolate Cake
Let me tell you, I have tried more chocolate cake recipes than I can count, but this one always comes out on top. Here’s why:
- It’s Pure Chocolate Bliss. Rich, deep cocoa flavor—just like the cakes you remember from childhood.
- Ridiculously Moist. The secret? A touch of buttermilk and hot coffee (trust me, it deepens the chocolate flavor).
- No-Fuss, All Flavor. No complicated steps, no fancy equipment—just simple, honest ingredients and a mixing bowl.
- Versatile For Any Occasion. Dress it up for birthdays or enjoy a generous slice with a casual weeknight dinner.
When I say this is my go-to homemade chocolate cake, I truly mean it. It’s the kind of cake that brings people together, with seconds (and thirds) requested nearly every time.
Ingredients You’ll Need for Old-Fashioned Chocolate Cake
Gathering your ingredients is the first (and arguably most satisfying) step—here’s what you’ll need, with a few personal tips thrown in:
- All-purpose flour (1 3/4 cups / 220g): Gives our cake its structure. Make sure to measure accurately (spoon, then level) for a light, tender crumb.
- Unsweetened cocoa powder (3/4 cup / 65g): Opt for a high-quality cocoa if you can—it makes a noticeable difference!
- Baking powder & baking soda (1 1/2 tsp each): These double up for the perfect rise.
- Salt (1/2 tsp): Don’t skip it. It balances all the sweet flavors.
- Large eggs (2): Room temperature eggs mix better and create a smoother batter.
- Granulated sugar (1 cup / 200g) + Brown sugar (1/2 cup / 100g): Brown sugar adds a subtle caramel warmth.
- Vegetable oil (1/2 cup / 120ml): Keeps the cake extra moist.
- Buttermilk (1 cup / 240ml): Or make it quickly with milk and a tablespoon of vinegar—don’t let a missing jug stop you!
- Vanilla extract (1 tsp): The background note that makes everything better.
- Hot coffee or hot water (1 cup / 240ml): Enhances the chocolate—if you’re caffeine-sensitive, hot water is just fine!
- Unsalted butter (1/2 cup / 115g): For the dreamiest chocolate frosting.
- Powdered sugar (2 cups / 250g): Sift it for an ultra-smooth frosting.
- Milk (1/4 cup / 60ml): Start with less, add more as needed for spreadability.
- Pinch of salt: Just a touch for balance.
If you’re feeling fancy, finish with chocolate shavings or a little dusting of cocoa powder for that vintage, homemade cake look.
Step-by-Step Guide: Making the Perfect Old-Fashioned Chocolate Cake
I promise, this cake is as easy as it is delicious. Here’s how we bring it all together:
- Prep your pans and oven.
Preheat to 350°F (175°C) and grease + flour two 8-inch round pans, or a 9×13-inch dish (parchment paper on the bottom works wonders for easy removal). - Mix dry ingredients.
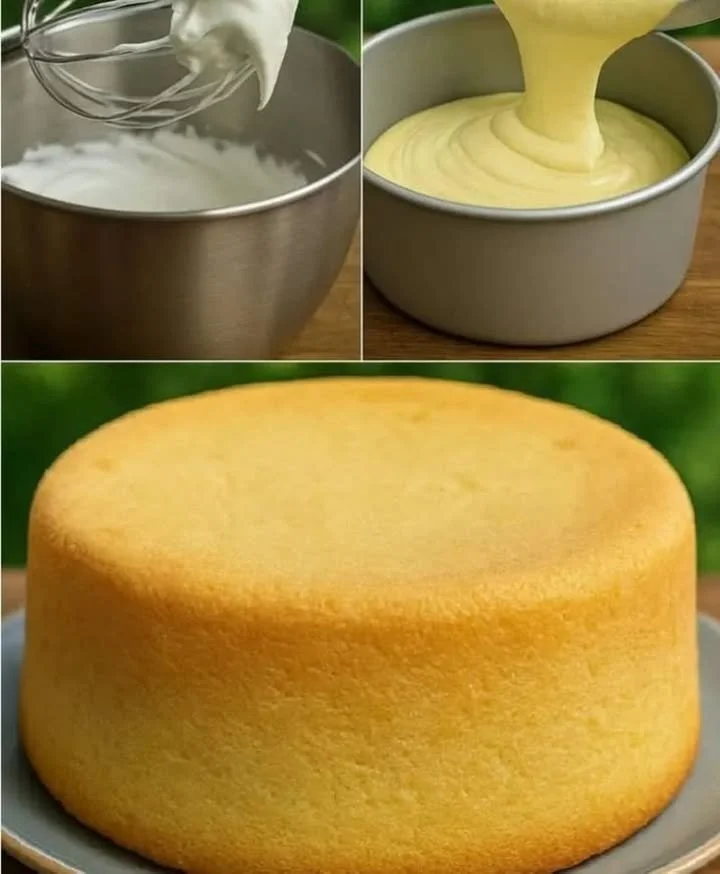
In a large bowl, whisk together flour, cocoa, baking powder, baking soda, and salt. I like to whisk extra long just to make sure there are no cocoa lumps. - Blend wet ingredients.
In another bowl, beat the eggs, granulated sugar, and brown sugar until they’re pale and a little fluffy. Add in the oil, buttermilk, and vanilla—mix until smooth. - Combine wet and dry.
Gradually mix in the dry ingredients. The batter starts thick but don’t worry! - Add hot coffee (or water).
This creates a thin batter (it’ll seem runny, but that’s what makes it moist!). Stir it in slowly so you don’t splash. - Bake.
Pour into your prepared pans. Bake for 30–35 minutes (if using rounds) or 35–40 minutes (for a sheet), until a toothpick comes out mostly clean—you want it just a little fudgy! - Cool Completely.
Patience! This helps the frosting glide on smoothly. - Make the chocolate frosting.
Melt butter, then stir in cocoa powder. Add powdered sugar, milk, vanilla, and a pinch of salt. Beat (with a hand mixer or good old muscle) until fluffy. If it’s too stiff, add another splash of milk. - Frost.
Go rustic with big swoops or smooth it out for a more classic look. Sprinkle a handful of chocolate shavings if you’re feeling fancy.
I always sneak a spoonful of frosting while the cake cools… shhh, it’s baker’s privilege!
My Secret Tips and Tricks for Old-Fashioned Chocolate Cake Success
- Trust the Thin Batter. It’s supposed to seem runny! This is why your cake will turn out unbelievably moist.
- Don’t Over-Bake! Keep an eye on things—pull the cakes out as soon as a toothpick comes out with just a few moist crumbs (over-baking dries it out).
- Room Temperature Ingredients. Cold eggs and buttermilk can make batter lumpy; leave them out for a bit before mixing.
- Coffee Makes Magic. If you’re worried about the flavor, don’t! It won’t taste like coffee, it just turns the chocolate flavor up to eleven.
- Frosting Consistency Is Key. If it’s too thick, add milk a tablespoon at a time until it’s just right for swooping and spreading.
Trust me, using these baking tips can take any simple homemade chocolate cake from good to “wait, you baked this?!”
Creative Variations and Ingredient Swaps
You know I love a versatile recipe! Here are some fun ways to change up your old-fashioned chocolate cake:
- Dairy-Free: Use plant-based milk and swap the butter for vegan margarine—still super rich and decadent!
- Gluten-Free: Try your favorite 1:1 gluten-free flour blend (just check for any extra baking soda recommendations).
- Add-Ins: Toss in chocolate chips, chopped walnuts, or even a handful of dried cherries for a grown-up twist.
- Frosting Flavors: Swap vanilla for almond extract in your frosting for a subtle, nutty edge or add a tablespoon of espresso powder for extra depth.
- Seasonal Touch: Top with fresh raspberries or strawberries when they’re in season (the sweet-tart fruit and deep chocolate… oh YES).
Don’t be afraid to get creative! This easy chocolate cake recipe is totally forgiving.
How to Serve and Store Your Old-Fashioned Chocolate Cake
- Serving Suggestions: I’m a sucker for a warm slice with a scoop of vanilla ice cream or a tall glass of cold milk. Feeling nostalgic? A dusting of powdered sugar and a few chocolate curls give it that perfect homemade chocolate cake vibe.
- Storage:
- Countertop: Covered, your cake will stay moist for 2-3 days (if it lasts that long).
- Fridge: To keep the frosting firm, pop it in the fridge—just let your slice sit out for a bit to take off the chill before eating.
- Freezer: Cut unfrosted cake into layers, wrap tightly, and freeze for up to 2 months. Defrost, frost, and you’re ready for any occasion!
Homemade cake is always best shared, but it freezes beautifully for when you just need a chocolate fix on hand.
FAQs: Your Top Questions About Old-Fashioned Chocolate Cake Answered
Is it OK to make this chocolate cake without coffee?
Absolutely! Hot water works perfectly. The coffee just makes the chocolate a touch richer, but you won’t miss out on flavor if you skip it.
Can I make this cake ahead of time?
Yes! Bake the cake layers a day ahead and store tightly wrapped at room temp. Frost just before serving for best results (homemade chocolate cake stays super fresh this way).
What’s the best cocoa powder for this recipe?
I recommend a good-quality unsweetened cocoa for that deep, classic chocolate flavor, but you can always experiment with Dutch-process for a slightly different taste.
Can I use this recipe for cupcakes?
Totally! Fill liners about two-thirds full and bake at the same temperature for 18-22 minutes—check with a toothpick for doneness.
**Why did my chocolate cake sink in the middle