Peanut Butter and Jelly Swirl Cheesecake

Peanut Butter and Jelly Swirl Cheesecake: Childhood Nostalgia Baked into Every Bite
If you’d told 10-year-old me that someday I’d be swirling grape jelly into cheesecake for a living, I probably wouldn’t have believed you—but here we are! The first time I made this Peanut Butter and Jelly Swirl Cheesecake, the rich smell of peanut butter baking in the oven instantly transported me back to sticky-fingered after-school snacks and giggle-filled kitchen adventures with my mom. There’s something so warm and familiar about this flavor duo. It’s like a hug from the inside out, and every bite is pure, velvety nostalgia (plus, it’s the best excuse ever to eat dessert for breakfast—no judgment here!).
Why You’ll Adore This Peanut Butter and Jelly Swirl Cheesecake
Let’s be real—a classic pb&j sandwich is already comforting, but make it creamy, dreamy, and baked into a show-stopping dessert? Yes, please! Here’s why this cheesecake belongs on your must-bake list:
- Childhood in Every Slice: It tastes just like the peanut butter and jelly sandwiches you grew up loving, but with a decadent, grown-up twist.
- Easy, Make-Ahead Dessert: This is my go-to when I want to impress with minimal effort (hello, stress-free entertaining).
- Crowd-Pleasing Flavors: The salty peanut butter with bursts of sweet jelly hits everyone right in the happy place—kids and adults can’t resist it.
- Beautiful Swirls, No Skills Needed: The gorgeous jelly swirls on top look fancy but are honestly foolproof (you’ll feel like a dessert artist!).
Ingredients You’ll Need for Peanut Butter and Jelly Swirl Cheesecake
Gathering your ingredients is a breeze, and I’ll share some little tips to make things even better:
- Graham cracker crumbs (1 1/2 cups): I love the classic flavor, but a honey graham or even a chocolate version? Amazing.
- Granulated sugar (1/4 cup for crust, 1 cup for filling): Gives just the right sweetness.
- Unsalted butter (1/2 cup, melted): Real butter really shines in the crust—skip the substitutes if you can.
- Cream cheese (16 ounces, softened): Go full-fat for that ultra-creamy texture (trust me!).
- Peanut butter (1 cup): Creamy works best for swirling, but chunky adds a fun texture.
- Large eggs (3): Helps set the cheesecake perfectly.
- Vanilla extract (1 teaspoon): Rounds out the flavors—don’t skimp.
- Jelly (1/2 cup, any flavor): Grape or strawberry are classic, but raspberry or cherry are fun twists.
Step-by-Step Guide: Making the Perfect Peanut Butter and Jelly Swirl Cheesecake
Here’s how I make this peanut butter cheesecake with jelly swirls feel totally doable (even if it’s your first cheesecake ever):
- Prep the oven: Preheat to 325°F (163°C). Grab your favorite playlist and get into baking mode.
- Make the crust: Combine graham cracker crumbs, sugar, and melted butter in a bowl. Press into a 9-inch springform pan (I use the bottom of a measuring cup to get a firm, even layer).
- Mix the filling: Beat cream cheese and peanut butter together until it’s creamy and smooth—no lumps! Slowly add the sugar, then mix in eggs one at a time (scrape the bowl between each for a futz-free batter). Stir in the vanilla extract for that homey aroma.
- Layer it up: Pour the cheesecake batter over your crust. Drop spoonfuls of jelly randomly over the top. Now for the fun: swirl the jelly with a knife—don’t overdo it, or you’ll lose those pretty ripples.
- Bake: Pop the pan in the oven for 45-50 minutes. The center should just barely jiggle when you tap it.
- Cool and chill: I know it’s hard, but let it cool completely, then refrigerate at least 4 hours (overnight is even better for a perfectly set peanut butter and jelly cheesecake).
My Secret Tips and Tricks for Peanut Butter and Jelly Swirl Cheesecake Success
- Room-Temp Everything: Make sure cream cheese, eggs, AND peanut butter are room temp for a smooth peanut butter cheesecake filling (no weird lumps!).
- Gentle Swirling: Use a butter knife for swirling the jelly and resist the urge to overmix—you want beautiful, dramatic streaks.
- Springform Pan Savvy: Line the bottom with parchment for stress-free removal (your swirled cheesecake will come out picture-perfect).
- Chill Time: Don’t rush the chilling step; it’s worth the wait for that perfect slice. Sometimes I make it the night before a big event to save on stress.
Creative Variations and Ingredient Swaps
Want to put your own spin on this peanut butter and jelly swirl cheesecake? Try these tasty ideas:
- Nut-Free: Use sunflower butter for a school-friendly, allergy-safe option.
- Different Jellies/Jams: Raspberry, blueberry, or even apricot jam make for fun flavor combos (the more colorful, the better!).
- Chocolate Drizzle: After chilling, drizzle with melted chocolate for a peanut butter cup cheesecake twist.
- Gluten-Free: Swap the graham crackers for gluten-free cookies or crumbs (store-bought are totally fine).
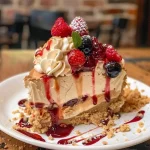
How to Serve and Store Your Peanut Butter and Jelly Swirl Cheesecake
- Serving: A sharp, hot knife makes for those ultra-clean, Instagram-ready slices (wipe between cuts for max wow-factor).
- Toppings: Add fresh berries, whipped cream, or a few peanuts for extra flair.
- Storing: Keep leftovers covered in the fridge for up to 5 days—the flavors actually get better! For longer storage, freeze individual slices (use parchment between pieces and wrap tightly).
- Reheating: No need! This creamy peanut butter and jelly cheesecake is happiest served cool.
FAQs: Your Top Questions About Peanut Butter and Jelly Swirl Cheesecake Answered
Can I use crunchy peanut butter?
Absolutely, if you dig a bit of crunch in your cheesecake filling, go for it! Just know you’ll get little nutty pockets throughout.
What’s the best jelly for cheesecake?
I usually reach for grape or strawberry for that classic pb&j flavor, but honestly, any fruit jelly, jam, or preserves will work great.
Do I need a water bath?
Nope—this cheesecake recipe bakes gently and creamy at 325°F, so you can skip the fuss (and leaks!) of a water bath.
Can I make it ahead?
Yes! In fact, it tastes better chilled overnight, so it’s the best kind of make-ahead dessert.
Help! My cheesecake cracked. Now what?
Don’t worry—just cover it with extra jelly swirls or a whipped cream blanket. It’ll still taste amazing (ask me how I know).
If you make this Peanut Butter and Jelly Swirl Cheesecake, let me know how it turns out! Tag me in your pictures or drop a comment below—nothing makes my day like seeing nostalgia baked from one kitchen to another. Happy swirling!
Peanut Butter and Jelly Swirl Cheesecake
Ingredients
For the crust
- 1 1/2 cups Graham cracker crumbs Classic flavor, can substitute honey graham or chocolate.
- 1/4 cup Granulated sugar For added sweetness in crust.
- 1/2 cup Unsalted butter, melted Real butter recommended for best flavor.
For the filling
- 16 ounces Cream cheese, softened Full-fat for ultra-creamy texture.
- 1 cup Peanut butter Creamy works best for swirling.
- 1 cup Granulated sugar For the filling.
- 3 large Eggs Helps set the cheesecake.
- 1 teaspoon Vanilla extract Rounds out the flavors.
- 1/2 cup Jelly (any flavor) Grape or strawberry recommended.
Instructions
Preparation
- Preheat the oven to 325°F (163°C).
- Combine graham cracker crumbs, sugar, and melted butter in a bowl. Press into a 9-inch springform pan.
- In a mixing bowl, beat cream cheese and peanut butter until smooth. Gradually add sugar and mix in eggs one at a time, scraping the bowl between additions.
- Stir in vanilla extract.
- Pour the cheesecake batter over the crust. Drop spoonfuls of jelly on top and swirl with a knife.
Baking and Cooling
- Bake for 45-50 minutes until the center jiggles slightly when tapped.
- Cool completely, then refrigerate for at least 4 hours, preferably overnight.