Raisin Cake
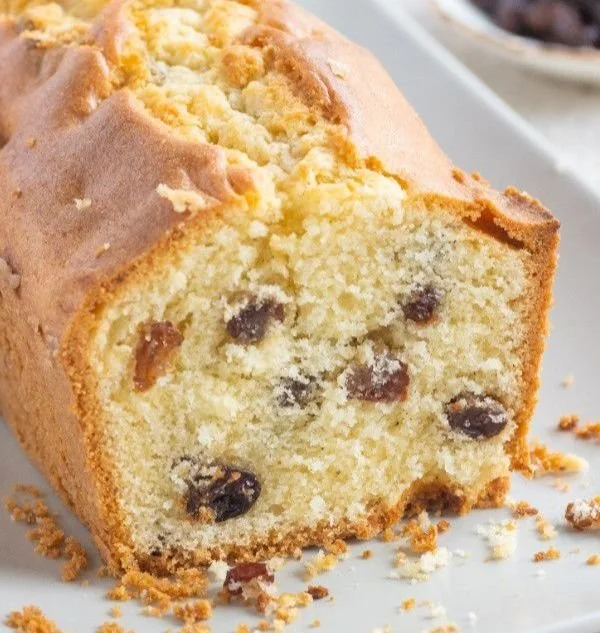
The Sweet Nostalgia of Homemade Raisin Cake
You know those recipes that instantly take you back to your grandma’s kitchen, where the air always smelled like butter, cinnamon, and something bubbling sweet on the stove? That’s what this raisin cake is for me—a true old-fashioned treat that wraps you up in warmth and memories. The first time I baked this classic raisin cake, I was eight years old and barely tall enough to reach the kitchen counter. I still remember the sound of the raisins plopping into the saucepan and the caramelly aroma that filled the house (I might’ve licked the spoon when no one was looking!). Whether you’re craving an easy dessert or just want that delicious, homemade cake comfort, this raisin cake recipe always hits the spot.
Why You’ll Adore This Raisin Cake
Let’s be honest: it’s not just about the flavor (although this homemade raisin cake is like a hug for your taste buds!). Here’s why I think this cozy loaf absolutely deserves a place in your baking rotation:
- Incredibly Moist and Fluffy: The blend of simmered raisins and a touch of brown sugar gives you a moist crumb that stays soft for days.
- Full of Nostalgic Flavor: With cinnamon, nutmeg, and a hint of cloves, this cake tastes like autumn afternoons, family gatherings, and stories told over mugs of tea.
- Super Simple to Make: No fussy creaming or multi-bowl messes—just simple steps, everyday ingredients, and foolproof results.
- Versatile and Crowd-Pleasing: This raisin cake’s warming spices make it ideal for breakfast, snacking, or dessert (trust me, it disappears fast at potlucks!).
Ingredients You’ll Need for Raisin Cake
Here’s what you’ll want to round up for this easy dessert (and a few of my personal notes to make sure you get the best results!):
- 1 cup (150g) raisins: I prefer juicy Thompson raisins, but golden or flame raisins work beautifully too. Plump, fresh raisins make a world of difference!
- 1 cup (240ml) water: For simmering the raisins and melding all that fruity flavor into the base (don’t skip this—it’s magic).
- 1/2 cup (100g) brown sugar: Adds a caramel note and extra moisture. Light or dark both work.
- 1/2 cup (100g) granulated sugar: For that sweet balance.
- 1/2 cup (113g) unsalted butter: I always use real butter for depth of flavor—just be sure it’s unsalted so you can control the saltiness.
- 1 1/2 cups (190g) all-purpose flour: Regular flour is perfect, but you can swap for a gluten-free blend if needed.
- 1 tsp baking soda: For lift and texture.
- 1 tsp ground cinnamon: Essential for that cozy, classic spice profile.
- 1/2 tsp ground nutmeg: Brings warmth and depth.
- 1/4 tsp ground cloves (optional): Just a pinch, but what a difference—it’s optional, but I’m always glad when I add it!
- 1/4 tsp salt: Balances everything out.
- 2 large eggs: At room temperature, so everything mixes smoothly.
- 1 tsp vanilla extract: Rounds out the flavors with sweet, mellow notes.
Step-by-Step Guide: Making the Perfect Raisin Cake
Baking your own raisin cake is surprisingly easy! Here’s how I do it:
- Simmer the Raisins: In a medium saucepan, toss in your raisins, water, brown sugar, granulated sugar, and butter. Bring it all to a gentle boil over medium heat, stirring until the butter melts and sugars dissolve (your kitchen will smell heavenly!).
- Cool Completely: Take the saucepan off the heat and let the mixture cool down—I pop mine in the fridge to speed things up if I’m impatient.
- Whisk the Dry Ingredients: In a mixing bowl, whisk together the flour, baking soda, cinnamon, nutmeg, cloves, and salt (this helps keep your batter light and lump-free).
- Add Eggs and Vanilla: Once your raisin mixture is cool, beat in the eggs and vanilla extract until smooth and glossy.
- Combine Wet and Dry: Gently stir the dry ingredients into the raisin mixture. Don’t overmix—just until you have a smooth, thick batter.
- Bake: Pour the batter into a greased and floured loaf pan. Bake in your preheated oven at 175°C (350°F) for 30–35 minutes, or until a toothpick poked in the center comes out clean.
- Cool: Let the cake cool in the pan for 10 minutes, then turn it out onto a wire rack to finish cooling. (Try not to sneak a slice while it’s still warm—I dare you!)
Bonus tip: Dust with powdered sugar or drizzle with a simple vanilla glaze for extra pizzazz.
My Secret Tips and Tricks for Raisin Cake Success
After plenty of trial and error (and snacking), here’s what I’ve learned about making a truly unforgettable homemade raisin cake:
- Let the raisin mixture cool completely before adding eggs—otherwise, you’ll end up with scrambled eggs (yikes!).
- Sift dry ingredients if your flour’s a little clumpy, especially for the fluffiest crumb.
- Don’t overbake: This easy dessert is best when just golden. I start checking around the 30-minute mark.
- For extra flavor, soak your raisins in a splash of orange juice or dark rum before simmering (makes for a more “grown-up” raisin cake!).
- Line your pan with parchment paper for easy removal, especially if you’re gifting this loaf.
Creative Variations and Ingredient Swaps
One of my favorite things about this classic recipe is how flexible it is! Here are a few fun twists:
- Nutty Addition: Throw in a handful of toasted walnuts or pecans (so good with the spices!).
- Go Dairy-Free: Swap the butter for a good-quality vegan butter or coconut oil.
- Make it Gluten-Free: Use a cup-for-cup gluten-free flour blend in place of the all-purpose flour (easy swap, same cozy texture).
- Add Citrus: Stir in the zest of one orange or lemon for a zingy flavor boost.
- Try Different Dried Fruit: Swap out half the raisins for chopped dates, currants, or dried cranberries for a festive touch.
How to Serve and Store Your Raisin Cake
This homemade raisin cake shines at room temperature, but honestly, it’s equally amazing lightly toasted with a bit of butter (the warmth brings out every note of spice!). Try it:
- For Breakfast: Paired with coffee or tea.
- As an Easy Dessert: With whipped cream or a scoop of vanilla ice cream (trust me, it’s dreamy).
- For Snacks: Sliced thin and packed in lunchboxes or picnic baskets.
Storage tip: Wrap leftovers tightly in foil or store in an airtight container at room temperature for up to 3 days. You can also freeze individual slices for a grab-and-go treat any time (just thaw overnight in the fridge or nuke for a few seconds in the microwave).
FAQs: Your Top Questions About Raisin Cake Answered
Can I use other dried fruits besides raisins?
Absolutely! This cake is super adaptable—try dried cranberries, currants, or chopped apricots for a tasty twist on classic raisin cake.
Is this raisin cake recipe suitable for beginners?
Yes! This easy dessert is one of the first recipes I ever made solo (with zero prior baking confidence). The steps are simple, the method is forgiving, and cleanup is a breeze.
Does it freeze well?
It sure does—slice and freeze in a zip-top bag, then thaw whenever a cake craving hits. You’ll be so glad you did!
How do I keep the cake from getting too dense?
Don’t overmix your batter and be sure your baking soda is fresh. Also, measure flour by spooning it lightly into your cup (not scooping), which ensures a lighter crumb every time.
What’s the best way to add a glaze or icing?
I love a simple vanilla glaze (just powdered sugar, a splash of milk, and a dash of vanilla)—drizzle over the cooled loaf for instant wow factor.
Nothing says comfort quite like a freshly baked raisin cake. I hope this easy, homemade recipe brings as much joy and nostalgia to your kitchen as it does to mine. If you bake it, share your twists—or tag me in your photos! We bakers gotta stick together, right?
Happy baking, friends!
