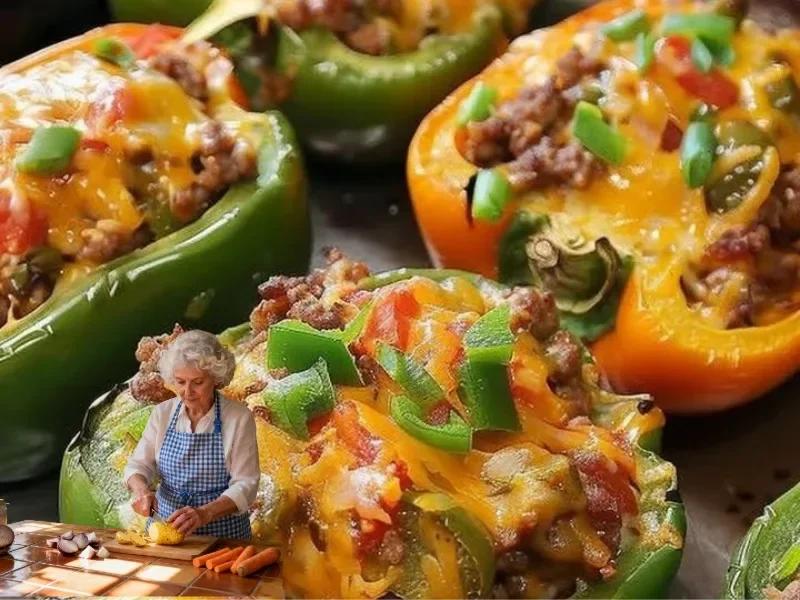
Stuffed Bell Peppers
Easy & Creamy Stuffed Bell Peppers — A Homemade, Family-Favorite Comfort Recipe
Stuffed Bell Peppers are one of those cozy, comforting dinners that smell like home the minute they hit the oven. This easy, creamy, traditional stuffed bell peppers recipe is perfect for weeknight dinners, family meals, or lazy weekend cooking — tender green peppers filled with savory beef, fluffy Spanish Rice-a-Roni, and a slightly creamy finish that everyone loves.
If you adore stuffed vegetables, you might also enjoy other stuffed classics like the classic stuffed cabbage rolls, which share the same warm, hearty vibe. These peppers deliver a lovely mix of textures: a slightly crisp pepper shell, a thickened, savory filling, and a golden top when baked just right.
Background & Origin
Stuffed peppers are a global comfort food with roots in Mediterranean, Eastern European, and Latin cuisines. The idea is simple: hollow out a vegetable and fill it with a savory mixture — a technique that shows up in dishes like dolma, dolmades, and, of course, cabbage rolls. This cross-cultural appeal explains why stuffed peppers are so popular — they’re adaptable, economical, and endlessly satisfying.
Fun fact: many home cooks started using boxed rice mixes like Rice-a-Roni as a time-saving shortcut in the mid-20th century. This version leans into that retro convenience while delivering a creamy, modern finish. If you enjoy the warm familiarity of stuffed vegetables, try pairing techniques from a trusted stuffed cabbage rolls recipe when you want to switch things up.
What makes this variation unique:
- Uses Rice-a-Roni Spanish flavor for quick, aromatic rice.
- Slightly creamy finish (briefly stirred with a touch of cheese or cream).
- Focus on simple steps for busy weeknights.
Ingredients
- 6 medium green peppers — tops cut off, seeds removed (room temperature)
- 1 lb ground beef — lean or 80/20 (optional swap: ground turkey)
- 1 chopped onion — finely chopped
- 1 (6 7/8 ounce) box of Rice-a-Roni mix, Spanish flavor — prepared per package
- 1 cup shredded cheddar cheese — divided (optional, extra creamy)
- 1 cup tomato sauce or crushed tomatoes — for saucing the baking dish (optional)
- 2 cloves garlic — minced (optional, adds depth)
- 1 tsp salt (adjust to taste)
- 1/2 tsp black pepper
- 1 tsp smoked paprika or chili powder — optional for warmth
- 1 tbsp olive oil — for sautéing (room temperature)
- Fresh parsley or cilantro — chopped for garnish (optional)
- Hot sauce or red pepper flakes — optional for heat
Notes:
- Onion: finely chopped for even cooking.
- Cheese: optional for extra creaminess or sprinkling on top.
- Rice-a-Roni: prepared according to package for best texture.
Step-by-Step Instructions
Preheat the oven to 350°F (175°C).
- Allow oven to fully preheat for even baking.
Cut the tops off the green peppers and remove the seeds.
- Trim a thin slice from the bottom if needed so peppers stand upright. Rinse and set aside.
In a skillet, cook the ground beef and chopped onion over medium heat until the meat is browned.
- Time: ~7–10 minutes.
- Visual cues: beef should be no longer pink and onions translucent; drain excess fat if desired.
Prepare the Rice-a-Roni mix according to the package instructions.
- Time: usually 15 minutes.
- Visual cues: rice should be tender but not mushy; Spanish flavor gives a tomato-y, slightly smoky note.
Combine the cooked beef and onion mixture with the prepared Rice-a-Roni.
- Stir in garlic, spices, and 1/2 cup cheese if using — the filling should be thickened and slightly creamy.
- Mini-tip: if filling seems dry, add 2–4 tbsp tomato sauce or reserved cooking liquid to loosen.
Stuff each green pepper with the mixture.
- Pack gently — don’t overfill to avoid bursting in the oven.
Place the stuffed peppers upright in a baking dish and cover with foil.
- Pour a little tomato sauce into the bottom of the dish for moisture, if desired.
Bake in the preheated oven for about 30–35 minutes or until the peppers are tender.
- Visual cues: peppers should be softened but still hold shape; filling will be hot and set.
Remove the foil and bake for an additional 10 minutes.
- Add remaining cheese on top during this last bake so it melts and turns golden.
Serve hot.
- Let cool 5 minutes; garnish with fresh parsley and a sprinkle of cracked pepper.
Times & Temperatures Summary:
- Prep: 15–20 minutes
- Bake: 40–45 minutes total at 350°F (175°C)
- Total: ~1 hour
Mini-tips:
- If peppers brown too quickly on top, tent with foil.
- To get tender peppers faster, parboil for 3–4 minutes before stuffing.
- For creamier filling, stir in 2–3 tbsp sour cream or cream cheese before stuffing.

Pro Tips & Common Mistakes
- How to improve flavor:
- Sear beef until well-browned — browning = flavor. Deglaze pan with a splash of beef broth for extra depth.
- Add a teaspoon of Worcestershire or a splash of soy sauce to the filling for umami.
- Texture tricks:
- Use slightly undercooked rice to avoid a mushy filling after baking.
- Add a beaten egg for a firmer, binder-style filling.
- What NOT to do:
- Don’t overfill the peppers — they can split open and spill filling.
- Avoid soggy bottoms: a thin layer of sauce in the pan is fine, but don’t drown them.
- Helpful shortcuts:
- Use pre-chopped onions or a rotisserie chicken for a faster version.
- Boxed Rice-a-Roni saves time but you can substitute with quick-cook rice + seasoning.
- Prep-ahead hacks:
- Assemble stuffed peppers a day ahead, cover, and refrigerate. Bake 10–15 minutes longer if cold.
- Freeze unbaked stuffed peppers in an airtight container for up to 3 months.
If you’re curious about swapping fillings or trying a different stuffed-vegetable tradition, consider recipes like the hearty stuffed cabbage rolls for inspiration.
Variations & Substitutions
- Vegan:
- Use a plant-based ground meat or cooked lentils + mushrooms, vegan cheese, and vegetable broth.
- Gluten-free:
- Use a gluten-free rice mix instead of Rice-a-Roni or make homemade rice with gluten-free seasonings.
- Low-carb:
- Replace rice with cauliflower rice or chopped zucchini; add more cheese and herbs for richness.
- Kid-friendly:
- Mild spices, extra cheese, and small-chopped vegetables make it toddler-approved.
- Extra creamy:
- Fold in cream cheese, ricotta, or a splash of heavy cream to the filling before stuffing.
- Spicy:
- Add chopped jalapeño, cayenne, or a spoonful of chipotle in adobo for heat.
- Budget-friendly:
- Use bulk rice, swap ground beef for ground turkey/chicken, or bulk up filling with canned beans.
Serving Suggestions
- Best sides:
- Crisp green salad with vinaigrette, roasted potatoes, or simple steamed veggies.
- Bread:
- Crusty sourdough or garlic bread to soak up any sauce.
- Salads:
- Cucumber-tomato salad or coleslaw adds freshness and crunch.
- Rice or pasta:
- Serve alongside plain rice for extra comfort or buttered noodles for picky eaters.
- Wine pairing:
- Light red like Pinot Noir or a fruity Zinfandel pairs nicely; for whites, try a crisp Sauvignon Blanc.
- How to plate beautifully for guests:
- Place pepper upright on a white plate, spoon a bit of warm tomato sauce around it, sprinkle fresh herbs and microgreens, and add a lemon wedge for color.
Storage, Freezing & Reheating
- How long it lasts in the fridge:
- Stored in an airtight container, leftovers keep 3–4 days.
- Freezer-friendly instructions:
- Freeze unbaked stuffed peppers (wrap individually) for up to 3 months. Thaw overnight in fridge before baking.
- To freeze cooked peppers: cool completely, wrap tightly, up to 2 months for best quality.
- Best reheating method:
- Oven: 350°F until heated through (~20 minutes for leftovers). This preserves texture.
- Microwave: quicker but may make peppers softer — heat covered in 1–2 minute intervals.
- Meal-prep options:
- Make a double batch, refrigerate half, and freeze half for easy dinners later.
Nutrition & Health Info
- Approximate per stuffed pepper (depends on cheese, exact beef fat, rice):
- Calories: ~350–450
- Protein: ~20–25g
- Carbs: ~30–40g
- Fat: ~12–20g
- Lighter versions:
- Use lean ground turkey, reduce cheese, and swap for cauliflower rice to cut calories and carbs.
- Healthy swaps:
- Add more veggies to the filling (spinach, carrots, mushrooms) to boost fiber and micronutrients.
FAQ

Q: Can I prepare Stuffed Bell Peppers ahead of time?
A: Yes — assembly can be done the day before. Cover and refrigerate; bake covered, adding 10–15 minutes to the bake time if very cold.
Q: How do I thicken or thin the sauce in the filling?
A: To thicken: simmer to reduce liquid, or stir in a small amount of breadcrumbs or beaten egg. To thin: add a splash of broth, tomato sauce, or reserved rice cooking liquid.
Q: What ingredient substitutions work best?
A: Ground turkey or lentils for meat-free; cauliflower rice for low-carb; gluten-free boxed rice or homemade rice for gluten-free. For other stuffed-vegetable ideas, check related recipes like this stuffed cabbage rolls for swap inspiration.
Q: Can I double or halve the recipe?
A: Absolutely — it scales well. Use a larger baking dish for doubled recipes and add a few extra minutes to bake time.
Q: What cookware is best?
A: A sturdy glass or ceramic baking dish works great. A Dutch oven is useful if you want to braise uncovered for a golden finish.
Q: Can I make it dairy-free or meat-free?
A: Yes — use vegan cheese or omit cheese, and swap beef for lentils, mushrooms, or plant-based crumbles. See vegan variations above and try techniques from stuffed vegetable classics like stuffed cabbage rolls for more ideas.
Q: What sides go well with Stuffed Bell Peppers?
A: Light salads, roasted potatoes, garlic bread, or plain rice complement the peppers without overpowering them.
Conclusion
Thanks for cooking along — I hope these Stuffed Bell Peppers become one of your go-to comfort dinners. They’re cozy, forgiving, and perfect for feeding a family or prepping ahead. If you try the recipe, please leave a comment below, rate it, and share a photo on social media — I love seeing your versions!
👉 #fblifestyle