Ube Oreo Cheesecake
The First Bite: My Love Affair with Ube Oreo Cheesecake
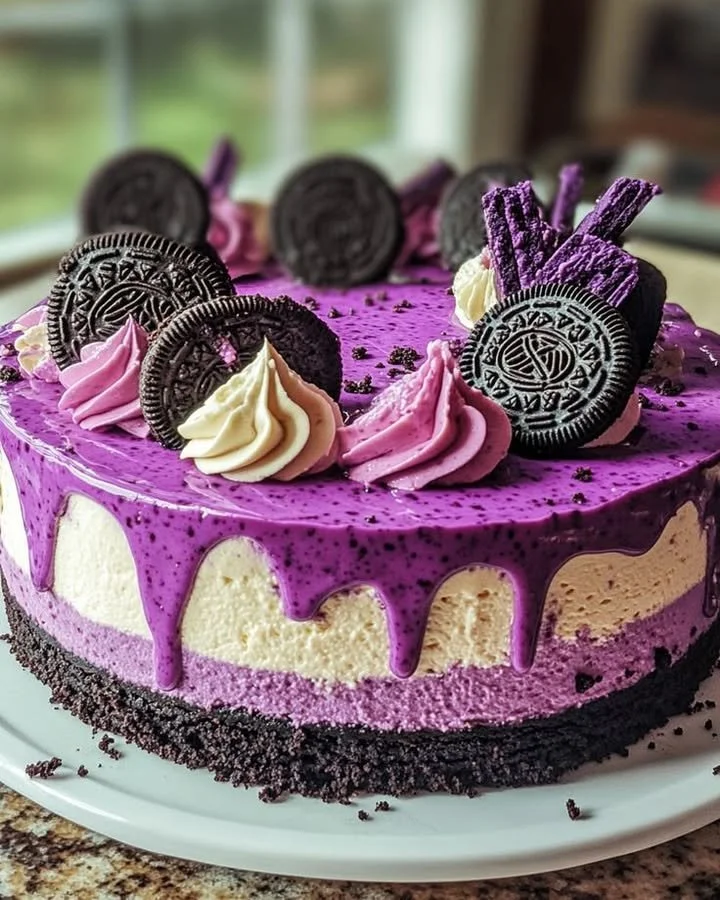
If you’ve ever found yourself daydreaming about the perfect fusion of Filipino goodness and classic cookies, then let me introduce you to my all-time favorite treat: Ube Oreo Cheesecake. I still remember the first time I tasted that velvety purple filling against the chocolatey Oreo crust—instantly, I felt like I was transported back to my childhood, sneaking spoonfuls of ube halaya in my grandma’s kitchen during summer breaks. The pop of color, the toasty aroma from baking, the playful crunch of Oreos—this isn’t just cheesecake. It’s a total celebration, and honestly, every slice is like a warm hug from home.
Why You’ll Adore This Ube Oreo Cheesecake
There are loads of reasons I keep coming back to this ube cheesecake. Here are a few that (trust me) will win you over too:
- A True Showstopper: That bright purple layer always brings out the wow factor at any gathering. Your friends won’t stop taking photos—and asking for seconds!
- East Meets West: The classic taste of Oreo cookies combined with creamy Filipino ube halaya makes every bite totally unique, yet comfortingly familiar.
- Fuss-Free Yet Fancy: Even if you’re new to homemade cheesecake, this recipe is straightforward. You get a dessert that looks bakery-worthy with minimal stress.
- Gooey, Crunchy, Dreamy: Between the buttery Oreo cookie crust, the tangy cream cheese, and the silky ube filling, there’s something for everyone to swoon over.
Ingredients You’ll Need for Ube Oreo Cheesecake
Gathering your ingredients is half the fun! Here’s what to snag next time you’re at the market (plus a few tips I’ve learned along the way):
- Oreo cookies (about 20, crushed): For the rich, chocolatey base. I use classic, but double-stuffed works for an extra-lush crust!
- Melted butter (6 tbsp): Helps those Oreo crumbs bind together—unsalted is my go-to.
- Cream cheese (500 g, softened): The backbone of any great cheesecake, so let it sit at room temp for ultra-smooth mixing.
- Sugar (1 cup): Just enough sweetness to balance the ube flavors.
- Heavy cream (200 ml for filling, 100 ml for topping): Adds that signature richness.
- Large eggs (3): Bind everything together and keep the texture creamy.
- Vanilla extract (2 tsp): Rounds out the flavors for a bakery-style finish.
- Ube halaya (1 cup; purple yam jam or puree): The purple star! Jarred or homemade both work.
- Ube extract (few drops, optional): If you want that extra oomph (and an even punchier purple).
- White chocolate (150 g): For the silky ganache topping.
- Purple food coloring (optional): Amp up the color if you’re feeling festive.
- Whipped cream, Oreo cookies, Oreo wafers: For those irresistible finishing touches.
Tip: Look for ube halaya at Asian groceries or specialty shops—it makes all the difference!
Step-by-Step Guide: Making the Perfect Ube Oreo Cheesecake
Let’s break it down, cheesecakers! Here’s how I do it every single time:
- Make the Oreo Crust:
Crush Oreos until they’re fine crumbs (I pop them in a plastic bag and use a rolling pin for stress relief—SO satisfying). Mix with melted butter and press into a springform pan. Pop this in the fridge while we prep the filling. - Prepare the Ube Cheesecake Filling:
In a big bowl, beat cream cheese and sugar until fluffy (no lumps, please—it’s worth the extra mixing). Add heavy cream, vanilla, and ube halaya. Give it another mix until silky. Gently mix in eggs, one at a time. - Pour and Bake:
Pour the creamy purple filling over your chilled Oreo crust. Place your pan in a water bath (I just set it in a bigger tray with hot water), and bake at 160°C (320°F) for 60–70 minutes. When the edges are set but the center still jiggles a little, you’re set! - Cool, Then Chill:
Turn off the oven, crack open the door, and let the cake cool inside for an hour. Afterwards, pop it in the fridge (minimum four hours, but I like overnight for best results). - Make the Ganache Topping:
Heat cream and pour over melted white chocolate. Mix until glossy and smooth. Add purple coloring or a dash more ube jam if you want extra drama. - Decorate:
Pour that dreamy ganache over the cold cheesecake and let it artfully drip. Pipe on whipped cream swirls, then garnish with whole Oreos and crunchy Oreo wafers. - Chill, Slice, ENJOY:
Chill another 30 minutes, slice thick, and enjoy the jaw-dropping marbled purple layers.
Pro-tip: Don’t rush the cooling—cheesecake always tastes better (and sets perfectly) after a long chill.
My Secret Tips and Tricks for Ube Oreo Cheesecake Success
After several (delicious) trials and a few cheesecake fails, here’s what I wish someone had told me sooner:
- Room Temp Everything: Cold cream cheese = lumpy filling. Trust me, let it soften fully before mixing.
- Water Bath = Crack-Free: Don’t skip the water bath. It keeps your ube Oreo cheesecake silky, avoids dry edges, and gives you a professional finish.
- Don’t Overmix the Eggs: Mix until just combined after adding each egg—you want creamy, not airy.
- Scrape the Bowl Often: Ube can settle at the bottom, so keep folding everything together.
- Patience Pays Off: It’s always more tempting to dig in early, but giving it ample fridge time lets the flavors meld and the texture firm up.
Creative Variations and Ingredient Swaps
Cheesecake is all about making it your own! Here are some ways you can mix things up:
- Gluten-Free: Swap regular Oreos for a gluten-free variety without sacrificing the signature Oreo crust.
- Vegan/Dairy-Free: Try vegan cream cheese, coconut cream, and dairy-free chocolate for a plant-based twist.
- Chocolate Lovers: Add a layer of dark chocolate ganache below the ube filling for an ultra-rich treat.
- Chunky Style: Fold in chopped white chocolate or extra Oreo cookie bits into the filling for texture bombs.
- No Ube? No Problem: Purple sweet potato puree is a surprisingly close sub if you can’t find ube halaya at your store.
Semantically, you can play with other Filipino-inspired flavors—think a layer of macapuno (sweet coconut strips) on top, or pandan extract instead of ube for a green spin!
How to Serve and Store Your Ube Oreo Cheesecake
Serving suggestions? I like mine thick and cold, with a big dollop of whipped cream and extra Oreo wafers for crunch.
- Serving:
Remove from the fridge right before you want to serve for extra-clean slices. A hot knife (run under warm water) makes for beautiful, smooth cuts! - Storing Leftovers:
Pop leftovers in an airtight container and keep chilled. Your homemade cheesecake stays fresh for up to five days (though honestly, it’s usually gone by Day 2 in my house). - Freezing:
This Ube Oreo cheesecake freezes like a charm. Slice before freezing, wrap tightly, and thaw slices as needed for instant dessert bliss.
FAQs: Your Top Questions About Ube Oreo Cheesecake Answered
Is ube cheesecake hard to make if I’m a beginner?
Nope! This ube Oreo cheesecake recipe is beginner-friendly. Just take your time on each step and enjoy the process—you’ve got this.
Where can I buy ube halaya for cheesecake?
Most Asian grocery stores carry it in jars or tubs (sometimes labeled “purple yam jam”). If you’re feeling ambitious, homemade ube jam is lovely too.
Can I use regular sweet potatoes instead of ube?
For the classic ube Oreo cheesecake flavor and that vibrant purple hue, true ube is best. But in a pinch, purple sweet potatoes make a solid alternative.
Why did my cheesecake crack on top?
Cracks usually happen if the oven temp is too high, or if the cheesecake cools too quickly. Keep that water bath in the baking process, and always cool gradually for best results.
My ube cheesecake tastes bland—how do I boost the flavor?
Try adding a few extra drops of ube extract or a little more ube halaya next time—you might just love how it intensifies both color and flavor!
Making this Ube Oreo Cheesecake has become my go-to way of blending family traditions with sweet, new memories. I hope you have as much joy baking (and sharing) it as I do. If you try it, tag me on Instagram or share your own baking story—I’d absolutely love to see your purple creations!
Ready to bake your own slice of happy? Let’s make that kitchen smell amazing. 💜
Ube Oreo Cheesecake
Ingredients
For the Crust
- 20 pieces Oreo cookies, crushed Classic or double-stuffed for extra richness.
- 6 tbsp Melted unsalted butter Helps bind the crumbs together.
For the Filling
- 500 g Cream cheese, softened Let it sit at room temperature for smooth mixing.
- 1 cup Sugar Balances the ube flavors.
- 200 ml Heavy cream For filling richness.
- 100 ml Heavy cream For ganache topping.
- 3 pieces Large eggs Bind the filling together.
- 2 tsp Vanilla extract Enhances flavor.
- 1 cup Ube halaya Purple yam jam or puree.
- few drops Ube extract Optional for flavor enhancement.
- 150 g White chocolate For silky ganache topping.
- 1 Purple food coloring Optional for color enhancement.
- Whipped cream For decoration.
- Oreo cookies, whole For decoration.
- Oreo wafers For finishing touches.
Instructions
Make the Oreo Crust
- Crush Oreos into fine crumbs and mix with melted butter. Press the mixture into the bottom of a springform pan. Refrigerate.
Prepare the Ube Cheesecake Filling
- In a large bowl, beat the softened cream cheese and sugar until fluffy and smooth.
- Add heavy cream, vanilla extract, and ube halaya, mixing until incorporated.
- Gently add eggs, mixing one at a time to keep the batter smooth.
Bake the Cheesecake
- Pour the ube filling over the chilled crust. Bake in a water bath at 160°C (320°F) for 60-70 minutes until the edges are set and the center jiggles slightly.
Cool and Chill
- Turn off the oven and leave the cheesecake inside with the door cracked for 1 hour to cool slowly.
- Refrigerate for at least 4 hours, preferably overnight.
Make the Ganache Topping
- Heat 100 ml of cream and pour it over the melted white chocolate. Mix until smooth and glossy.
- Optional: Add purple food coloring or more ube jam for extra flavor.
Decorate
- Pour ganache over the chilled cheesecake and drizzle as desired. Decorate with whipped cream and garnish with whole Oreos and Oreo wafers.
Serve and Enjoy
- Slice the cheesecake thick and serve chilled. For clean cuts, use a hot knife.