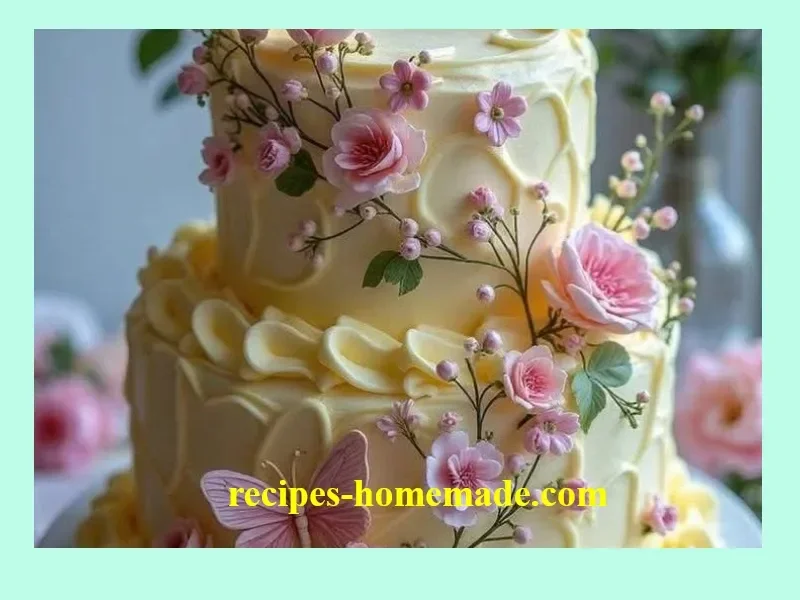
Whimsical Butterfly Blossom Cake
The Whimsical Butterfly Blossom Cake: Where Memories (and Sprinkles) Take Flight
There’s something downright magical about the first time you dig into a slice of a beautifully decorated Butterfly Blossom Cake. For me, it takes me straight back to my childhood: birthday parties in grandma’s garden, warm spring breezes, handfuls of wildflowers, and the anticipation of seeing what she’d dreamed up for my cake that year. The first time I saw a butterfly-shaped cake, I didn’t just eat dessert—I was invited into a fairy tale. Now, baking this whimsical butterfly blossom cake for friends or family feels less like following a recipe and more like passing along a little piece of that wonder.
If you’ve ever wanted to create a show-stopping, joy-filled centerpiece that makes everyone’s eyes light up, this is it. And don’t worry if you’re not a pro baker—this butterfly blossom cake is as delightful to make as it is to share.
Why You’ll Adore This Butterfly Blossom Cake
Let me tell you why this cake truly has my heart (and will soon have yours, too!):
- It’s a Conversation Starter: People can’t help but smile when they see those edible butterflies and pink blossoms. You’ll be fielding questions and compliments all night!
- Unbelievably Soft & Buttery: The classic sponge is outrageously tender and full of comforting vanilla flavor (that secret extra pat of butter doesn’t hurt).
- Deceptively Simple: It looks elaborate, but the steps are totally manageable—even for newbie bakers. (And hey, fondant is more forgiving than you might think!)
- Perfect for Any Celebration: From birthdays to baby showers to those random Saturday afternoons where you just want to make something magical, a butterfly blossom cake fits the bill.
Ingredients You’ll Need for Your Butterfly Blossom Cake
Ready to get baking? Here’s what you’ll need for this butterfly blossom cake (and some tips for making sure every bite is perfect):
- 300g butter, softened
Go for real unsalted butter if you can—quality matters here for that lush, rich flavor! - 300g caster sugar
Caster sugar is best for a fine texture. If you only have granulated, give it a quick blitz in the food processor. - 6 eggs
Room temperature eggs help everything come together smoothly and bake up evenly. - 300g self-raising flour
This keeps your cake light and fluffy with minimal fuss (no sifting required, though I always do for good luck). - 2 tsp vanilla extract
Try to use pure vanilla extract for the deepest, most comforting flavor. - 600g fondant icing
I usually pick ready-to-roll fondant if I’m in a hurry. It’s so easy to color and shape! - Pink food coloring
Gel-based coloring creates gorgeous, vibrant shades without making the fondant sticky. - 300g buttercream
Homemade is best, but store-bought works in a pinch! (Don’t skimp on the butteriness.) - Edible butterfly and flower decorations
You can buy these or make your own with fondant—there’s no wrong answer. Just have fun with it!
Step-by-Step Guide: Making the Perfect Whimsical Butterfly Blossom Cake
Let’s dive in! Here’s my go-to routine for pulling off this stunning homemade butterfly blossom cake:
- Preheat & Prep:
Set your oven to 180°C (that’s about 350°F if you’re stateside). Grease two round cake tins and line the bases with parchment—it saves you from any “sticking disasters” later. - Cream Butter & Sugar:
Beat the softened butter and caster sugar together until they’re pale and fluffy. This is where your cake’s dreamy texture begins! - Add Eggs:
Crack in the eggs one by one, beating well with each addition. Don’t worry if it looks a bit curdled at first—the flour will bring it all together. - Fold in Flour & Vanilla:
Sift in your self-raising flour. Gently fold it together with the vanilla extract—be patient, you don’t want to lose all that air you whipped in. - Divide & Bake:
Split the batter evenly between your tins. Bake for 25-30 minutes, or until a skewer inserted in the center comes out clean. (Your kitchen will smell amazing.) - Cool Completely:
Take the cakes out of their tins and let them cool fully on a wire rack. Warm cakes + fondant = sticky disaster (I’ve learned this the hard way). - Assemble with Buttercream:
Level the cakes if needed, then slather one with buttercream. Stack the other cake on top and spread a thin layer over the whole outside “crumb coat” style. - Roll & Color Fondant:
Knead pink food coloring into your fondant for a rosy hue. Roll it out and carefully cover the cake. Smooth it gently with your hands or a fondant smoother. - Decorate!
Use your creativity—roll extra fondant into little butterflies and flowers, or stick on edible decorations. This is where the “whimsical” magic happens. - Set & Serve:
Let your cake rest for about 1 hour to firm everything up. Then slice and enjoy!
My Secret Tips and Tricks for Butterfly Blossom Cake Success
With a few extra bits of wisdom, your whimsical butterfly cake will be impossible to resist:
- Chill Before Decorating:
Pop your assembled (but not yet fondant-ed) cake in the fridge for 30 minutes. It firms up the buttercream and helps the fondant go on smoothly (avoiding pesky lumps!). - Knead Fondant Until Smooth:
Cold fondant can crack—warm it with your hands first. If it gets sticky, a dusting of powdered sugar sorts it right out. - Don’t Sweat Cake Imperfections:
Even if your cake layers are a bit uneven, the decorations hide a multitude of sins! This isn’t about perfection—it’s about JOY. - Batch Fondant Decorations Ahead:
If you’re making butterflies or blossoms by hand, whip up a bunch the day before. They’ll dry and hold their shape better.
These easy-breezy baking tips will give you that perfect homemade butterfly blossom cake—no stress, just sweet success.
Creative Variations and Ingredient Swaps
Let’s make this butterfly blossom cake your own! Here are a few of my favorite twists:
- Lemon or Orange Zest:
Swap out the vanilla extract for a tablespoon of citrus zest for a zippy, summery vibe. - Gluten-Free Flour Mix:
Use your favorite gluten-free self-raising flour blend for a cake everyone can enjoy. - Butterfly Garden Theme:
Mix up flower colors with extra food gels and top with tiny edible pearls for dreamy “garden vibes.” - Chocolate Lovers:
Add 2 tbsp cocoa powder to the batter for a subtle chocolate butterfly blossom cake—you won’t regret it. - Vegan Swap:
Use your go-to vegan butter, flax eggs (1 Tbsp ground flax + 2.5 Tbsp water per egg), and a reliable dairy-free buttercream for a vegan butterfly cake that’s every bit as pretty.
Don’t be afraid to experiment! These creative swaps open up a world of easy celebration cakes with a whimsical twist.
How to Serve and Store Your Butterfly Blossom Cake
Because you’ll want every last crumb to shine, here’s how I handle leftovers and party logistics (from easy birthday cake to afternoon treat):
- Serving:
Use a sharp knife dipped in hot water for clean slices—especially through the fondant layer. - Storing:
Store at room temperature in a cake tin or covered container for up to 3 days. If your kitchen is super warm or humid, refrigerate—but let it come back to room temp before serving so it’s soft and luscious. - Freezing:
You can freeze the sponge (undecorated) for up to 2 months. Wrap in cling film and foil, then thaw completely before icing.
Fresh, homemade butterfly blossom cake always goes fast—trust me!
FAQs: Your Top Questions About Butterfly Blossom Cake Answered
1. Can I make the butterfly blossom cake ahead of time?
Absolutely! Bake the sponges a day or two ahead, then decorate the day of your event for the best texture and presentation.
2. What’s the best way to color fondant for decorations?
Gel food coloring is my go-to. Start small—it’s super concentrated—and knead until the color is even. (Powdered sugar helps with any stickiness.)
3. I’m nervous about working with fondant. Any tips?
Don’t overthink it! Use a little extra icing sugar on your work surface and hands, and remember—if you mess up, just knead it out and start again. The butterflies and flowers hide any minor flaws.
4. How do I keep my butterfly decorations upright on the cake?
Let your fondant butterflies dry slightly before placing them, then stick the wings into a dab of buttercream or melted white chocolate on the cake.
5. Can I use whipped cream instead of buttercream?
You can, but whipped cream is trickier under fondant (it can make things too soft and even soggy). Buttercream works best for stability and flavor.
Making a whimsical butterfly blossom cake is about so much more than baking—it’s about sharing joy, making memories, and maybe getting

Butterfly Blossom Cake
Ingredients
Cake Ingredients
- 300 g butter, softened Go for real unsalted butter for better flavor.
- 300 g caster sugar Best for a fine texture; can blitz granulated sugar if needed.
- 6 pcs eggs Use room temperature eggs for even baking.
- 300 g self-raising flour Keeps the cake light and fluffy; optional to sift for good luck.
- 2 tsp vanilla extract Use pure extract for best flavor.
Decoration Ingredients
- 600 g fondant icing Ready-to-roll fondant is easiest to use.
- Pink as needed food coloring Gel-based coloring produces vibrant hues without stickiness.
- 300 g buttercream Homemade is best, but store-bought works in a pinch.
- as needed edible butterfly and flower decorations Can be bought or made with fondant.
Instructions
Preparation
- Preheat your oven to 180°C (about 350°F). Grease two round cake tins and line the bases with parchment.
- Cream the softened butter and caster sugar together until pale and fluffy.
- Beat in the eggs one by one, mixing well after each addition.
- Fold in the self-raising flour and vanilla extract gently.
- Divide the batter evenly between the two tins and bake for 25-30 minutes, or until a skewer inserted comes out clean.
- Cool the cakes fully on a wire rack before decorating.
Decoration
- Level the cakes if needed, then spread buttercream on one layer and stack the other on top.
- Knead pink food coloring into the fondant and roll it out.
- Cover the cake with the fondant and smooth out any lumps.
- Use creativity to add fondant decorations or edible butterflies and flowers.
- Let the cake rest for about 1 hour before slicing.