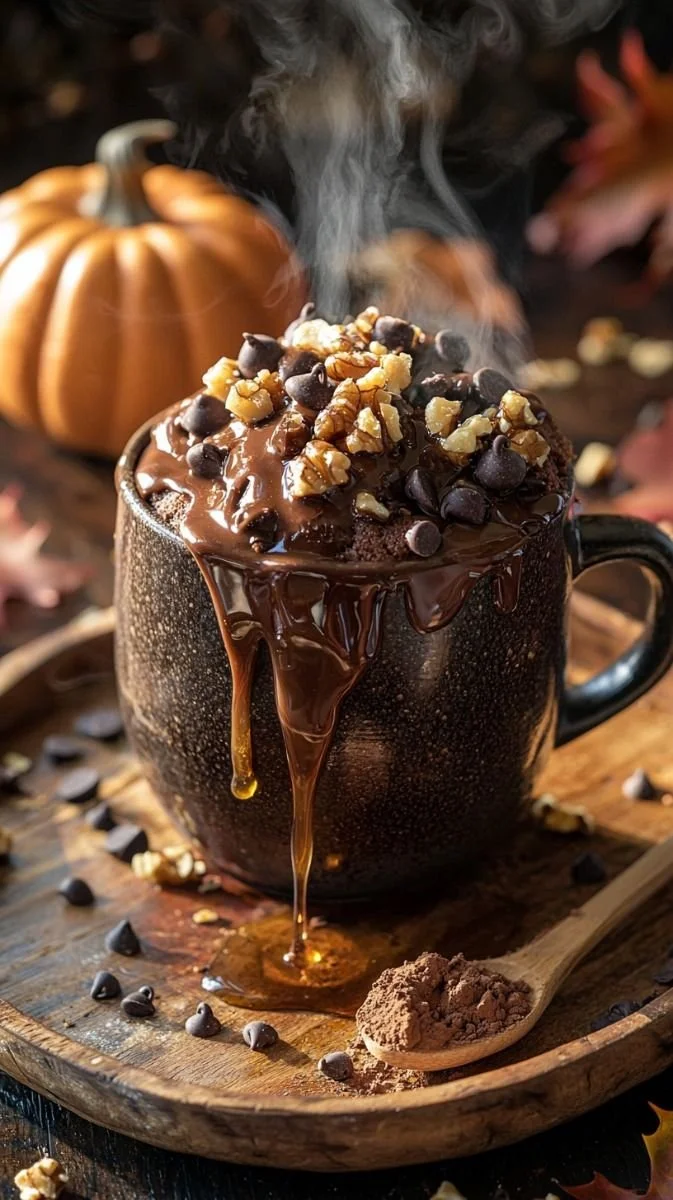
Decadent Chocolate Lava Mug Cake
The Cozy Magic of a Decadent Chocolate Lava Mug Cake
I’ll never forget the first time I made a decadent chocolate lava mug cake on a chilly Friday night after a long, wild week. I was standing in my flannel pajamas, raiding the pantry for something—anything—that would hit that sweet spot between comfort and pure chocolate indulgence. That’s when I remembered the magic: this easy, fudgy chocolate mug cake you whip up in minutes, with just a regular mug and your microwave. There’s something about watching the center ooze out molten chocolate after just a minute of “cooking” that feels—well, a little bit like you’ve cast your own cozy kitchen spell.
Whether you’re celebrating a tiny win, mending a tough day, or simply craving something soul-soothing, this gooey chocolate lava mug cake is my forever secret weapon. Trust me, after just one bite, you’ll understand why.
Why You’ll Adore This Decadent Chocolate Lava Mug Cake
Let’s be real—sometimes you want dessert FAST, with minimal mess, and maximum payoff. Here’s why this chocolate lava mug cake is a total game changer:
- It’s Instant Chocolate Bliss: In less than five minutes, you get that rich, melty, almost sinful chocolate center (hello, lava!).
- No Fancy Equipment Needed: Seriously, all you need is a mug, a spoon, and a microwave—no mixers or special dishes.
- Super Customizable: Whether you love nuts, caramel, or double chocolate, this mug cake is made for mixing things up.
- Single-Serve Perfection: No leftovers to worry about—just one personal, piping-hot portion all for you (or to split, if you’re feeling generous).
Honestly, this decadent chocolate lava mug cake brings joy to even the drizzliest of evenings.
Ingredients You’ll Need for Decadent Chocolate Lava Mug Cake
Gather these simple staples (bonus: you probably have them already):
- 4 tbsp all-purpose flour: Just regular flour—no sifting needed.
- 2 tbsp cocoa powder: Go for unsweetened for that rich, deep chocolatey taste.
- 3 tbsp sugar: White granulated, but brown sugar gives it a caramel note.
- ¼ tsp baking powder: For that magical lift.
- Pinch of salt: Never skip this! It makes the chocolate pop.
- 3 tbsp milk: Dairy or plant-based—whatever’s in the fridge.
- 2 tbsp vegetable oil or melted butter: I love using butter for a richer flavor, but oil keeps it extra moist.
- 1 tbsp chocolate chips (plus extra for topping): They melt into pockets of gooey goodness (use semisweet or dark as you like).
- 1 tbsp chopped walnuts (optional): For a bit of crunch and nuttiness.
- 1 tbsp Nutella or chocolate spread: This is your “lava”—don’t be shy!
- Extra chocolate chips, chopped walnuts, caramel drizzle (all optional, for garnish and extra decadence).
Each ingredient packs a punch, so feel free to swap or double up if you’re feeling creative!
Step-by-Step Guide: Making the Perfect Chocolate Lava Mug Cake
You’re just minutes away from dessert heaven. Here’s how I make my go-to chocolate lava mug cake—no stress, just sweet success:
- Mix Dry Ingredients: In a big microwave-safe mug, whisk together flour, cocoa, sugar, baking powder, and a pinch of salt. (I use a fork—less to clean.)
- Add Wet Ingredients: Pour in the milk and oil (or melted butter). Stir until the batter is nice and smooth—lumps = a no-go.
- Fold in the Extras: Gently mix in your chocolate chips and walnuts (if using).
- Add the Lava Center: Drop a heaping spoonful of Nutella or chocolate spread right in the middle. Push it down just a tad underneath the batter. This is the lava magic!
- Microwave: Pop it in the microwave for 1–1.5 minutes. (My microwave is a little old, so I do the full 90 seconds. If yours runs hot, start with 60 seconds and check.)
- Garnish and Enjoy: Finish with extra chocolate chips and walnuts. Feeling fancy? Drizzle with caramel sauce. Let it cool—just a bit!—then dive in.
Pro tip: Don’t overcook—the top should look set but feel soft in the middle. That’s how you get that dreamy, molten core!
My Secret Tips and Tricks for Chocolate Lava Mug Cake Success
I’ve made my fair share of mug cakes (and, okay, a few epic fails). Here’s how to make your decadent chocolate lava mug cake truly next-level:
- Don’t Overmix: Stir until just combined. Over-mixing can make your cake tough (and no one wants a rubbery microwave dessert).
- Go Mug-Wide: Use a larger mug—ideally 12 oz or more—so your cake doesn’t overflow as it rises.
- Experiment With Chips: Try dark, milk, or even white chocolate chips for different flavor profiles (double chocolate is never a bad idea).
- Warm Garnishes: If you’re adding extra chocolate chips or caramel, pop the mug back in the microwave for 5-10 seconds to melt everything slightly—it gets all gooey and irresistible.
- Watch the Microwave: Every microwave is a bit different, so keep an eye on yours the first time. The cake should puff up but still feel soft in the center.
- Texture Troubleshooting: If your cake feels dry, reduce cook time slightly next round (or add a splash more milk to the batter).
Once you find your sweet spot, you’ll be making this mug cake with your eyes closed!
Creative Variations and Ingredient Swaps
Love to play around in the kitchen? Here are some favorite ways to remix your chocolate lava mug cake (because dessert should never be boring):
- Peanut Butter Lava: Swap Nutella with a spoonful of peanut butter for a nutty “lava” twist.
- Gluten-Free: Use a 1:1 gluten-free flour blend so everyone can enjoy!
- Vegan Option: Use plant-based milk, dairy-free chocolate chips, and coconut oil or vegan butter.
- Extra Boozy: Stir in a splash of coffee liqueur or espresso for an adult upgrade.
- Seasonal Add-Ins: Throw in dried cherries, orange zest, or pumpkin spice depending on the mood.
- Allergy-Friendly: Omit nuts or switch to seeds if needed.
This chocolate lava mug cake is your blank dessert canvas!
How to Serve and Store Your Chocolate Lava Mug Cake
Honestly, this decadent chocolate lava mug cake rarely lasts long enough to store! But in case you have willpower:
- Serving: Let it cool for just a minute or two before digging in—too hot and you’ll miss the velvety lava center (and burn your tongue, trust me!).
- Serving Ideas: Top with a scoop of vanilla ice cream, whipped cream, or—my favorite—frozen berries for a hot/cold combo.
- Storing Leftovers: If you somehow have part of your mug cake left, cover and keep in the fridge up to 24 hours. Reheat in the microwave for 10–15 seconds for melty chocolate all over again (but freshly made is always best!).
- Make-Ahead Tip: You can pre-mix the dry ingredients and keep them in a jar for a mug-cake emergency.
Dessert should be easy, right?
FAQs: Your Top Questions About Chocolate Lava Mug Cake Answered
Can I double this recipe for two?
Absolutely! Just use two separate mugs and microwave each one individually. If you try to make a double batch in one mug, it might overflow or cook unevenly.
What if I don’t have Nutella for the lava center?
No worries—you can use any chocolate spread, peanut butter, a square of chocolate, or even a spoonful of caramel sauce. The whole idea is the gooey lava center!
My mug cake turned out dry. What happened?
Microwaves vary a lot, so try cutting 10-15 seconds off cooking time next time or add a splash extra milk to the batter. You want the top set, but the inside should stay moist and soft.
Can I make a vegan version?
For sure! Use plant-based milk, dairy-free chocolate chips, and a vegan chocolate spread for the lava. Coconut oil or vegan butter works great for the fat.
What kind of mug is best for lava mug cake?
Choose a large, microwave-safe mug—at least 10 to 12 oz capacity. Straight-sided mugs work best to help the cake rise evenly (and prevent overflow!).
I hope you fall for this decadent chocolate lava mug cake as hard as I did! If you whip some up tonight, let me know how yours turns out (and don’t forget the extra chocolate chips on top—you deserve it).
Chocolate Lava Mug Cake
Ingredients
Dry Ingredients
- 4 tbsp all-purpose flour Just regular flour—no sifting needed.
- 2 tbsp cocoa powder Go for unsweetened for that rich, deep chocolatey taste.
- 3 tbsp sugar White granulated, but brown sugar gives it a caramel note.
- ¼ tsp baking powder For that magical lift.
- a pinch salt Never skip this! It makes the chocolate pop.
Wet Ingredients
- 3 tbsp milk Dairy or plant-based—whatever’s in the fridge.
- 2 tbsp vegetable oil or melted butter Butter for a richer flavor, oil keeps it extra moist.
Extras
- 1 tbsp chocolate chips Plus extra for topping; use semisweet or dark as you like.
- 1 tbsp chopped walnuts Optional for a bit of crunch and nuttiness.
- 1 tbsp Nutella or chocolate spread This is your 'lava'—don’t be shy!
Instructions
Preparation
- In a big microwave-safe mug, whisk together flour, cocoa, sugar, baking powder, and a pinch of salt.
- Pour in the milk and oil (or melted butter). Stir until the batter is nice and smooth—lumps = a no-go.
- Gently mix in your chocolate chips and walnuts (if using).
- Drop a heaping spoonful of Nutella or chocolate spread right in the middle. Push it down just a tad underneath the batter.
Cooking
- Pop it in the microwave for 1–1.5 minutes. Start with 60 seconds and check if your microwave runs hot.
Serving
- Finish with extra chocolate chips and walnuts. Drizzle with caramel sauce if desired, and let it cool slightly before digging in.