Oreo Cream Cheese Cheesecake Sushi Roll

Oreo Cream Cheese Cheesecake Sushi Roll
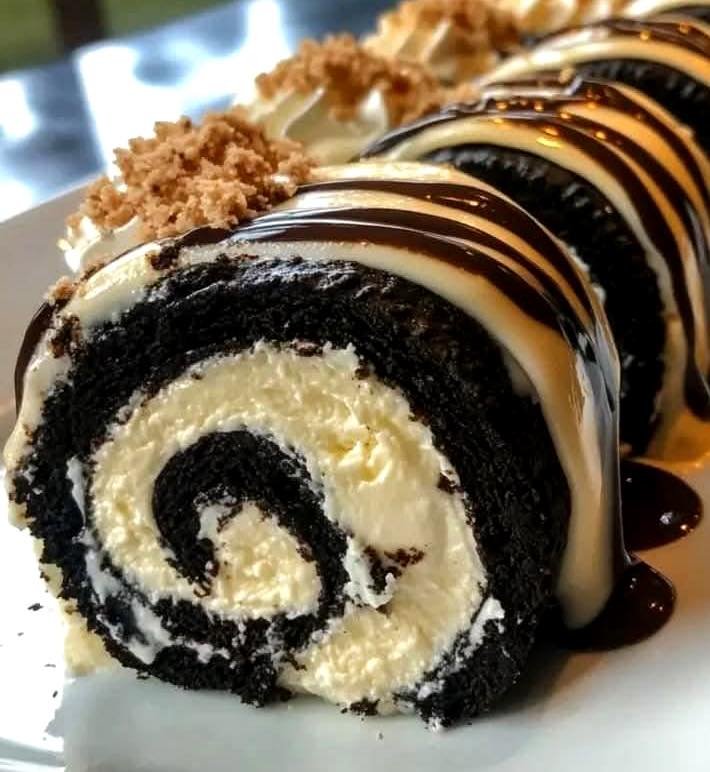
Who doesn’t love a delicious and creative dessert? Introducing the Oreo Cream Cheese Cheesecake Sushi Roll—a whimsical and scrumptious treat that combines the beloved flavors of Oreos and cheesecake with a fun sushi twist! Perfect for parties, special occasions, or just a fun night in, this dessert will leave your friends and family craving more.
A Sweet and Creative Treat
The Oreo Cream Cheese Cheesecake Sushi Roll is not only visually appealing but also incredibly easy to make! This recipe is perfect for those who want to impress guests without spending hours in the kitchen. Made with simple ingredients, this dessert is sure to delight everyone. Let’s dive into this fun recipe!
🧂 Ingredients:
- 2 packages Oreo cookies (processed)
- 2–3 tablespoons milk
- 200 g cream cheese
- 3 tablespoons powdered sugar
- 1 teaspoon vanilla extract
- 4 tablespoons cream (or milk)
- Banana, strawberry, or any fruit of your choice (cut into long strips)
- Melted chocolate (optional)
- Mini Oreo crumbs
- Powdered sugar (for dusting)
👩🍳 Directions:
1️⃣ Prepare the Oreo Mixture: Begin by processing the Oreo cookies in a food processor until they become fine crumbs. In a mixing bowl, combine the Oreo crumbs with 2–3 tablespoons of milk. Mix until the consistency is moldable but not too wet.
2️⃣ Make the Cream Cheese Filling: In a separate bowl, blend the cream cheese, powdered sugar, and vanilla extract. Mix until the mixture is smooth and creamy. If it’s too thick, you can add a tablespoon of cream or milk to help reach the desired consistency.
3️⃣ Assemble the Sushi Roll: On a clean, flat surface, lay a piece of parchment paper or a sushi mat. Spread an even layer of the Oreo mixture onto the parchment paper, leaving a bit of space at the edges.
4️⃣ Add the Cream Cheese Filling: Spread a layer of the cream cheese filling over the Oreo base. This will be your delicious filling when you roll it up!
5️⃣ Incorporate the Fruits: Carefully place your long strips of banana or strawberry (or your fruit of choice) horizontally across the cream cheese layer.
6️⃣ Roll It Up: Starting from one end, carefully lift the parchment paper to begin rolling the mixture tightly into a sushi roll. Make sure to apply gentle pressure as you roll to keep everything together.
7️⃣ Slice and Serve: Once rolled, slice the sushi roll into bite-sized pieces. Roll the slices in mini Oreo crumbs or dust with powdered sugar for an extra touch.
8️⃣ Optional Chocolate Drizzle: If you’re feeling indulgent, drizzle melted chocolate over your sushi rolls before serving!
💡 Tips & Variations:
- Fruits: Experiment with different fruits—kiwi or mango also add a refreshing twist!
- Dairy-Free Version: Use a dairy-free cream cheese alternative to cater to dietary restrictions.
- Decor: Sprinkle edible glitter or colorful sprinkles on top for an extravagant presentation.
- Make-Ahead: You can prepare the rolls in advance. Just store them in the fridge wrapped tightly in plastic wrap and slice just before serving.

FAQ
Q: Can I use other types of cookies instead of Oreos?
A: Absolutely! You can get creative with different cookies or even use graham crackers for a different flavor profile!
Q: How long do these sushi rolls stay fresh?
A: They can be kept in the refrigerator for up to 2-3 days, but they’re best consumed fresh.
Q: Is it necessary to use cream cheese?
A: While cream cheese provides a rich and creamy texture, you can substitute it with mascarpone cheese or a vegan alternative for a lighter option.
Q: Can I freeze the Oreo sushi rolls?
A: Yes, you can freeze the rolls for later enjoyment. Just ensure they are well-wrapped to prevent freezer burn.
👉 Ready to impress your friends and family? Try making your own Oreo Cream Cheese Cheesecake Sushi Roll today! Share your experience and any creative variations you come up with. Happy baking!