Vanilla Berry Layer Cake
The Sweetest Moments: My Vanilla Berry Layer Cake Story
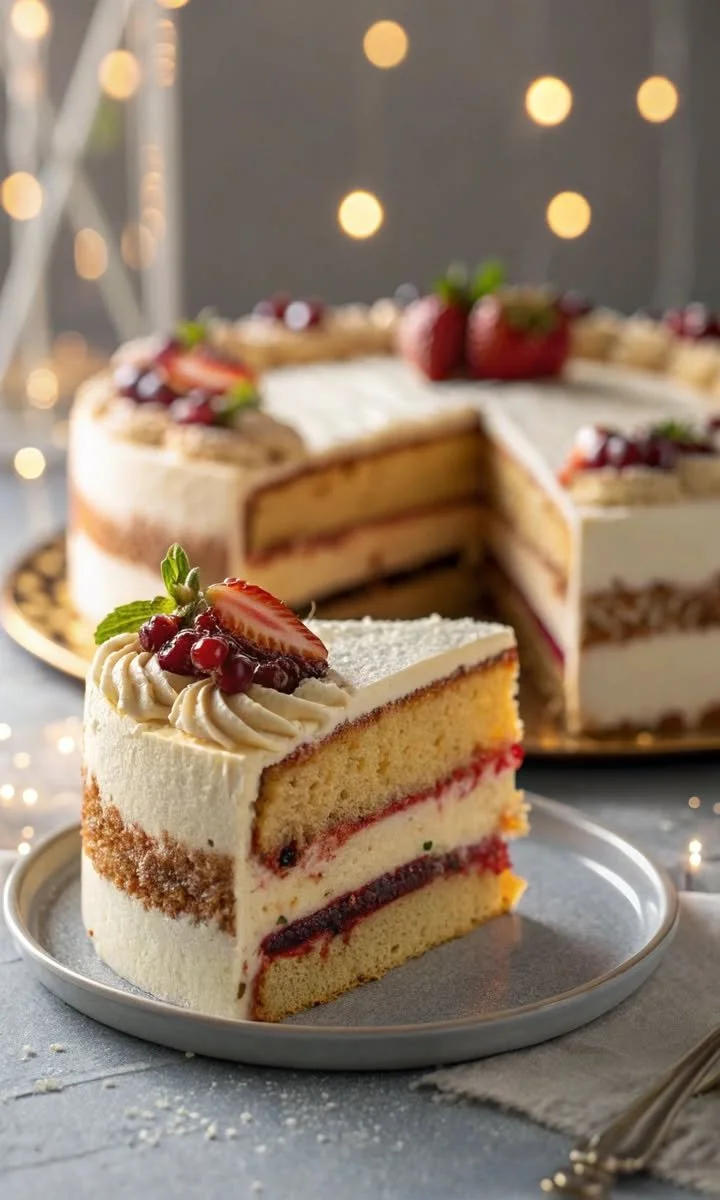
There’s just something truly magical about a fresh Vanilla Berry Layer Cake waiting on the table. Whenever I pull this beauty out of the fridge, it’s an instant showstopper—especially in early summer, when the scent of fresh strawberries and cream seems to float on the breeze. I still remember the first time I made this vanilla berry cake for my grandma’s birthday; family laughter echoed around the garden, sticky berry jam clung to little fingers, and even my usually critical aunt declared it “better than the bakery” (high praise in our clan!).
Whether you’re celebrating something special or just want an excuse to indulge, this layered vanilla and berry cake always feels like a hug on a plate.
Why You’ll Adore This Vanilla Berry Layer Cake
If you’re searching for a classic, irresistible vanilla berry layer cake, here’s why this one will win your heart:
- Light as Air, Buttery Sponge: The cake layers are impossibly soft, thanks to lots of eggs and warm milk (trust me, they practically melt in your mouth).
- Bright, Juicy Berry Layers: Swirls of berry jam and pillowy whipped cream offer gorgeous flavor balance—sweet, tart, and creamy in every forkful.
- Stunning, Yet Simple to Decorate: A crown of whipped cream, fresh berries, and mint makes it look like a bakery masterpiece (but, honestly, it’s way easier than you’d think!).
- Chills and Keeps Beautifully: This homemade berry layer cake tastes even better when chilled—hello, perfect make-ahead dessert for parties, potlucks, or just a cozy weekend.
Homemade, classic, and full of bright berry flavor—this beautiful cake always brings people together.
Ingredients You’ll Need for Vanilla Berry Layer Cake
Here’s what you’ll need to make your own vanilla berry layer cake, plus a few little tricks I’ve picked up along the way:
- All-Purpose Flour (200g/1 1/2 cups): Measure carefully for a fluffy cake—fluff, spoon, then level.
- Baking Powder (2 tsp): Gives the sponge its irresistible lift.
- Salt (1/4 tsp): Balances sweetness, so don’t skip it!
- Eggs (4 large, room temperature): Room-temp eggs whip up fluffier—set them out early!
- Sugar (200g/1 cup): Classic granulated works perfectly.
- Warm Milk (120ml/1/2 cup): Warming enhances tenderness (you can use full-fat or 2%).
- Melted Butter (100g/1/2 cup, unsalted preferred): Brings rich flavor—let it cool slightly.
- Vanilla Extract (1 tsp): A must for that sweet, nostalgic aroma.
- Berry Jam (150g—strawberry, raspberry, or mixed berry): Choose your favorite, or use homemade if you’ve got it.
- Heavy Cream (200ml—whipped to soft peaks, for the filling + 250ml cold, for frosting): Use full-fat cream for the best whipped texture.
- Powdered Sugar (50g): Sweetens the whipped cream topping just enough.
- Extra Vanilla (1 tsp, for frosting): Gives the whole cake a cozy, bakery-fresh taste.
- Fresh Strawberries, Red Currants, Berries of Choice: Go wild—whatever looks best at the market!
- Mint Leaves (for decoration): Optional, but they add a little pop of freshness.
- Edible Flowers or Extra Powdered Sugar: Just for fun!
Adding a touch of simple syrup before layering is totally optional, but it does keep the cake extra moist. (I love using leftover berry syrup for this part!)
Step-by-Step Guide: Making the Perfect Vanilla Berry Layer Cake
Ready to tackle your vanilla berry layer cake? Here’s how I do it, including a few little tips so you breeze through with confidence.
- Preheat and Prep: Get your oven to 175°C (350°F). Grease and line two 8-inch round cake pans—parchment lining guarantees no sticking!
- Mix the Dry Stuff: Sift flour, baking powder, and salt together in a bowl.
- Fluffy Magic: In a big bowl, beat room-temperature eggs and sugar for about 5 minutes—aim for pale, thick, and super airy (this is the key to light cake!).
- Blend It All: Gently fold in the dry mixture, then pour in the melted butter, warm milk, and vanilla. Stir just until smooth—don’t overmix.
- Bake: Divide batter between your pans, then bake for 20–25 minutes. Cakes should be golden and springy.
- Cool: Let the cakes cool completely on a rack—don’t rush this or your whipped cream will melt!
- Whip Up the Cream: Beat the cold cream, powdered sugar, and vanilla til stiff peaks form. Chill in the fridge.
- Slice and Assemble: (Optional) Level the cakes, and slice each in half if you want four thin layers. Spread jam on the first layer, then whipped cream, repeat. Stack it all up.
- Frost and Decorate: Smother the outside with remaining cream. Swirl, swoop, or keep it rustic—your call! Top with berries, mint, edible flowers, and that snowy dusting of powdered sugar.
- Chill Before Serving: I always pop mine in the fridge for at least an hour—this makes slicing way easier and melds the flavors.
My Secret Tips and Tricks for Vanilla Berry Layer Cake Success
Having baked my fair share of vanilla berry cakes, here are a few game-changers (plus a couple of classic “don’t panic!” troubleshooting tips):
- Room Temperature Is Everything: Don’t skip bringing eggs and milk up to temp—it makes the texture so much better (you’ll see!).
- Use Good Vanilla: Real extract or even paste makes the difference in homemade layer cakes.
- Cool Thoroughly: If the cakes are even a little warm, whipped cream frosting will slide right off!
- Simple Syrup: Brush cake layers lightly with syrup (plain or berry-infused) for an ultra-moist crumb. This is a pro-baker move!
- Whip Cream Cold: Chill your bowl and beaters for fast, fluffy peaks.
- Layer Like a Pro: Don’t overfill—keep your jam and cream to thin, even layers to prevent sliding.
- Decorate with Abandon: Use whatever berries, herbs, or edible blossoms you love; the more abundance, the better!
Remember, it’s supposed to look a little rustic and “homemade”—that’s the charm of a truly classic vanilla berry cake.
Creative Variations and Ingredient Swaps
Love experimenting? Me too. Here’s how you can put your own twist on this vanilla berry layer cake:
- Dairy-Free?: Try coconut milk and a good plant-based butter, plus coconut cream for the topping (just chill a can overnight and scoop off the thick cream).
- Gluten-Free Cake: Sub a 1:1 gluten-free all-purpose flour blend—just check it already has xanthan gum.
- Berries, Your Way: Use strawberries, raspberries, blueberries, or even blackberries—it’s all delicious.
- Citrus Zest: Add a little lemon or orange zest for brightness.
- Chocolate Version: Layer in thin shavings of dark chocolate between the jam and cream for a decadent spin.
- Nutty Crunch: Sprinkle chopped toasted almonds or pistachios between the layers, too.
No matter how you mix it up, you’re still sticking with classic flavors and that irresistible berry-layer-cake experience.
How to Serve and Store Your Vanilla Berry Layer Cake
When it comes to serving this homemade vanilla berry layer cake, here’s my go-to advice:
- Slice with a Hot Knife: Dip your knife in hot water and wipe it dry between cuts for clean, gorgeous slices (great trick!).
- Chill First: This cake is always better after a couple of hours in the fridge. It sets up, slices neatly, and the flavors meld.
- Fridge Storage: Leftovers (if you have any) keep beautifully for up to 3 days—just store in an airtight container.
- No Freezer: Unfortunately, whipped cream doesn’t freeze well, so stick to the fridge.
Serve chilled, with extra berries or even a scoop of berry ice cream. Bliss!
FAQs: Your Top Questions About Vanilla Berry Layer Cake Answered
Can I make this vanilla berry layer cake ahead of time?
Yes! In fact, I recommend you do. Bake and cool the layers up to a day before, then assemble and chill. It’s even tastier after resting overnight in the fridge.
Do I have to use berry jam, or can I use fresh berries between the layers?
You can—but jam adds a lovely consistency and helps keep the layers moist. If you want to use fresh, spread a bit of sweetened whipped cream under the berries for stability.
What’s the best way to whip cream for the frosting?
Keep everything cold—cream, bowl, even the beaters! Stop at stiff peaks (when the cream just holds its shape) so it pipes and spreads easily.
Can I make this cake gluten-free?
Absolutely! Substitute a 1:1 gluten-free flour blend (with xanthan gum). Just use the same amount
Vanilla Berry Layer Cake
Ingredients
Main Ingredients
- 200 g All-Purpose Flour Measure carefully for a fluffy cake.
- 2 tsp Baking Powder Provides lift to the sponge.
- 1/4 tsp Salt Balances sweetness.
- 4 large Eggs (room temperature) Whips up fluffier at room temp.
- 200 g Sugar Classic granulated sugar.
- 120 ml Warm Milk Enhances tenderness.
- 100 g Melted Butter (unsalted preferred) Brings rich flavor.
- 1 tsp Vanilla Extract For sweet aroma.
Berry Layers
- 150 g Berry Jam (strawberry, raspberry, or mixed berry) Choose your favorite.
- 200 ml Heavy Cream (for filling, whipped to soft peaks) Full-fat for best texture.
- 250 ml Heavy Cream (cold, for frosting) Chill before use.
- 50 g Powdered Sugar To sweeten whipped cream.
- 1 tsp Extra Vanilla (for frosting) For added flavor.
Decorations
- Fresh Strawberries, Red Currants, Berries of Choice Use whatever looks best.
- Mint Leaves Optional garnish.
- Edible Flowers or Extra Powdered Sugar Optional decoration.
Instructions
Preparation
- Preheat oven to 175°C (350°F). Grease and line two 8-inch round cake pans.
- Sift flour, baking powder, and salt into a bowl.
- Beat room-temperature eggs and sugar for about 5 minutes until pale and thick.
- Gently fold in dry mixture, then add melted butter, warm milk, and vanilla. Stir until smooth.
Baking
- Divide batter between pans and bake for 20–25 minutes until golden and springy.
- Allow cakes to cool completely on a rack.
Whipping and Assembling
- Beat cold cream, powdered sugar, and extra vanilla until stiff peaks form; chill.
- Level cakes and slice each in half if desired. Spread jam on the first layer, followed by whipped cream. Repeat and stack.
- Frost the outside of the cake with remaining whipped cream. Decorate with berries and mint leaves.
Chilling
- Chill in the fridge for at least an hour before serving.