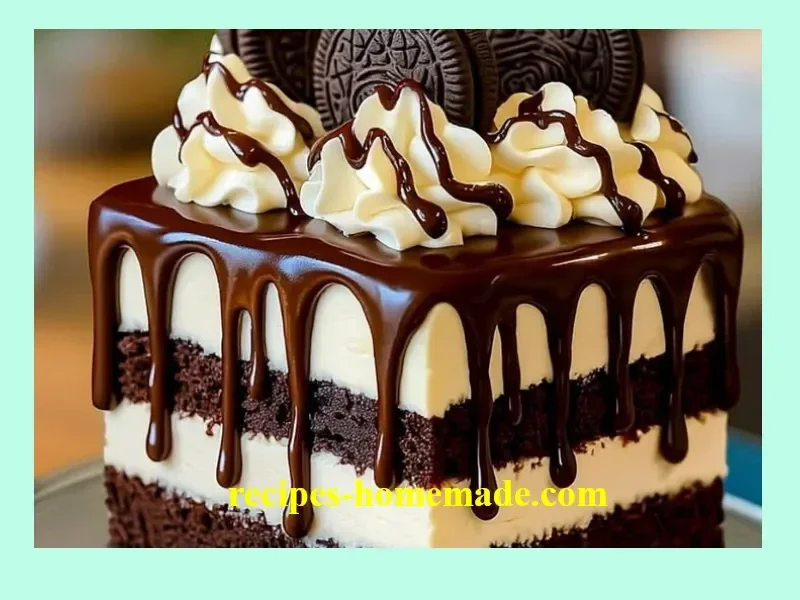
Chocolate Fudge Layered Bliss
The First Bite: My Love Story with Chocolate Fudge Layered Bliss
You know those recipes that bring everyone running to the kitchen? For me, nothing summons smiles quite like my Chocolate Fudge Layered Bliss. I first stumbled upon this decadent chocolate fudge dessert on one of those rainy afternoons when I was craving comfort—and a little bit of chocolate magic. The smell of rich cocoa, creamy butter, and the sweet promise of something delightfully fudgy always takes me back to childhood afternoons when baking meant messy countertops, laughter, and sneaking chocolate chips straight from the bag. Whether it’s a birthday, a potluck, or just a “because it’s Tuesday” treat, this chocolate fudge layered bliss never fails to wow my friends and family (trust me, it’s always the favorite at gatherings).
Why You’ll Adore This Chocolate Fudge Layered Bliss
So, what makes this recipe for chocolate fudge layered bliss such a showstopper? Here’s why I think you’ll fall for it just like I did:
- Ultimate Chocolate Indulgence: It’s a double dose! A thick, chewy brownie layer topped with a silky ganache—pure chocolate heaven.
- Fuss-Free Yet Impressive: Despite how luscious it looks (and tastes!), the steps are simple, and you won’t need any fancy ingredients or equipment.
- Crowd-Pleasing Every Time: Whether shared at a holiday party or enjoyed after dinner, everyone will be coming back for seconds. (There’s never any leftovers at my house.)
- Perfect Make-Ahead Dessert: The flavors get even better as they settle—meaning you can bake this a day ahead and still impress your guests.
If you love rich, gooey chocolate desserts that deliver comfort and delight in every layered bite, this is your new go-to recipe!
Ingredients You’ll Need for Chocolate Fudge Layered Bliss
Gather these goodies to make your own batch of chocolate fudge layered bliss (I always like to check my pantry twice—nothing worse than realizing I’m out of cocoa powder last minute):
- 1 cup unsalted butter: I recommend using real, high-quality butter for ultimate richness.
- 2 cups granulated sugar: Sweeten things up! Feel free to use organic sugar if you’d like.
- 4 large eggs: Room temperature eggs blend more easily, making for a smoother batter.
- 1 tsp vanilla extract: Pure vanilla gives the most aromatic depth, but use what you have!
- 1 cup all-purpose flour: The classic—nothing fancy needed.
- 1 cup unsweetened cocoa powder: I love a deep, dark cocoa, but milder cocoa delivers a more classic brownie taste.
- 1/2 tsp salt: Just a pinch to balance out all that sweet.
- 1 tsp baking powder: For the perfect little lift in your brownies.
- 1 cup chocolate chips (semi-sweet or dark): Splurge on your favorite here; I’ve even mixed dark and milk chocolate chips together—yum!
- 1 cup heavy cream: This transforms your ganache into absolute velvet.
- 8 oz semi-sweet chocolate, chopped: Go for a bar quality chocolate if possible—the ganache will thank you.
Step-by-Step Guide: Making the Perfect Chocolate Fudge Layered Bliss
Okay, let’s get straight to the chocolatey action (don’t worry, I’ll walk you through every easy step):
- Preheat and Prep: Set your oven to 350°F (175°C) and line a 9×13 inch baking pan with parchment paper. (If you’ve ever experienced “sticky brownie syndrome,” this step is essential!)
- Melt the Butter: In a large saucepan over medium heat, melt your butter. Once it’s just melted, remove from heat to avoid burning.
- Mix in Sugar, Eggs, and Vanilla: Stir in the sugar, then beat in the eggs and vanilla extract until it all looks glossy and well mixed.
- Combine Dry Ingredients: In a separate bowl, whisk together flour, cocoa powder, salt, and baking powder. Give it a quick whisk—no lumps here!
- Combine Wet and Dry: Gradually mix the dry ingredients into your saucepan, just until combined. Don’t overwork it—nobody wants tough brownies!
- Add Chocolate Chips: Fold in your chocolate chips for melty pockets of chocolate in every bite.
- Bake: Pour your luscious brownie batter into the pan. Spread it evenly and pop it in the oven for 25-30 minutes. I like to check at 25 minutes with a toothpick (a few moist crumbs = brownie perfection!).
- Cool Completely: Patience, friend! Let your brownies cool in the pan, no shortcuts here, or your ganache won’t set right.
- Prepare the Ganache: In a small saucepan, gently heat the heavy cream until it starts to simmer. Remove from heat, add your chopped chocolate, and stir until velvety smooth.
- Layer on the Ganache: Pour that glossy ganache over the cooled brownie base, spreading it with a spatula. Let it set at room temperature, or refrigerate for a quick chill (about 30 minutes).
- Slice and Enjoy: Once set, cut into generous squares. Call in your crew, because your chocolate fudge layered bliss is ready to dazzle!
My Secret Tips and Tricks for Chocolate Fudge Layered Bliss Success
Over the years, I’ve picked up a few tricks for The Best Chocolate Fudge Layered Bliss (and for luscious homemade brownies in general):
- Don’t Overbake: Take them out when the toothpick is just a bit sticky! They’ll keep cooking a teeny bit in the pan.
- Quality Chocolate Matters: Splurge on good cocoa powder and real chocolate for the ganache. Trust me, the flavor is next level!
- Line Your Pan: A parchment sling makes lifting your brownies out for slicing so easy—plus, no more crumbling edges.
- Customize Your Chips: Try mixing in dark chocolate, milk chocolate, or even a handful of nuts for texture.
- Room Temperature is Best: For the glossiest ganache, let your brownies cool completely before pouring it over. Sometimes patience really pays off (and you’ll get that pretty, bakery-worthy finish).
This layered fudge brownie dessert is all about little details adding up to utter bliss!
Creative Variations and Ingredient Swaps
Feeling adventurous, or need to adapt? Here’s how to make chocolate fudge layered bliss work for you and your crew:
- Nutty Twist: Add 1/2 cup chopped walnuts or pecans to the brownie batter for a crunch (this turns them into the best chocolate walnut brownies).
- Peanut Butter Drizzle: Swirl 1/4 cup creamy peanut butter into the batter for a decadent, nutty note.
- Gluten-Free Option: Substitute the all-purpose flour for a 1:1 gluten-free blend—still super fudgy!
- Espresso Kick: Mix 1 tsp instant espresso powder into your batter to intensify those chocolate notes.
- Seasonal Berries: Top finished squares with fresh raspberries or strawberries for a pop of tart color—looks gorgeous and tastes divine.
Don’t be shy—mix and match! That’s how you make these brownies your own signature chocolate fudge creation.
How to Serve and Store Your Chocolate Fudge Layered Bliss
Serving up this chocolate fudge layered bliss is honestly my favorite part. Here’s how I like to do it:
- Serve Chilled or at Room Temp: If you love ultra-firm chocolate ganache, chill before slicing. For a softer, melt-in-your-mouth ganache, let brownies come to room temperature.
- Pairings: They’re perfect with a cup of coffee, a scoop of vanilla ice cream, or a glass of cold milk (highly recommended for the classic chocolate fudge brownie moment!).
- Storing: Keep leftovers in an airtight container at room temperature for up to 2 days, or refrigerate for up to 5 days (if they last that long).
- Make-Ahead Friendly: Got a big event? Make these the night before—they slice even cleaner the next day, and the flavor only gets better.
FAQs: Your Top Questions About Chocolate Fudge Layered Bliss Answered
Can I freeze chocolate fudge layered bliss?
Absolutely! Just slice, wrap tightly in plastic, and place in a freezer-safe bag. They’ll keep for up to 2 months. Thaw at room temperature (trust me, they taste just as fudgy after freezing).
My brownies seem underbaked—what should I do?
A little gooeyness is okay! But if they’re super wet, just pop them back in the oven for a few more minutes. Next time, check your oven temperature to make sure it’s spot on.
Can I use milk chocolate instead of semi-sweet or dark?
Of course! Milk chocolate will make the ganache sweeter and a bit creamier. If you prefer a deep, classic fudge flavor, stick with semi-sweet or dark.
How do I get flawless slices?
Use a sharp knife, wipe between each cut, and make sure your brownies are fully cooled (chilled is best for precision slices). The parchment sling really helps too!
What makes this chocolate fudge layered bliss stand out from regular brownies?
It’s all about that extra layer—a shiny, satiny chocolate ganache that transforms a good brownie into a next-level chocolate fudge treat.
There you go: everything you need to make your own batch of chocolate fudge layered bliss! If you bake these, I’d love to hear how they turned out (and which variation you tried!). Here’s to sharing more delicious chocolate moments—one fudgy, decadent bite at a time.