Chocolate-Vanilla Marble Cake (Two-Layer or Swirled)
The Chocolate-Vanilla Marble Cake That Feels Like Home
Do you ever crave a dessert that’s as comforting as it is decadent? For me, that’s always been classic chocolate-vanilla marble cake. Maybe you know the feeling: the swirl of anticipation as the marbled batter glides into your pans, the childhood excitement of slicing into a cake and wondering which side you’ll get more of—will it be chocolate, vanilla, or that perfect, mosaic balance of the two?
The first time I made a chocolate-vanilla marble cake, I was nine. I remember peeking over the countertop, my grandma’s hands guiding mine as we swirled the batters together. The sweet scent of vanilla mixing with the bold aroma of cocoa filled our little kitchen, and every bite reminded me of her laughter (and the sneaky spoons of batter we tasted behind her back).
Here’s my heartfelt version of this classic marble cake—a recipe that brings nostalgia and warmth, layered into every bite.
Why You’ll Adore This Chocolate-Vanilla Marble Cake
Let’s be honest: there are a million reasons to love this marble cake. Here are my top ones:
- Nostalgic Flavors, Upgraded: That classic, old-school chocolate and vanilla combo gets a modern twist with real butter and a hint of sour cream (for a tender, moist crumb).
- Every Bite’s a Surprise: No two slices are exactly alike—sometimes you get more chocolate, sometimes more vanilla, but always a perfect bite.
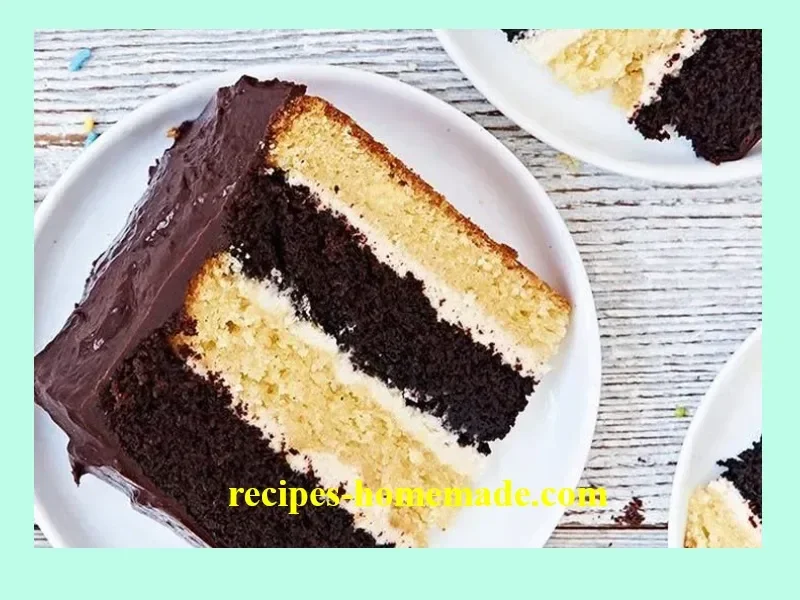
- Easy and Fun to Make: Whether you swirl the batters together or stack separate layers, this recipe is a cinch but looks like you spent all day on it.
- Perfect for Any Occasion: This chocolate-vanilla marble cake works for birthdays, random Tuesdays, and everything in between. It’s the homemade cake you reach for when you want comfort and celebration in the same forkful.
Ingredients You’ll Need for Chocolate-Vanilla Marble Cake
Here’s what you’ll need for this easy homemade marble cake (plus a sprinkle of kitchen wisdom for each):
- 2 ½ cups all-purpose flour: Go for the good stuff—sifting it makes for a fluffier cake.
- 2 tsp baking powder + ½ tsp baking soda: The dynamic duo for lift and that beautiful crumb structure.
- ½ tsp salt: Balances the sweetness and brings out all the flavors. Don’t skip!
- 1 cup unsalted butter, at room temp: Room temp really does make creaming easier (and your cake fluffier).
- 1 ¾ cups granulated sugar: For sweetness and moisture. I sometimes swap in a touch of brown sugar for extra depth.
- 4 large eggs: These add richness. Room temp helps them blend in smoothly.
- 1 tbsp vanilla extract: Real vanilla goes a long way—don’t be shy!
- 1 cup whole milk: For moisture and richness. You can sub with buttermilk for extra tang.
- ½ cup sour cream or plain yogurt: Adds tenderness and that irresistible bakery-style texture.
- ½ cup unsweetened cocoa powder: Dutch-process will give your chocolate layer a luxurious, dark color. Natural cocoa also works if you love a lighter hue.
- ¼ cup hot water or brewed coffee: Hot liquid “blooms” the cocoa, making it more intense.
Tip: Measuring your ingredients before starting (mise en place!) makes the cake-baking process so much smoother.
Step-by-Step Guide: Making the Perfect Chocolate-Vanilla Marble Cake
Ready to make your kitchen smell like heaven? Here’s how I do it, step by step:
- Prep the Pans: Preheat your oven to 175°C (350°F). Grease and flour two 8-inch cake pans (or line with parchment for easy removal).
- Mix Your Dry Ingredients: Whisk together the flour, baking powder, baking soda, and salt. (I always do this in a big bowl to avoid the infamous flour poof!)
- Cream Butter & Sugar: In another large bowl, beat room-temp butter and sugar until light and fluffy—about 2–3 minutes. Don’t skimp here; this is key for a tender crumb.
- Add the Eggs & Vanilla: Crack in the eggs one at a time, beating well after each. Pour in the vanilla extract and give it a good mix.
- Blend in Sour Cream/Yogurt: Stir in your sour cream (or yogurt). This is my favorite part; it’s what makes the cake so plush.
- Alternate Dry and Wet: Add the dry mix in three parts, alternating with the milk, beginning and ending with the dry ingredients. Mix gently—overmixing leads to dense cake!
- Create the Chocolate Batter: Divide the batter in half. In one bowl, mix the cocoa powder with hot water (or coffee), then stir it into one half of the batter. (Using coffee intensifies the chocolate flavor. Trust me.)
- Choose Your Adventure:
- Marble Style: Drop spoonfuls of chocolate and vanilla batter alternately into the pans. Swirl gently with a knife for that signature marbled look.
- Two-Layer Style: Pour the chocolate batter into one pan, vanilla into the other—for a dramatic two-tiered effect.
- Bake: Slide the pans into the oven. Bake for 28–32 minutes, or until a toothpick comes out clean and the tops spring back when pressed.
- Cool & Frost: Let cakes cool fully before frosting. Choose classic vanilla buttercream, rich chocolate ganache, or have some fun with a combo—chocolate inside, vanilla outside, or flip it!
Pro tip: I always use a cooling rack—it helps the cakes cool evenly and keeps the bases from getting too soggy.
My Secret Tips and Tricks for Marble Cake Success
After dozens of experiments (and plenty of messy kitchen counters), here are my marble cake secrets:
- Don’t Overmix the Swirls: For the perfect swirled marble cake, use a butter knife and gently swirl 2–3 times—less is more! Too much, and you lose those pretty patterns.
- Bloom Your Cocoa: Mixing your cocoa with hot water or coffee brings out deep, rich chocolate notes (a game-changer).
- Balance the Batters: Try to match the consistency of both batters—if your chocolate batter looks much thicker, add a tablespoon of milk.
- Check for Doneness Early: Start checking at 28 minutes. No one likes a dry marble cake!
- Freeze for Later: These cakes freeze beautifully, unfrosted. Wrap in plastic, then foil, and stash for a rainy day cake craving.
Creative Variations and Ingredient Swaps
This recipe is super adaptable! Here’s how you can switch things up:
- Gluten-Free: Use a reliable gluten-free all-purpose flour blend for a gluten-free marble cake that’s just as delicious.
- Dairy-Free: Substitute plant-based butter, non-dairy yogurt, and your favorite milk alternative (like oat or almond milk).
- Add-Ins: Swirl in mini chocolate chips, or sprinkle toasted nuts between layers for extra crunch.
- Flavor Twists: Try almond extract for a fragrant variation, or add orange zest to the batters for a chocolate-orange marble cake.
- Sheet Cake Style: Pour the batter into a 9×13 pan and swirl—great for a crowd or easy slicing.
- Cupcakes: This recipe makes about 24 cupcakes (marbled or layered, your choice!).
Sometimes I even toss in a sprinkle of flaky sea salt on top for a “grown-up” touch!
How to Serve and Store Your Chocolate-Vanilla Marble Cake
Want to make this homemade marble cake shine? Here’s how I serve and store leftovers:
Serving Suggestions
- Warm slices just a bit (10 seconds in the microwave) for a gooey texture—especially good with chocolate ganache.
- Serve with a scoop of vanilla ice cream or a dollop of whipped cream for a luscious dessert (because why not?).
- Dress up with fresh berries or a dusting of powdered sugar for simple elegance.
Storing Leftovers
- Room Temp: Store covered at room temperature for up to 3 days. Keep it in an airtight cake container to maintain that just-baked softness.
- Fridge: If your house is warm or you’ve used a cream cheese frosting, refrigerate for up to 5 days. Bring it to room temp before serving for best flavor.
- Freezer: Unfrosted cake layers can be wrapped tightly and frozen for up to 2 months. Thaw in the fridge, then frost and enjoy.
FAQs: Your Top Questions About Chocolate-Vanilla Marble Cake Answered
1. Can I make this marble cake ahead?
Absolutely! Marble cake keeps its flavor and texture for days. Bake it a day in advance, wrap tightly, and frost on the day you serve.
2. Why use coffee in the chocolate batter?
Coffee doesn’t make the cake taste like coffee—it just deepens the chocolate flavor, making the swirls extra rich.
3. Can I use oil instead of butter?
You can, but butter gives the best flavor and that golden, tender crumb. If you swap, use ¾ cup vegetable oil.
4. How do I get those perfect swirls?
Start with evenly distributed spoonfuls of each batter, then gently swirl with a knife just 2–3 times. Overdoing it blends the batters—pretty, but less distinct!
5. What frosting goes best with marble cake?
Classic vanilla buttercream, rich chocolate ganache, or even
Chocolate-Vanilla Marble Cake
Ingredients
Dry Ingredients
- 2.5 cups all-purpose flour Sift for a fluffier cake.
- 2 tsp baking powder For lift.
- 0.5 tsp baking soda For structure.
- 0.5 tsp salt Balances sweetness.
Wet Ingredients
- 1 cup unsalted butter, at room temp Makes creaming easier.
- 1.75 cups granulated sugar For sweetness and moisture.
- 4 large eggs Room temp helps blend.
- 1 tbsp vanilla extract Real vanilla enhances flavor.
- 1 cup whole milk Can use buttermilk for tang.
- 0.5 cups sour cream or plain yogurt Adds tenderness.
Chocolate Batter Ingredients
- 0.5 cups unsweetened cocoa powder Dutch-process recommended.
- 0.25 cups hot water or brewed coffee Enhances chocolate flavor.
Instructions
Preparation
- Preheat your oven to 175°C (350°F). Grease and flour two 8-inch cake pans.
- Whisk together the flour, baking powder, baking soda, and salt in a large bowl.
- In another large bowl, beat room-temp butter and sugar until light and fluffy—about 2–3 minutes.
- Crack in the eggs one at a time, beating well after each. Add the vanilla and mix well.
- Stir in the sour cream or yogurt until well blended.
- Add the dry mixture in three parts, alternating with the milk, mixing gently.
Batter Preparation
- Divide the batter in half. Mix cocoa powder with hot water (or coffee) in one half until smooth.
Baking
- For marble effect, spoon chocolate and vanilla batter alternately into the pans and swirl gently with a knife.
- For layered cake, pour chocolate batter into one pan and vanilla into the other.
- Bake for 28–32 minutes or until a toothpick comes out clean.
- Let the cakes cool fully before frosting.