Nut & Cream Layered Cake
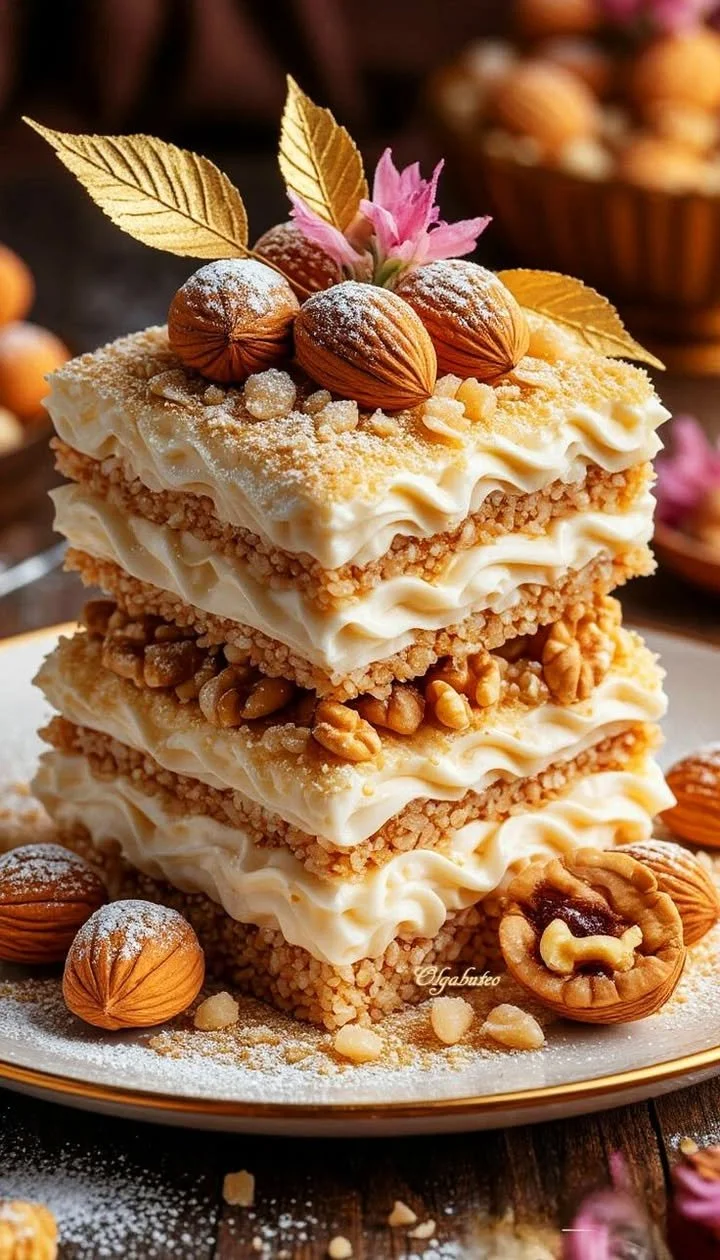
A Slice of Nostalgia: My Beloved Nut & Cream Layered Cake
Have you ever found yourself chasing after a taste from your childhood, a dessert that somehow manages to transport you back to a kitchen sprinkled with laughter and the aroma of something sweet and nutty wafting through the air? That’s exactly what this Nut & Cream Layered Cake is for me—a recipe that feels like home and comfort woven into delicate, creamy layers.
My earliest memories of this layered cake involve bustling family gatherings, my grandmother’s gentle hands dusting powdered sugar with that signature flourish, and the centerpiece always being this extraordinary cake. The crackle of crushed nuts, the silky cream, the way each bite would melt in my mouth—pure magic! Today, I’m so excited to share this heirloom recipe with you, inviting you to create new traditions and sweet moments around your own table.
Why You’ll Adore This Nut & Cream Layered Cake
There’s something irresistibly special about this nut & cream layered cake—let me tell you why it never fails to steal the show in my home:
- Richly Nutty & Creamy: Each bite brings together the earthy flavor of walnuts (or your favorite nuts) with a billowy, not-too-sweet cream filling. It’s that perfect harmony of crunchy and luscious.
- Showstopper Looks, Easy Steps: Despite its gorgeous, bakery-worthy layers, this cake is surprisingly simple to make. Even if you’re not a “cake person,” you’ll feel like a pro—promise!
- Versatile for Every Occasion: Elegant enough for holidays (seriously, those golden leaves and edible flowers!), but easy-going for a Sunday afternoon with coffee.
- Customizable for You: Allergic to walnuts? No problem. Have fun swapping in almonds or hazelnuts. The cake welcomes your personal touch and family favorites.
Ingredients You’ll Need for Nut & Cream Layered Cake
Here’s everything you’ll need to whip up this utterly dreamy nut & cream layered cake. I’ve tossed in some of my favorite tips so you get the best results every time!
- 2 cups all-purpose flour (go for unbleached for a more tender crumb)
- 1 cup finely ground walnuts (or swap in almonds or hazelnuts for a twist—toast them lightly first for deeper flavor)
- 1 tsp baking powder (freshness counts; check the date!)
- 1/2 tsp salt (balances the sweetness, trust me!)
- 1 cup unsalted butter, softened (room temp makes creaming a breeze)
- 1 cup sugar (I sometimes use superfine sugar for a lighter texture)
- 4 large eggs (let them come to room temp so the batter blends seamlessly)
- 1 tsp vanilla extract (real vanilla for a lovely aroma)
- 2 cups heavy cream, whipped (chill your bowl and whisk for maximum fluffiness)
- 250g cream cheese, softened (adds tang and stability to the filling)
- 1/2 cup powdered sugar, sifted (smooths out lumps in the cream)
- 1 tsp vanilla extract (for the cream—a double hit of vanilla’s never a bad idea!)
- Whole almonds & walnuts (for decorating)
- Crushed nuts (for sprinkling between layers)
- Powdered sugar (for dusting)
- Edible flowers or gold leaves (optional, but so fun for a celebration!)
Step-by-Step Guide: Making the Perfect Nut & Cream Layered Cake
Whether this is your first time making a layered cake or you’re a seasoned baker, I’ll walk you through each step with the kind of encouragement I wish I had when I first tackled it!
Prepare the cake layers:
Preheat your oven to 175°C (350°F). Grease and line your baking sheets with parchment paper. In a bowl, sift together the flour, baking powder, and salt. Stir in the ground walnuts.
(Tip: Sifting really does make a difference for airy cake layers!)Mix the wet ingredients:
In another large bowl, cream the softened butter and sugar together until pale and fluffy (about 3–5 minutes with a hand mixer). Beat in the eggs, one at a time, followed by the vanilla extract. Don’t worry if the batter looks a little split after the last egg—it’ll come together once you add the dry mix.Combine and bake:
Gently fold the dry mixture into the wet until just combined—no over-mixing! Spread thin, even layers of the batter on your lined baking sheets (an offset spatula is your friend here). Bake for 12-15 minutes, until lightly golden. Let them cool completely.Make the cream filling:
Beat the cream cheese until creamy and smooth. Add powdered sugar and vanilla extract, blending until glossy. Gently fold in the freshly whipped cream until the filling is gloriously fluffy and stable.Assemble the layers:
Cut your cooled cake into even squares or rectangles (a sharp knife helps; I like wiping it clean between cuts). Place the first layer on your serving plate, spread over a generous layer of cream, and sprinkle crushed nuts on top. Repeat for 2–3 more layers, finishing with a crown of cream.Decorate and chill:
Top with whole nuts, extra crushed nuts, and a flurry of powdered sugar. If you’re feeling fancy, edible flowers or golden leaves make a stunning statement.
(Tip: Chilling at least 2 hours lets the flavors meld—so worth it!)
My Secret Tips and Tricks for Nut & Cream Layered Cake Success
Curious how I get those dreamy, bakery-style results at home? Here are my tried-and-true secrets for this nut layered cake (aka your new “wow” dessert):
- Use super-fresh nuts: Freshly ground nuts deliver the most vibrant flavor. Pre-toast them for even more aroma and depth.
- Chill your tools: When whipping cream, use a chilled bowl and beaters. Your cream will whip up faster and hold its shape so much better (nobody likes a runny filling!).
- Don’t skip the parchment: Lining your baking sheets makes removing the delicate cake layers a breeze—no sticking or tearing.
- Rotate your pans: If your oven has hot spots, swap the pans halfway through baking for beautifully even cake layers.
- Be gentle with the cream: Fold, don’t stir, to keep the cream fluffy and light.
Creative Variations and Ingredient Swaps
Want to put your own spin on this layered cake? Here are a few fun ideas and handy nut-swapping suggestions:
- Different nuts: Try pistachios for a vibrant green layer, or pecans for cozy fall vibes.
- Add a flavor boost: Lemon or orange zest in the cream filling pairs beautifully with the nuts!
- Gluten-free: Use your favorite all-purpose gluten-free flour blend (I’ve had great results with almond flour, too).
- Lighter version: Swap half the cream cheese for Greek yogurt—still rich, but a little lighter.
- Berry twist: Add fresh berries between the layers for a burst of summer.
Whether it’s for a special occasion or a midweek treat, these ingredient swaps make this nut & cream cake easy to adapt for anyone at your table.
How to Serve and Store Your Nut & Cream Layered Cake
When it comes time to serve your nut & cream layered cake, I love to slice it into neat squares and serve on a vintage cake stand with strong coffee or black tea—absolutely divine!
Serving tips:
- Chill the cake for at least 2 hours before slicing for extra-neat layers.
- Sprinkle powdered sugar right before serving for that wintry, snowy look (and extra bakery feels).
- Garnish with extra whole or chopped nuts for a satisfying crunch.
Storing leftovers:
- Cover the cake tightly and keep it in the refrigerator.
- It’ll stay fresh for up to 3 days (honestly, though, it never lasts that long in my house!).
- If you’re making ahead, assemble the cake, then add final decorations just before serving.
FAQs: Your Top Questions About Nut & Cream Layered Cake Answered
Can I make this nut layered cake with a different filling?
Absolutely! Feel free to swap out the cream cheese filling for mascarpone, whipped ricotta, or even a light buttercream if you prefer.
Can I use pre-ground nuts or should I grind my own?
You can use pre-ground nuts in a pinch, but I always get the best flavor and texture from freshly ground. Just pulse them in your food processor until fine (but don’t go too far, or you’ll get nut butter!).
Is this nut & cream layered cake easy enough for beginners?
Definitely! The steps are simple, and you don’t need any fancy equipment. Just take your time with the layers and have fun with decorating.
(It’s all about joy—not perfection!)
How do I keep the cake from getting soggy?
Let your cake layers cool completely before assembling. Chilling helps the filling set so everything stays stable—and delicious—for days.
Can I freeze this cake?
I don’t recommend freezing the assembled cake (the cream filling tends to separate). But you can freeze the baked cake layers, tightly wrapped, for up to a month. Thaw overnight and proceed with assembly.
Nothing makes me happier than seeing how a simple recipe like this nut & cream layered cake becomes part of your precious family celebrations. If you give this recipe a try, I’d