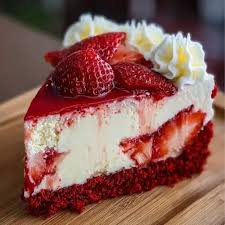
Strawberry Shortcake with Red Velvet Base
The Best Strawberry Shortcake with Red Velvet Base: A Family Favorite
When it comes to dessert, there are few things more comforting than a fresh Strawberry Shortcake. This Strawberry Shortcake with Red Velvet Base is a delightful twist on the traditional recipe, combining the rich, velvety flavors of red velvet cake with the classic freshness of strawberries and cream. Picture this: a sunny afternoon, the sweet scent of whipped cream wafting through the kitchen, and the kids’ giggles as they scoop out generous slices. It’s the perfect showstopper for a weeknight dinner, family gatherings, or simply to indulge yourself on a lazy weekend.
This recipe is special not just for its stunning appearance but also for its soul-soothing flavors. The contrast between the moist red velvet and the light, airy whipped cream makes each bite a textural delight. And, oh, the burst of fresh strawberries! This dessert invites everyone to the table, sparking joy and nostalgia with each spoonful.
The Background & Origin of Strawberry Shortcake
The Strawberry Shortcake has deep American roots, tracing back to colonial times when strawberries were enjoyed in various desserts. Originally a simple biscuit layered with fruit and cream, the recipe has evolved into the layered cake forms we see today. What makes this Strawberry Shortcake with Red Velvet Base unique is the addition of cocoa and red food coloring, resulting in a rich, visually striking cake that celebrates the heart of summer with fresh fruit.
Did you know that red velvet cake was made popular during the 1920s, and its color was often attributed to a reaction between cocoa powder and acidic ingredients? This twist on the traditional shortcake not only looks beautiful but also carries a history that celebrates American baking traditions.
Ingredients
- 1 ¾ cups all-purpose flour
- 1 teaspoon baking powder
- ½ teaspoon baking soda
- 1 cup sugar
- 1 cup vegetable oil
- 1 teaspoon vanilla extract
- 2 large eggs
- 1 cup buttermilk
- 1 tablespoon cocoa powder
- 1 tablespoon red food coloring
- Fresh strawberries, sliced (about 2 cups)
- Whipped cream (store-bought or homemade)
Helpful Notes:
- Ensure your eggs and buttermilk are at room temperature for a smoother batter.
- Fresh strawberries should be hulled and sliced for layering.
Step-by-Step Instructions
- Preheat the Oven: Start by preheating your oven to 350°F (175°C). Grease and flour two 9-inch round cake pans.
- Sift the Dry Ingredients: In a bowl, sift together the flour, baking powder, and baking soda. Set aside.
- Mix Wet Ingredients: In another bowl, mix sugar, vegetable oil, and vanilla until well combined. Add eggs one at a time, beating well after each addition.
- Combine Ingredients: Gradually add the dry ingredients alternately with the buttermilk to the wet mixture, starting and ending with the dry ingredients.
- Color the Batter: In a small bowl, mix cocoa powder and red food coloring until smooth, then fold this mixture into the batter.
- Bake the Cakes: Divide the batter evenly between the prepared pans and bake for 25-30 minutes or until a toothpick comes out clean.
- Cool the Cakes: After baking, let the cakes cool in the pans for 10 minutes before transferring them to a wire rack to cool completely.
- Layer the Cakes: Once cooled, layer the cakes with whipped cream and fresh strawberries in between.
- Finishing Touches: Top the cake with more whipped cream and strawberries. Serve and enjoy!
Tips for Success:
- Make sure your cakes are completely cooled before frosting them to avoid melting your whipped cream.
- Feel free to adjust the sweetness of the whipped cream to match your taste.
Pro Tips & Common Mistakes
- Enhancing Flavor: A splash of vanilla extract in your whipped cream can make a world of difference.
- Don’t Overmix: Stir just until combined to keep the cake light and fluffy.
- Prep-Ahead: You can prepare the cakes ahead of time and freeze them. Just wrap them tightly in plastic wrap.
Variations & Substitutions
- Vegan: Substitute eggs with flax eggs and use a plant-based milk.
- Gluten-Free: Use a 1:1 gluten-free baking mix instead of all-purpose flour.
- Extra Creamy: Add mascarpone cheese to your whipped cream for an indulgent touch.
Serving Suggestions
This Strawberry Shortcake pairs beautifully with a light, refreshing salad or a scoop of vanilla ice cream on the side. For adults, a glass of bubbly Prosecco or sweet rosé wine complements the flavors wonderfully. Don’t forget to arrange your strawberries in a pretty pattern on top for an Instagram-worthy presentation!
Storage, Freezing & Reheating
- Fridge: Store leftover Strawberry Shortcake in the fridge for up to 3 days; however, the texture might change.
- Freezing: You can freeze the un-frosted cake layers for up to 3 months. Thaw them in the fridge before frosting.
- Reheating: If you prefer it warm, gently microwave a slice for a few seconds.
Nutrition & Health Info
This dessert is indulgent, with approximate calories depending on slice size. A typical serving contains around 400 calories, which is why enjoying it in moderation is key. Using light whipped cream can reduce calories while keeping it delicious.
FAQ Section
- Can I prepare Strawberry Shortcake with Red Velvet Base ahead of time?
Yes, you can bake the cake layers a day in advance and assemble them the next day. - How do I thicken/thin the sauce?
If making a strawberry sauce, cornstarch can thicken it, while additional juice can thin it. - Ingredient substitutions?
Yes, check the Variations & Substitutions section for alternatives. - Can I double or halve the recipe?
Absolutely! Just adjust the ingredient quantities accordingly. - Best cookware to use?
Using non-stick cake pans helps with easy release. - Can I make it dairy-free or meat-free?
Yes, substitute buttermilk with almond or coconut milk and use a plant-based cream for whipping. - What sides go well with it?
Light salads or fruit platters work nicely!
Conclusion
Baking this Strawberry Shortcake with Red Velvet Base isn’t just about creating a pretty dessert; it’s about making memories, celebrating togetherness, and, most importantly, enjoying the sweet things in life. If you’ve enjoyed this recipe, I’d love to hear from you! Please comment below with your experiences and share this delightful recipe with your loved ones. Happy baking!